Friday 13 August 2021

Caramel Biscuit Cheesecake (Vegan)

Caramel biscuit cheesecake

This recipe is the simplest vegan cheesecake I've seen, and my partner/baby daddy adored it, saying it was their favourite cheesecake (and they eat non-plant based desserts!). A rich buttery spiced biscuit base and smooth caramel topping, what's not to love?

For the base, you can use store-bought caramelized biscuits (Lotus biscuits in the UK), or make your own, which is what I did for this base. For the filling, I used the Lotus biscuit smooth spread - in the future, I may try making my own version of this as well, as now I have 3/4 jar of the most addictive spread in my house!!

This takes around an hour to prepare if you make the biscuits for the base. If not, you can prepare it in less than 20 minutes. It needs to set in the freezer for around an hour before it is ready to serve, and once it has set, you can leave it in the fridge for a few days (not that it will last that long). Beautifully caramel flavoured, and surprisingly, not too sweet, it's a firm favourite of our household.

Makes one 20cm cheesecake

Ingredients:

For the biscuits*:

  • 150g plain flour
  • 1 & 1/2 tsp ground cinnamon
  • 3/4 tsp ground ginger
  • 3/4 tsp ground nutmeg
  • 3/4 tsp salt
  • 75g light soft brown sugar
  • 1 & 1/2 tbsp dairy-free milk
  • 110g margarine or butter (vegan)
* Instead of making the biscuits, you could use 200g of lotus biscuits

For the base:

  • 200g home-made biscuits (see above) or Lotus biscuits
  • 60g margarine or butter (vegan), melted

For the filling:

  • 100g Lotus biscuit smooth spread
  • 600g vegan cream cheese (I used Violife)
  • 45g granulated sugar
  • Pinch of salt


Method:

1. To prepare the biscuits, preheat the oven to 180c (160c fan)/gas mark 4. Stir together the flour, baking powder, spices, salt and sugar. Cut the vegan butter into cubes and use your hands to rub it into the dry mixture. Add the dairy-free milk and bring to a ball.

2. Roll the dough out onto a baking tray lined with baking parchment - as the biscuits are going to be crushed for the base, you can just spread this out without cutting it into shapes. You want the dough to be around 1cm thick, and you can use a rolling pin or your hands to achieve this.

3. Bake for 15-18 minutes until lightly browned. Leave to cool completely.

4. For the base of the cheesecake, preheat the oven to 180c (160c fan)/gas mark 4. Crush 200g biscuits (homemade or storebought) until they are a fine crumb, then pour over the melted butter/margarine. Stir until well combined.

5. Grease and line the base of a springform 20cm round cake tin with baking parchment, and pour in the biscuit mixture. Smooth down so it is level using the back of a spoon. Bake for around 10 minutes, until browning on the edges. Leave to cool completely.

6. For the filling, whisk together the biscuit spread, cream cheese and sugar until you have an even light brown colour. Pour onto the cheesecake base and smooth the top.

7. Cover with clingfilm and place in the freezer for around an hour to set. If you leave it longer, no worries - just bring it out to room temperature around an hour before you want to serve, and it will defrost nicely in that time. 

8. Enjoy!

Caramel biscuit cheesecake


Yum
Print This Recipe:

Sunday 8 August 2021

Vegan Confetti Macarons

vegan confetti macarons


Here is another attempt at the vegan macaron (so dairy and egg-free, as well as gluten-free). Not 100% perfect I'll admit, but much closer to their non-vegan counterpart. These I kept really simple, flavouring with vanilla and brushing the top with vegan sprinkles prior to baking. I also coloured them a light purple. They turned out soft but crisp and were well received.

One thing I finally realised for this bake - using almond flour rather than ground almonds works very well, as there is less waste when sieving the almond/sugar mix. The almond flour is far finer, so I'd recommend using that if possible. I bought a big bag from amazon and paid a similar amount to ground almonds.

Makes around 20 macarons

Ingredients:

For the shells:

  • 100g icing sugar
  • 150g almond flour
  • 100ml chickpea water (aquafaba) - this was one can's worth for me
  • 1/4 tsp cream of tartar
  • 125g caster sugar 
  • 1 tsp vanilla extract
  • Vegan sugar sprinkles
  • Gel food colouring, optional

For the filling:

  • 60 g vegan butter (I used Flora unsalted)
  • 150g icing sugar, sifted
  • 1 tsp vanilla extract
Method:

1. Sift the almond flour and icing sugar into a large mixing bowl. Add half of the aquafaba and stir to a paste.

2. Tip the remaining chickpea water into the bowl of a stand mixer with the whisk attachment and add the cream of tartar. Start whisking on a low speed for a few minutes, then crank up to a medium speed until the mixture becomes white and holds stiff peaks when the whisk is lifted from the bowl.

3. Add the caster sugar, one tablespoon at a time, whisking for 30 seconds between each addition. Once all of the sugar has been added, you should have a lovely thick glossy meringue that holds stiff peaks. Whisk in the vanilla (or any other flavourings you'd like the shells to have), and food colouring, if wanted.

4. Place around 1/4 of the meringue into the bowl with the almond flour and sugar. Fold in using a spatula or metal spoon - you can be relatively rough at this stage as you're just loosening the mix.

5. Add the remaining meringue and fold in gently, trying to keep as much air in the mix as possible. It is ready when you lift the spatula and the mixture slowly falls off (like lava).

6. Line 4 baking trays with baking parchment and pipe vertically down onto the parchment until you have a 2-3cm circle (you could draw circles on the reverse side of the parchment prior to piping). Once the tray has been filled (leave a 2-3 cm gap between each macaron), firmly tap the base of the tray on your surface. This can be done by lifting the tray a few inches above and dropping it.

7. Scatter sprinkles on half of the shells.

8. Leave at room temperature for around 90 minutes, or until when you lightly press the shells, no mixture sticks to your finger.

9. Preheat your oven to 140c (120c fan)/285f/gas mark 1. Bake the shell for 10 minutes, then swap the trays over in the oven and bake for a further 5-10 minutes, or until they feel like you could peel them away from the parchment. Leave to cool completely before peeling.

10. Whilst cooling, make the buttercream by whisking together the butter, icing sugar and vanilla. You could add other flavourings/colours at this stage. Whisk until it is fluffy and holds its shape. Fill a piping bag with the buttercream and pipe onto the base of half the macarons. Very gently, press another shell on top.

11. Enjoy!

Keep in an airtight container and these will keep well for 2-3 days. You can also freeze the shells.

vegan confetti macarons

Yum
Print This Recipe:

Saturday 7 August 2021

Vegan Chocolate Birthday Cake


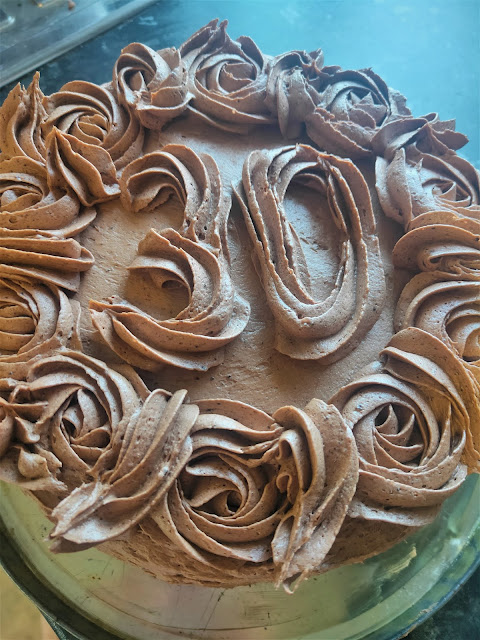
vegan chocolate cake

Back after a hiatus! A lot has changed, but now I'm set in my vegan ways, I've finally started to love baking again :) 

This is the cake I made for my 30th birthday, the cake turned out really moist and the buttercream was to die for. I used Flora vegan butter, but any stick butter should work well.

Completely vegan, so dairy and egg-free. Also nut and soy-free for other allergy sufferers :) 

Ingredients:

For the cake:

  • 250ml oat milk
  • 1 tbsp apple cider vinegar
  • 250g plain flour
  • 350g caster sugar
  • 65g cocoa powder
  • 2 tsp baking powder
  • 1 tsp salt
  • 110g vegetable oil
  • 165g apple sauce
  • 235g boiling water

For the buttercream:

  • 50g cocoa powder
  • 1/2 tsp ground cinnamon
  • 1/2 tsp ground ginger
  • 300g icing sugar
  • 150g vegan butter, softened
  • 3-4 tbsp oat milk
  • 1 tbsp vanilla extract
Method:

1. Preheat oven to 180c (160c fan)/gas mark 4/350F. Grease and dust the base of two 20cm round cake tins with oil and flour. (Alternatively, grease the base and line with baking parchment).

2. Pour the oat milk into a bowl of a stand mixer (with the balloon whisk attachment). Add the vinegar. Stir and wait for 5 minutes.

3. Sift into the bowl the flour, cocoa and baking powder. Pour over the remaining cake ingredients and whisk until well combined (until you see no more flour/cocoa speckles).

4. Pour into the prepared cake tins and bake for around 40 minutes, until the top is springy to the touch and a skewer inserted into the centre of the cakes comes out clean.

5. Meanwhile, make the butter cream. Cut the butter into small chunks and place it in the bowl of a stand mixer with the balloon whisk attachment. Add the cinnamon, ginger, cocoa powder and half of the icing sugar. Pour over the milk and vanilla, and begin whisking. Once the icing sugar has been absorbed (it will be very loose at this stage), add the other half of the icing sugar and whisk for 5 minutes. If the buttercream is very stiff, add some more milk, if too loose, add a little more icing sugar. It will become very fluffy. Cover until ready to use.

6. Once the cake is fully cool, place one of the cakes onto your serving dish. If domed significantly, level the top of the cake. Cover with around a third of your buttercream. Top with the other cake layer.

7. Lightly spread a thin layer of buttercream around the top and sides of your cake using a palette knife if possible (if not, a butter knife will work, it will just be a bit messier). Once all of the cake has been lightly covered, place it in the fridge for 10 minutes to set slightly. This helps trap in the cake crumbs to give a cleaner result.

8. Spread another layer of buttercream over the top and sides of the cake. Leave 4-5 tablespoons of mixture to pipe on the top of the cake.

9. Fit a piping bag with the 1B flower tip (or the open star tip, anything that makes pretty spirals!). Pipe rosettes over the top of the cake as desired.

10. Enjoy!

This cake will keep in the fridge for up to a week.

vegan chocolate cake

Yum
Print This Recipe: