Sunday 25 November 2018

Roasted Almond and Cranberry Biscuits

Roasted almond cranberry biscuits

I'm a bit behind on bakes this month :( It's been very busy with training and studying (as well as planning some Christmas bakes) - however, I had time to try out these biscuits a few hours ago. Oaty biscuits with orange-soaked cranberries and roasted almonds - they're a grown-up (i.e. not too sweet) biscuit, perfect with a cup of tea. My partner approves (and he's a tough critic when it comes to biscuits!), and I've been told I have to make them again :-)

Once baked and cooled, these will keep in an airtight container for around a week.

Makes around 20 biscuits

Ingredients:

  • 175g whole almonds (unpeeled)
  • 225g softened butter
  • 100g light soft brown sugar
  • 90g wholemeal flour
  • 150 porridge oats
  • 1/4 tsp salt
  • 100g dried cranberries, soaked in 2 tbsp orange juice for at least 2 hours

Method:

1. Preheat your oven to 180c (160c fan)/355f/gas mark 4. Line a baking tray with baking parchment and pour over the almonds. Bake for 10 minutes and then set aside to cool fully.

2. Chop the roasted almonds into pieces around 1cm in size.

3. Turn the oven up to 190c (170c fan)/375f/gas mark 5, and line two baking trays with baking parchment.

4. Cream together the butter and the light soft brown sugar for a few minutes, until all of the sugar has dissolved and the mixture is light and fluffy.

5. Add the flour, oats, salt, roasted almonds and cranberries and bring the mixture together into a ball.

6. Wrap in clingfilm and chill for around half an hour.

7. Dust your surface with a little flour, and then roll the dough out until it is around 1/2-1cm thick - it will never be perfectly level due to the almonds.

8. Use a 7cm round cutter make your rounds of biscuit, and then gently transfer to a baking tray lined with baking parchment.

9. Bake for 12-14 minutes, until the edges are starting to brown. Leave to cool for a few minutes, and then transfer to a wire rack to cool fully.

10. Enjoy!

Roasted almond cranberry biscuits
Yum
Print This Recipe:

Sunday 11 November 2018

Nutty Treacle Tart with Crystallized Sage

Nutty Treacle Tart Slice


This treacle tart is amazing. It's not your classic super sweet golden-syrup filling but contains proper black treacle with brown sugar and plenty of nuts. Deep, rich and satisfying, this will last for several days in your fridge. I topped the tarts with crystallized sage but this is completely optional. The sage is VERY strongly flavoured so don't go eating a whole crystallized leaf at one (unless you like the flavour of soap that is).

Makes one 20cm tart (8 large slices)

Ingredients:

For the pastry:
  • 200g (1 cup) plain flour
  • 120g (1/2 cup + 1tsp) cold butter
  • 2 tbsp caster sugar
  • 1/4 tsp salt
  • 1/2 tsp white wine vinegar
  • 3 tbsp ice-cold water
For the filling:
  • 175g (2 cups) nuts (I used a mixture of walnuts and hazelnuts, but pecans or macadamias would be lovely also)
  • 110g (2 cups) wholemeal bread, crustless
  • 50g (1 cup) bran flakes
  • Zest of one orange
  • 120g (1/3 cup) black treacle
  • 200g (10 tbsp) golden syrup
  • 1/2 tsp salt
  • 1/2 tsp ground cinnamon
  • 2 tbsp butter
  • 100ml (2/5 cup) double cream
  • 2 eggs
For the crystallized sage leaves (optional):
  • 8 sage leaves
  • 1 egg white
  • 2 tbsp caster sugar
Method:

1. If making the sage leaves, lightly whip the egg whites until frothy. Lay the sage leaves on a wire rack and brush each side of the leaf with the egg white. Sprinkle liberally with the sugar and leave to dry. Depending on the temperature/dryness of your kitchen this can take at least 8 hours so it might be best to do this the day before you want to bake the tart.

2. Prepare the pastry by sifting the plain flour into a large bowl, and stir in the caster sugar and the salt. Chop the butter into small chunks (about 1cm cubes) and add to the bowl.

3. Rub the butter into the flour mixture until the mixture resembles fine breadcrumbs.

4. Add the white wine vinegar and ice cold water and bring the dough together into a smooth ball. Try not to overwork the dough - as soon as it forms a ball, stop working. Cover in cling film and place in the fridge and chill for at least one hour (it can stay in the fridge for a few days provided it is well covered).

5. Lay out a piece of clingfilm on your counter and place the chilled dough on top. Cover with another piece of cling film and roll the dough out until it is about 5mm thick.

6. Lightly grease a loose-bottomed 20cm fluted tart tin with butter and dust with flour. Carefully transfer the dough to the tin and press into all of the corners. Leave the overhanging pastry for now. Cover with clingfilm and return to the fridge for at least half an hour.

7. Preheat your oven to 180c (160c fan)/355f/gas mark 4. Line a baking tray with baking parchment (or kitchen foil) and spread out your choice of nuts. Once the oven has pre-heated, roast the nuts for 8-10 minutes (until the nutty fragrance is wafting out of the oven). Set aside to cool.

8. Place a layer of baking parchment on the pastry dough and fill the case with ceramic baking beans, or I tend to use spare flour/rice. Bake for around 20 minutes, or until the sides of the pastry are golden brown.

9. Remove the tart case from the oven and gently remove the baking parchment with the baking beans/flour. Bake for another 8 minutes.

10. Whilst baking the tart case, prepare the filling by pouring the bread, bran flakes, and 100g of the nuts into a food processor, and blitz to a fine crumb. Stir in the orange zest.

11. In a small saucepan melt together the butter with the golden syrup and treacle, until the butter has melted and the syrup has become very loose.

12. Pour the syrup mixture over the crumbs, and combine. Add the two eggs and double cream and whisk until smooth. Finally, roughly chop the remaining 75g of the nuts and fold these through the filling.

13. Once the tart has finished cooking, remove from the oven. Trim off any excess pastry overhanging the tart case, and then carefully pour over the filling. Return to the oven for 18 minutes until it has just set.

14. Remove from the oven to cool for around 20 minutes, if you want to serve the tart warm (with some ice cream perhaps). This tart also tastes great at room temperature.

15. When ready to serve, top the slices with a crystallized sage leaf (if using).

16. Enjoy!

Nutty Treacle Tart Slice
Yum
Print This Recipe:

Sunday 4 November 2018

GBBO 2018 Week 9 - Patisserie - Cherry Chocolate Millefeuille


Cherry Chocolate Millefeuille


I've got a little behind on my Bake Off posts this year :( These Mille Feuille are my take on one part of the showstopper from the semi-finals of GBBO 2018. I made my own rough puff pastry and filled layers of puff with a cherry chocolate ganache and cherry curd, then iced the top layer of puff pastry to give a neat finish.
These are the perfect showstopper dessert to serve at a dinner party, but once assembled, they ideally need to be eaten the same day - one workaround for this is to make all the components (puff pastry, curd and ganache) the day (or a few days) before, and assemble just before you need them :)
I made my ganache dairy-free (as I find cream overrides the chocolate flavour and makes the ganache too rich).

Makes 12

Ingredients:

For the puff pastry:

  • 250g '00 plain flour
  • 250g butter, frozen (to enable grating)
  • 1/2 tsp salt
  • 125ml cold water

For the cherry curd:

  • 140g (1 cup) frozen cherries
  • 115g (1/2 cup) caster sugar
  • 1 tbsp lime juice
  • 3 egg yolks
  • 4 tbsp butter

For the cherry chocolate ganache:

  • 200g milk chocolate (dairy-free)
  • 100g dairy-free sunflower margarine
  • 150g icing sugar
  • 2 tbsp hazelnut milk
  • 2 tbsp cherry liqueur (or concentrated cherry syrup)

For the icing:

  • 100g icing sugar
  • 2-3 tbsp hazelnut milk

Method:

1. Prepare your ruff puff pastry. Sift the flour into a large mixing bowl and grate over the frozen butter and add the salt. Mix together with your fingertips until all of the butter has been coated in flour.

2. Slowly pour over the water, and bring the dough together into a ball - try not to overwork the pastry.

3. Dust your work surface with flour, and tip your dough onto the surface. Roll out to a rectangle about 40 x 20cm in size. With the long edge facing you, fold the right third over the middle of the dough, and the left third on top of it (like making an A4 leaflet). Cover in clingfilm and chill for 20 minutes.

4. Unwrap the dough, turn so the long edge is facing you, and then roll out the dough to a 40 x 20cm rectangle. Fold as in step 3. Turn the dough 90 degrees (a quarter turn) - so the long edge is again facing you - and roll and fold again. Cover in cling-film and chill for 30 minutes.

5. Repeat the rolling and folding twice more, and chill for a final 30 minutes (this can be chilled overnight if very short on time).

6. Meanwhile, make your fillings. To make the cherry curd, place the cherries, lime juice and sugar into a saucepan, and place on a medium heat. Leave to cook for 3-5 minutes, until the cherries have fully broken down.

7. Press the mixture through a sieve (to remove and cherry skins) into a bowl. In a separate bowl whisk the egg yolks, and pour over the cherry mixture, whisking constantly.

8. Return to the pan on a low heat, stirring constantly for around 5 minutes, until the curd has started to thicken. Add the butter, one tablespoon at a time, and continue to cook for a minute or so, or until the curd is thick enough to cover the back of a spoon. Pour into a bowl, and leave to cool to room temperature. Cover, and place in the fridge until ready to use.

9. Make the cherry chocolate ganache, by melting the milk chocolate and margarine in a saucepan over a low heat. Once melted, pour into a mixing bowl and leave for a few minutes to cool slightly.

10. Sift over the icing sugar, then add the hazelnut milk and cherry liqueur/syrup. Beat until the mixture is thick and glossy - if it's too stiff, add more milk or cherry liqueur (depending on how strong a cherry kick you want in the ganache), and if it's too loose, add more icing sugar, a tablespoon at a time. Cover and chill for at least an hour - if at this point it is still very runny, add more icing sugar until it would be firm enough to pipe.

6. Preheat your oven to 220c (200c fan)/430f/gas mark 7. Grease and line baking tray with baking parchment.

7. Roll the puff pastry out on a floured surface until it is a rectangle about 33 x 30cm in size. Cut into 18 rectangles, 11cm x 5cm. Transfer to the lined baking tray. Place any rectangles that don't fit onto the tray back in the fridge whilst the first batch bakes.

8. Cover the tray with another layer of baking parchment, and top with another tray. Bake for 25 minutes, until golden brown, then leave to cool fully.

9. To make the icing, sift the icing sugar into a bowl, and add the hazelnut milk, one teaspoon at a time until the icing is thick enough to pipe.

10. To assemble, slice each rectangle into two (to get to 36 rectangles of puff pastry). Place one rectangle cut side up on your work surface. Pour the cherry curd into one piping bag, and the ganache into another. Pipe "blobs" of curd and ganache over the puff pastry layer (about one teaspoon's worth of ganache/curd per blob). Top with a second layer of puff pastry, and add more ganache and curd. Top with the final layer of puff pastry (cut side DOWN).

11. Gently smooth the icing on top of the final layer of puff pastry so that it just reaches the edges of the rectangle. Across the short edge of the rectangle, pipe thin lines of cherry curd, and lightly drag the back of a spoon through the lines to create a feathering effect. Leave for around 10 minutes (until the icing has started to set), and then serve.

12. Enjoy!
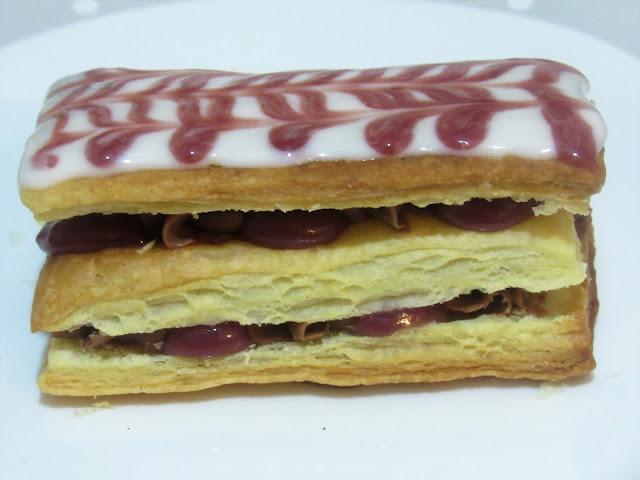
Cherry Chocolate Millefeuille
Yum
Print This Recipe: