Sunday, 30 October 2016

GBBO 2016 Week 10 - Chocolate, Plum and Amaretto Tarts

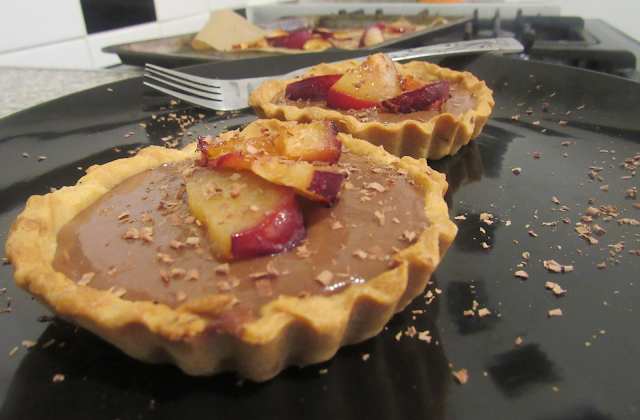
GBBO Individual Chocolate Plum Amaretto Tartlets


This week was the final of the Great British Bake Off! The showstopper was insane, with the bakers having to make 49 bakes. One of these were fruit tartlets, which  I decided to have a go at. As we're in the midst of autumn, it seemed wrong to do a summer fruit tart so instead I gave the tart more seasonal flavours with roasted plums topping a chocolate and amaretto custard, encased in a ginger pastry.
YUM are the only words I can use to describe this tart. 
This recipe makes four tartlets, but the recipe is easily doubled if you have enough tartlet tins.
Also, if you have left over pastry, it freezes brilliantly (raw) - just leave it to fully defrost prior to using.
You will need individual 10cm fluted tartlet tins with removable bases.

Ingredients:

For the pastry:
  • 125g (1 cup) plain flour
  • 30g (2 tbsp) icing sugar
  • 1/4 tsp salt
  • 2 tsp ground ginger
  • 1 tsp ground cinnamon
  • 60g (1/4 cup) butter, chilled and cubed
  • 1 egg yolk
  • 1 & 1/2 tbsp water


For the custard:
  • 2 egg yolks
  • 250ml (1 cup) milk
  • 70g (1/3 cup) caster sugar (or brown sugar for a more caramel hit)
  • 3 tsp cornflour
  • 3 tsp plain flour
  • 30g (2 tbsp) dark chocolate (at least 50% cocoa solids), roughly chopped
  • 40ml (2 & 1/2 tbsp) amaretto

For the plums:
  • 2-3 plums, destoned and sliced
  • 50g (1/4 cup) brown sugar
  • 2 tbsp honey
To finish:
  • 10g dark chocolate

Method:

1. Prepare the pastry. Into a large bowl sieve the plain flour, icing sugar, salt, ginger and cinnamon.

2. Add the butter to the dry ingredients and rub together until the mixture resembles breadcrumbs. Be patient at this point and make sure no large clumps of butter remain.

3. Add the egg yolk and water. Bring the dough together with your hands. Knead lightly into a ball.

4. Roll the dough out between two layers of clingfilm, until it is around the thickness of a pound coin (2-3mm). Cut into circles around 14cm in diameter (big enough to line the base and sides of a tartlet tin), and place into the tins. Place in the fridge for 20 minutes.

5. Preheat your oven to 180c (160c fan)/350f/gas mark 4.

6. Place greaseproof paper in the base of each tart tin and fill with baking beans. Bake the tarts for 10 minutes.

7. Carefully remove the paper and beans (the beans will be very hot!), and return the tarts to the oven for 3 minutes. Set aside to cool.

8. Make the custard. Bring the milk to a simmer in a medium sized saucepan.

9. Meanwhile whisk together the egg yolks, sugar, cornflour and plain flour until smooth. Once the milk is bubbling, slowly pour the milk onto the egg mixture, whisking constantly.

10. Return to the pan, and cook on a low heat (stirring constantly) until it has thickened enough to coat the back of a wooden spoon (this will only take a few minutes). Take off the heat and add the chocolate and amaretto. Stir until the chocolate has melted.

11. Fill the tartlet tins with the custard and set aside to cool. Place in the fridge to set fully (for at least 30 minutes).

12. Line a baking tray with greaseproof paper and add the plum slices. Sprinkle on the brown sugar and honey and bake for 5-7 minutes, until a little caramel has formed and the plums have cooked through. Set aside to cool.

13. To assemble place the roasted plum slices onto each tart. Grate the remaining dark chocolate over the tarts.

14. Enjoy!

GBBO Individual Chocolate Plum Amaretto Tartlets

Yum
Print This Recipe:

Friday, 28 October 2016

Halloween Game Pie


Here's just a quick post as to a way to make your main meal halloween themed! A while ago I made a game pie, and decided to add some extra decorations/make a few improvements to the recipe. I also added in some pumpkin to the filling to give a real halloween vibe. Venison and duck are both amazing at the moment, but you could use something like chicken instead :)
I've only made a pie lid for this pie, as I had many issues with soggy bottoms. If you would like a base, just double the recipe for the pastry, and use half to cover the base and sides of the pie dish.
I also used a large 24cm pie dish, but a 23cm springform cake tin would work well too.

Makes one large pie - enough for around 8 servings 

Ingredients:

For the filling:
  • 350g butternut squash or pumpkin, peeled and chopped into 2.5cm chunks
  • 200g carrots, peeled and chopped into 2.5cm chunks
  • 1 onion, peeled and chopped finely
  • 250g mushrooms, chopped
  • 3 tbsp vegetable oil
  • 1kg venison, duck (or chicken if you want to cut down on costs!)
  • 100g dried chopped apricots
  • 100g mixed chopped nuts (I used a combination of peanuts, walnuts and almonds)
  • 100g 0% fat greek yoghurt
  • 100g black treacle
  • 1 ¼ tsp salt
  • 2 tbsp Schwartz Moroccan spice blend

For the hot water crust pastry:
  • 55g butter
  • 65g lard
  • 1 tsp salt
  • 265g plain flour
  • 55g strong white bread flour
  • 135ml boiling water
  • 1 egg, beaten

Method:

1. Preheat the oven to 180c/160c fan/gas mark 4.

2. In a large frying pan, heat the oil and fry the spices for 1 minute. Add the meat, and fry for 3-4 minutes – this browns off the meat.

3. In a large mixing bowl, add the chopped vegetables, apricots, nuts and meat. Stir in the treacle and yoghurt, and season. Set aside whilst you make the pastry.

4. For the pastry, place the butter, lard, salt and water in a medium saucepan, and bring to a simmer. Stir occasionally until the butter and lard have melted and the mixture is bubbling. 

5. Sieve together the plain and strong bread flour. Once the lard and butter have melted, make a well in the centre of the flours, and pour in the fat mixture. Mix with a wooden spoon at first, and then use your hands to make a smooth dough.

6. Once cool enough to handle, roll out two thirds of your pastry to about 5mm thick. This will be the pie lid.

7. Add the filling to the pie. Place the rolled out pie lid over the filling, and press the edges down with a fork (to help prevent leakage). 

8. Roll out the remaining pastry and cut into a large pumpkin. Cut out the face, then place the pumpkin onto the pie lid. You can use any excess pastry to make a fancy rim around the pie if you like.


9. Brush the beaten egg over the pumpkin - this will make it stand out against the pie background. Bake for 1 hour. Check the pie, and cover with foil if it is browning too much. Use a meat thermometer to check that the game pie has cooked – it should be around 74c. 


10. Enjoy the pie warm or cold.


Yum
Print This Recipe:

Wednesday, 26 October 2016

GBBO 2016 Week 9 - Sun-dried Tomato and Olive Palmiers


For the signature round of the semi final of GBBO, it was all about palmiers. I've had an issue making puff pastry for a while, and was determined to crack it! This recipe worked amazingly, and wasn't too time consuming. I filled the palmiers with soft cheese, sundried tomatoes and olives, and they are flavour-full! 
This batch made 12 palmiers, but the recipe is easily doubled or quadrupled.

Makes 12

Ingredients:

  • 125g (1 cup) strong white bread flour
  • 1/4 tsp salt
  • 15g (1 tbsp) melted butter
  • 100g (1/2 cup) cold butter
  • 55ml (1/4 cup) ice cold water
  • 50g (3 tbsp) sun-dried tomatoes (in oil), finely chopped
  • 50g (3 tbsp) olives, finely chopped
  • 75g (1/3 cup) soft cheese
  • 1 egg, beaten


Method:

1. Make the puff pastry. In a mixing bowl sift in the flour, and add the salt. Pour in the melted butter and water, then bring the dough together into a firm ball. Cover in cling film and place in the freezer for 10 minutes.

2. Roll the chilled butter between two sheets of cling film into a 9cm square. Cover and place in the freezer for 10 minutes.

3. Roll the dough out to a 13cm square. Place the butter in the centre of the square, and fold the dough over the butter, so that the butter is completely encased. Pinch the dough together to ensure no butter leaks out.

4. Roll the dough out to a rectangle, about the width of a pound coin (2-3mm). Fold the top third of the dough down, and the bottom third up (like a leaflet). Wrap in clingfilm and place in the freezer for 10 minutes. This counts as the first turn.

5. With the seam created by the first turn towards you, roll the dough out to the rectangle again (about 15cm x 12cm). Fold the top third of the dough down, and the bottom third up  (the seam will now be horizontal to you). Place in the freezer for 10 minutes. This is the second turn.

6. Repeat the rolling and turning process three more times. Chill the dough until ready to use.

7. Preheat your oven to 210c (190c fan)/410f/gas mark 7. Line the base of two baking trays with baking parchment.

8. Roll the dough out to the thickness of a pound coin. Spread over the cream cheese, and cover with the chopped sun-dried tomatoes and olives. Roll one long end towards the centre (until it is halfway), then roll the opposite side in to the centre. You will end up with what looks like two Swiss rolls next to each other. Cover and place in the freezer for 10 minutes.

9. Trim off the ends of the palmiers, then slice the dough into 1cm pieces. Transfer the baking trays, and brush on some egg wash.

10. Bake for 10 minutes. Turn the palmiers over, and bake for a further 8-10 minutes, until crispy and a light brown colour. Leave to cool.

11. Enjoy!


Yum
Print This Recipe:

Tuesday, 25 October 2016

GBBO 2016 Week 9 - Giant Chocolate Caramel Fondant Fancies


It was the semi-final this week on the Great British Bake Off, and it was all about patisserie. I decided to have a go at the show-stopper of fondant fancies. Sponge filled with buttercream and covered in fondant, what could go wrong? Well, from watching the bake off and having tried to bake fondant fancies previously, I know covering the mini cakes in liquid fondant icing is very tricky - they always look a bit messy. To solve this issue, I cheated and use a block of fondant icing. I think you get a much prettier end result and it's SO less messy!
I flavoured the sponge with cocoa and brown sugar (to give a caramel-like taste). Then I hid a little caramel sauce in the top of the sponge, and covered it in caramel buttercream. Finally I marbled pink and purple food colouring into fondant icing and covered each cake with the icing.
These ended up huge! If I made them again, I'd make them half the size. They taste yum though, and would do great at bake sales.

Makes 12 huge fondant fancies

Ingredients:

For the cake:

  • 5 medium eggs
  • 165g soft light brown sugar
  • 150g plain flour
  • 10g cocoa powder
  • 40g butter, melted

For the caramel sauce:

  • 125g caster sugar
  • 2 tbsp water
  • 70ml double cream
  • 25g butter

For the buttercream:

  • 200g butter, softened
  • 400g icing sugar

For the caramel shards:

  • 125g caster sugar
  • 2 tbsp water

To finish:

  • 750g fondant icing block
  • Pink food colouring
  • Red food colouring
  • 100g dark chocolate


Method:

1. Preheat your oven to 180c (160c fan)/ 355f/gas mark 4. Grease and line the base of a 30 x 20cm swiss roll tray.

2. Add the eggs and sugar to a medium bowl, and place on a saucepan half-filled with simmering water. Make sure that the bottom of the bowl does not touch the water.

3. Whilst heating, use an electric whisk to beat the eggs and sugar for 3 minutes, until the mixture feels hot to the touch. Take off the heat and whisk for a further 7 minutes, until the mixture has trebled in size, and ribbons of mixture are left on the surface when the whisk is lifted from the mixture.

4. Sieve in the flour and cocoa powder in three goes, gently folding in each time with a metal spoon.

5. Pour the butter around the edges of the bowl, and gently fold in.

6. Pour the mixture into the prepared tin, and bake in the oven for 15 minutes, until it is springy to the touch. Leave to cool in the tray.

7. Make the caramel sauce. Add the sugar and water to a medium saucepan, and heat (without stirring) until a deep caramel colour is achieved - this will take 3-5 minutes.

8. Add the butter and cream and whisk until smooth. Set aside to cool.

9. Make the buttercream. Beat together the butter, icing sugar, and 2 tablespoons of the cooled caramel sauce. If the mixture is too stiff, add more caramel sauce a tablespoon at a time, until spreadable.

10. Divide the cake into two horizontally. Spread a layer of the caramel buttercream on one half of the cake and sandwich with the other half.

11. Cut the cake into twelve squares of equal size. To the top of each cake spoon out some sponge (about a 1cm square's worth). Fill with a teaspoon of caramel sauce.

12.Spread buttercream around the sides and top of the cake, as evenly as possible. Place the cakes in the fridge for 10 minutes, to firm slightly.

13. Prepare your fondant. Divide the fondant into two, and colour one purple, the other pink (or whatever colour you'd like). Roll the fondant out on a silicon mat lightly dusted with icing sugar, until it is a few mm thick.

14. Cut squares of fondant so that it will cover the top and sides of the cake (depending on the thickness of your sponge, this will be around 12cm).

15. Place the fondant squares on the cakes, and gently smooth over.

16. Prepare your caramel shards by heating the sugar with the water in a medium saucepan. Heat for 3-5 minutes, until the mixture is caramel coloured. Pour onto a tray lined with greaseproof paper, and leave to cool.

17. Prepare your chocolate by melting in a microwave on high power, for 30 second bursts. After each burst, stir the chocolate well. Once melted, pour onto a tray lined with greaseproof paper and leave to set.

18. Finish your fondants by breaking the caramel and chocolate into shards, and topping each fondant fancy with both shards.

19. Enjoy!


Yum
Print This Recipe:

Thursday, 20 October 2016

GBBO 2016 Week 8 - Halloween Marzipan Centrepiece


I really wanted to make a cool halloween cake that was in the theme of the showstopper challenge from week 8 on the Great British Bake Off. The challenge was to make a marzipan centrepiece, and I think I accomplished this :)
A chocolate cake baked in a small hemisphere tin (mine was from Lakeland), filled with an orange buttercream, and covered in a layer of marzipan. 
With the spare marzipan I added mini pumpkins, and my boyfriend had the genius idea to add little pieces of grape to them to resemble faces.
It was really fun to make, and perfect for halloween. Here I bought marzipan, but you could make your own using this easy recipe (I couldn't get hold of ground almonds).
I realised that I could have made my life a lot easier (when carving the face) by making a chocolate orange buttercream. If you do this, replace a tablespoon of icing sugar with that of cocoa powder. This means that no additional work is needed after cutting out the face pieces. The orange buttercream (without cocoa) is a nice contrast to the chocolate cake though, so either option has its benefits!

Makes 1 cake

Ingredients:

For the cake:

  • 75ml (1/3 cup) vegetable oil
  • 100ml (1/2 cup) yoghurt
  • 50ml (1/4 cup) strong coffee or espresso
  • 1 tsp vanilla extract
  • 1 egg
  • 100g (1 cup) self-raising flour 
  • 140g (3/4 cup) soft light brown sugar
  • 2 tbsp cocoa powder

For the orange buttercream:

  • 100g (1/2 cup - 1 tbsp) butter, softened
  • 200g (2 cups) icing sugar (or replace 1tbsp of icing sugar with that of cocoa powder if chocolate orange buttercream is preferred)
  • 1-2 tbsp orange juice

For the chocolate buttercream:
  • 50g (3 tbsp) butter, softened
  • 85g (3/4 cup) icing sugar
  • 1 tbsp cocoa powder
  • 1/2 tbsp milk

To finish:

  • 500g marzipan
  • Orange food colouring (concentrated gel)
  • Green food colouring (concentrated gel)
  • Sliced red grapes (optional)

Method:

1. Preheat your oven to 180c (160c fan)/355f/gas mark 4. Grease two small hemisphere pans.

2. Break up the sugar so that no large lumps remain. Sift in the flour and cocoa powder and stir together. 

3. In a jug beat the egg with the oil, vanilla, coffee and yoghurt. Pour into the dry ingredients and beat until smooth.

4. Pour into the prepared tins and bake for 22-25 minutes, until they are coming away slightly from the sides of the tin, and spring back when pressed. Leave to cool in the tin.

5. Make the orange buttercream. Beat the softened butter with the icing sugar and orange juice until smooth and spreadable.

6. Cover the sides of the cakes with buttercream and place in the fridge for 20 minutes - this will help in the assembly.

7. Use the remainder of the buttercream to sandwich the two halves together. Place back in the fridge whilst you make the chocolate buttercream and prepare the marzipan.

8. Make the chocolate buttercream. Beat the softened butter with the icing sugar, cocoa powder and milk until it is smooth and spreadable. 

9. Use 150g of the marzipan for the cake. Colour it orange. If the marzipan gets sticky, add a little icing sugar to the marzipan, and work in. 

10. Roll out the marzipan on a surface lightly dusted with cling film, until it is a few mm thick, and is a circle around 18cm in diameter.

11. Cover the cake with the marzipan, and gently smooth it over. Use the back of a spoon to lightly run lines over the cake (to resemble the ridges on a pumpkin).

12. Take around 50g of marzipan and colour it green. Shape two thirds of this into a stalk and place on top of the cake.

13. To get the jack-o-lantern effect, use a sharp knife to carefully cut out shapes for the face. Place small amounts of chocolate buttercream in the gaps (or scrape out the orange buttercream). 

14. Cover a cake board with the remainder of the chocolate butter cream. Place the jack-o-lantern cake in the centre of the board.

15. Colour the rest of the marzipan orange, and make ovals (a little larger than golf balls). With the reserved green marzipan, add stalks to each pumpkin. 

16. Slice the grapes into small pieces and add features to the marzipan (optional).

17. Enjoy!


Yum
Print This Recipe:

Tuesday, 18 October 2016

GBBO 2016 Week 8 - Pork Pies with Chicken and Apricot


This week's bake off was an eclectic one, being all about Tudors. Unfortunately I've had a bit of a bug, so only just was able to try the signature challenge - Tudor pies!

The pastry needed to be hot water crust, which is ideal for me as I love that pastry. It is for me the simplest pastry to work with, doesn't stick to your counter, and it doesn't need to be chilled! 

Due to the illness previously mentioned, I had to be quite simplistic in my choice of filling - I decided to base the recipe on what Andrew made, which were pies layered with sausage meat, chicken and apricots. All of the contestants made fancy baking tins to enable them to make mini pork pies. I couldn't work out how to make them or find any in the shops...so I used a straight sided, loose-bottomed mini cake tray (like this one from lakeland). You could alternatively use a deep muffin tray.
I found after making 6 mini pies that I had loads of filling left. So I made a larger 20cm pie as well :)

If you only want a large pie, this mixture can be used to make a 23cm pie. Increase the cooking time to 1 hour 20 minutes if you do this, to ensure that the filling is cooked.
If you only want mini pies, this recipe will make a lot!! I'd estimate between 24 and 30. 

Makes 6 mini pork pies and 1 large 20cm pie

Ingredients:

For the pastry:

  • 530g plain flour
  • 110g strong white bread flour
  • 110g unsalted butter
  • 130g lard
  • 2 tsp salt
  • 270ml water


For the filling:

  • 200g boneless chicken thighs
  • 1 onion
  • 454g pack pork sausages (the higher the percentage meat the better),
  • 150g dried apricots
  • 1 tbsp thyme (leaves)
  • 1 baking potato
  • Salt and pepper (for seasoning)
  • 1 egg 


Method:

1. Preheat the oven to 200c (180c fan)/400f/gas mark 6.

2. Make the pastry. In a saucepan add the butter, lard, water and salt. Heat until the butter and lard have melted, and the mixture is simmering.

3. In a large mixing bowl add the plain and strong white flour. Once bubbling, take the saucepan off the heat and pour over the flour.

4. Beat the pastry well with a wooden spoon at first (it will be very hot), in order to incorporate all of the flour. Once no more flour speckles can be seen, set aside to cool enough to be able to handle (this should be a maximum of five minutes).

5. Take a quarter of the dough. This will be enough dough for the mini pork pies. Roll two thirds of  this dough out to about 1/2cm thickness - it shouldn't stick to your counter (if it does, dust lightly with flour). Cut out circles that will cover the base and sides of your pie - for a muffin tin (or the mini cake tin I used), 8cm circles should be large enough. Transfer the circles to the tin, and carefully guide the dough into the corners of the tin. If any tears occur, just use a bit of excess dough to patch them up.

6. With the remaining third of dough, roll out to about 1/2cm thickness. Cut smaller 5cm circles of dough. These will be the lids of the pie. Set aside.

7. Take 2/3 of the large quantity of pastry dough, and roll it out until it is about 1/2cm thick. This dough will cover the base and sides of a 20cm cake tin. Roll the dough until it is big enough to sit on the base of the tin, and spread up the sides of the tin (to the top). For a deep 20cm cake tin, this will approximately be a 40cm circle. 

8. Transfer the rolled out dough to the cake tin, again guiding the dough into the sides of the tin. If there are any gaps in the sides, fill them in with excess dough. 

9. Roll out the remaining third of the dough to about 1/2cm thickness. Cut a 20cm circle - this will be the pie lid.

10. Roll out any trimmings, and use a leaf cutter (or your imagination) to cut out leaves - 3 per mini pie, and 16 for the large pie.

11. Make your filling by chopping the onion and dried apricot until they are the size of a 1cm dice. In a medium bowl, mix the onion and dried apricot with the chopped chicken thighs and thyme.  Season with salt and pepper.

12. Remove the lining of the sausages, so that you are left with just the sausage meat. Chop the chicken thighs into bite-size pieces.

13. Peel and finely slice the potato (as fine as you can).

14. To the base of each pie add sausage meat. Top with the chicken and apricot mixture, followed by the thinly sliced potato.

15. Top each pie with it's lid, and seal by pinching the top and the edges together with your fingers. Beat the egg briefly, and brush over each pie.

16. Add the leaves to each pie - I chose to put three leaves on each mini pie, and the remainder on the large pie. Brush these leaves with more egg wash.

17. Bake the mini pies in the oven for 30 minutes. After 15 minutes, check them, and if the tops are browning too much, top with kitchen foil.
Bake the large pie in the oven for 1 hour, checking after 30 minutes for the top browning too much, and adding kitchen foil to the top of the pie if it is.

18. Leave the pies to cool - though they are lovely eaten warm but hold together better cold.

19. Enjoy!


Yum
Print This Recipe:

Tuesday, 11 October 2016

GBBO 2016 Week 7 - Lemon and Strawberry Cheesecake Roulade


It was all about desserts on this week on the Great British Bake Off. As I have a stockpile of cake in my house after making the three-tired cake from Week 6 (my recipe and pictures are here if you're interested), I decided to only bake one of the challenges - the signature roulade. I took inspiration from a couple of the bakers in the tent - Salasi and Andrew :)
Using a decorative paste, I piped strawberries onto the base of the cake, and the roulade itself is filled with strawberry jam and soft cheese that has been marbled through with home-made lemon curd.
If you don't fancy the cheese element, you could use lightly whipped double cream instead - I'm just not a huge cream fan...

Makes one roulade

Ingredients:

For the decorative paste:

  • 40g butter, softened
  • 40g icing sugar
  • 40g egg whites (about 1 medium egg's worth)
  • 45g plain flour
  • Red food colouring (concentrated gel)
  • Green food colouring (concentrated gel)

For the sponge:

  • 4 eggs
  • 120g caster sugar
  • 100g plain flour
  • 20g butter, melted

For the lemon curd:

  • 175g caster sugar
  • Zest and juice of 2 lemons
  • 2 eggs
  • 110g butter, cubed

To finish:

  • 150g good quality strawberry jam (store-bought or home-made - my recipe is here)
  • 200g soft cheese
  • Icing sugar, to dust


Method:

1. Grease and line the base of a 30x24cm baking tray with baking parchment. Preheat your oven to 190c (170c fan)/ 375f/gas mark 5.

2. Make the decorative paste. Cream together the softened butter and icing sugar until the mixture is smooth and creamy. Add the egg white and flour, and beat until the mixture is smooth. Take about a tablespoon of the mixture and place in a separate bowl.

3. Colour the majority of the paste a deep red colour. Colour the reserved tablespoon green. Place the red paste in a piping bag, and pipe strawberry shapes all over the baking parchment lining the tin. Leave space to add green leaves.

4. Place the green paste in a piping bag, and pipe on leaves. Place the tray in the freezer for 10 minutes whilst you make the sponge.

5. Place a pan half-filled with simmering water on a medium heat, and place on top of it a heat-proof bowl. Make sure that the base of the bowl does not touch the water.

6. Crack the eggs into the bowl and add the caster sugar. Use an electric whisk to beat the egg/sugar mixture for 3-4 minutes, until it has doubled in size.

7. Take the bowl off the heat and whisk for a further 5 minutes on a medium speed.

8. Carefully pour the melted butter around the side of the bowl, and sift in the plain flour. Use a large metal spoon to quickly but carefully fold in the flour. As soon as no large flour speckles are visible, stop folding.

9. Take the tray out of the freezer and pour over the sponge mixture. Spread carefully to the edges of the tray using a spatula.

10. Bake for 10-12 minutes, until the top of the cake is golden and springs back when lightly touched.

11. Carefully remove your sponge from the tray so that the greaseproof paper is touching the tabletop. Starting at the short end, roll up the sponge, leaving the greaseproof paper in place. Leave the sponge rolled up whilst it cools.

12. Make the filling. In a heat-proof bowl, add the sugar, lemon juice and zest. Beat in the eggs, then place the butter on top of the other ingredients.

13. As previously put the bowl on top of a pan half-filled with simmering water. Whisk continuously as the butter melts and the eggs begin to cook. Be careful to not let the mixture boil.

14. Keep stirring for 5-10 minutes, until the lemon curd has thickened enough to coat the back of a wooden spoon. Take off the heat and leave to cool - it will thicken as it cools down.

15. Marble the cooled lemon curd into the soft cheese, so that speckles of curd can still be seen.

16. To assemble, unroll the roulade carefully. Spread over the jam evenly, then top with the lemon soft cheese mixture.

17. Re-roll the roulade up, taking the baking parchment off the roulade as you roll. Dust with icing sugar.

18. Enjoy!
Yum
Print This Recipe:

Saturday, 8 October 2016

GBBO 2016 Week 6 - Summer to Autumn Botanical Cake


I know, I'm a week behind, but this cake took a while to prepare! The showstopper on this week of bake off was to make a three-layer botanical-themed cake. 
As it's just starting to get a bit chilly in England, I thought I'd make a cake to represent the changing of the seasons. The bottom layer is a spiced pumpkin and apricot cake - both ginger and cinnamon are botanicals :)
The middle layer is a rose and vanilla cake, soaked in a rose syrup. 
The top layer is my favourite - an orange Tunisian cake - this cake has an orange blossom glaze, making it botanical as well.
The cake is covered with a rose buttercream, icing and fondant rosettes (I know, I make them a lot!)
I also made my own crystallised rose petals - they are insanely easy to make - you just need to make them the day before to allow them time to dry.

The cake tins I used were 12cm (orange Tunisian cake), 17cm (vanilla & rose) and 23cm (spiced pumpkin). 

You will also need 8 straws to act as doweling rods - they help to prevent the layers of cake from collapsing.

For the buttercream roses you need a piping bag and a 2D piping nozzle.

Ingredients:

For the crystallised flowers:

  • 1-2 rose buds - cleaned
  • 1 egg white
  • 50g caster sugar

For the orange Tunisian cake:

  • 20g bread (white or wholemeal work well)
  • 100g caster sugar
  • 50g ground almonds
  • 3/4 tsp baking powder
  • 100ml vegetable oil
  • 2 eggs
  • finely grated zest of one orange
  • finely grated zest of one lemon

For the orange blossom syrup:

  • 45g granulated sugar
  • 1 cinnamon stick
  • juice of one orange
  • 1 tsp orange blossom water

For the rose & vanilla cake:

  • 175g margarine (or butter)
  • 250g caster sugar
  • 3 eggs
  • 100g natural yoghurt (I used fat-free and it worked well)
  • 250g self raising flour
  • 1 tsp vanilla extract
  • 1 tsp rose water

For the rose syrup:
  • 70g granulated sugar
  • 1 tsp rose water
  • 50ml water

For the spiced pumpkin cake:

  • 300g self raising flour
  • 300g light soft brown sugar
  • 1 tbsp ground cinnamon
  • 2 tsp ground ginger
  • 1 tsp allspice
  • 175g dried apricots
  • 1/2 tsp salt
  • 4 eggs
  • 200g margarine or butter, melted
  • 500g butternut squash (or pumpkin), grated coarsely

For the buttercream frosting:

  • 300g margarine 
  • 600g icing sugar
  • 1 tbsp rose water

For the buttercream roses:

  • 150g butter, softened
  • 300g icing sugar
  • 1/2 tbsp orange juice
  • orange food colouring (concentrated gel)
  • purple food colouring (concentrated gel)

To finish:

  • 500g fondant icing

Method:

Crystallised rose petals

1. Make sure the rose petals are clean and dry.

2. Whisk the egg whites until they have frothed up. Using a pastry brush, gently brush each petal with the egg white on both sides.

3. Dip the petals into the sugar, and tap off any excess sugar. Place onto a sheet of greaseproof paper, and leave until dry. This takes at least 3 hours, and preferably leave them overnight to dry fully.

Tunisian Orange Cake

1. Grease and line the base of a 12cm springform circular cake tin with baking parchment.

2. Blend the bread into fine breadcrumbs. Combine with the ground almonds and baking powder.

3. In a medium bowl whisk together the eggs, caster sugar, oil and zest of the orange and lemon. Add the dry ingredients (breadcrumbs/almonds/baking powder), and stir in briefly.

4. Pour into the cake tin, and place in a cold oven (do not preheat!).

5. Turn the oven to 150c/140c fan/gas mark 2. Bake the cake for 30-35 minutes, until the cake is golden on top and springs back when lightly pressed.

6. Towards the end of the cooking time, make the syrup. Place the granulated sugar, orange juice and cinnamon stick in a pan and bring to a simmer. Boil for 2-3 minutes, until reduced slightly.

7. Add the orange blossom water and remove the cinnamon stick. 

8. Once the cake is out of the oven, prick the top of the cake all over with a fork or skewer, then pour over the warm syrup. 

9. Leave to cool.

Rose and Vanilla Cake

1. Preheat the oven to 160c/140c fan/gas mark 3. Grease and line the base of a 17cm springform circular cake tin with baking parchment.

2. Cream the butter with the caster sugar until the mixture is light and fluffy.

3. Add the eggs, yoghurt, vanilla and rose extract, then sift in the flour. Gently fold in.

4. Pour into the prepared cake tin and bake for 35-40 minutes, until the cake is golden, and a skewer inserted into the centre of the cake comes out clean.

5. Towards the end of baking, make the rose syrup by adding the water and granulated water to a pan and bringing it to the boil. Simmer for 2-3 minutes, until it has reduced slightly. Take off the heat and add the rose extract.

6. Once the cake is out of the oven, prick all over the top of the cake with a fork or skewer, then pour over the syrup.

7. Leave to cool.

Spiced Pumpkin cake

1. Preheat the oven to 180c/160c fan/gas mark 4. Grease and line the base of a 23cm springform cake tin.

2. In a large mixing bowl add the flour, sugar, cinnamon, ginger, allspice and salt. Break up the sugar so that no clumps exist and stir the dry ingredients together.

3. Make a well in the centre of the dry ingredients and pour in the butter and eggs. Beat until the wet ingredients are well-incorporated.

4. Add the dried apricots and pumpkin/butternut squash. Fold in until evenly throughout the batter.

5. Pour into the prepared cake tin. Bake for 45-50 minutes, until springy to the touch and a skewer inserted into the centre of the cake comes out clean.

6. Leave to cool.

Buttercream frosting

1. Pour the icing sugar into a bowl, and add the margarine and rose extract. Beat until smooth and spreadable. Add a little hot water (a teaspoon at a time) if it is too stiff.

2. Use a palette knife the spread buttercream over the top and sides of each cake layer - this is a crumb coating, and will taste great and mean that the icing will stick to the cake.

3. Place each layer in the fridge to firm up for 30 minutes.

Icing the cakes

1. Prepare the fondant by kneading it lightly. For my fondant, I marbled the icing through with a little purple and orange food colourings - go wild with whichever colour(s) you'd like :D

2. Divide the fondant - you will need 250g for the bottom layer, 175g for the middle layer, and 75g for the top layer. Roll the fondant icing out to a few mm thickness, so that it can cover the respective cake's top and sides

This works best on a silicon mat, but if you don't own one, clingfilm works well. As to a rolling pin, plastic ones (rather than wooden ones) are vastly superior! If you don't have one, I can really recommend getting one - I bought a small one from Ebay, and it only cost a few pounds :)

3. Drape each piece of fondant over the cake, and gently smooth over. Cut off any excess fondant.

Assembling the cake layers

1. Place the bottom layer of cake on a cake board. Place four straws in the centre of the cake in a square, so that they are equal distant from each other and the edge of the cake. Press down until the straw touches the cake board.

2. Trim the straws so that the top of the straw just pokes out of the top of the cake.

3. Place the middle layer on the middle of the cake. Repeat the placement and trimming of straws.

4. Place the top layer of cake on to the centre of the middle layer. 

Buttercream roses

1. Cream together the butter and icing sugar with the orange juice until it is smooth and thick enough to pipe (practice piping a little onto some greaseproof paper. If it holds it's shape, it's ready. If the mixture is too slack, add more icing sugar. If it is difficult to add, add a little more orange juice a teaspoon at a time.

2. Once the buttercream is the correct consistency, colour it orange using the gel food colouring. This will slacken the mixture slightly.

3. Turn a piping bag inside out, and paint a purple line along the length of the bag. Gently turn the bag back out and place in a 2D piping nozzle.

4. Cut the end off of the bag and fill with the orange buttercream.

Finishing Off

1. Pipe roses onto the cake. To pipe a rose, pipe a small blob of icing in the centre of where the rose will be, then pipe around this blob in a spiral. Pipe the roses so that they look to cascade down the cake.

2. Add the crystallised flowers.

3. Enjoy!!


Yum
Print This Recipe:

Monday, 3 October 2016

GBBO 2016 Week 6 - Lime and Ginger Meringue Pie


This week on The Great British Bake Off, the theme was botanicals. I was pretty confused leading up to the episode about what would actually be baked, other than flowers, but the first challenge was pretty straightforward - a citrus meringue pie.
I decided to make a lime and ginger meringue pie, which is lovely and sharp from the filling, with a sweet and fluffy Italian meringue topping. It's super yum, and was really simple!
I used a long tart tin with a removable base - it's 36cm (14 inches) x 10cm (4 inches). If you use a larger tart tin, double the quantity of the recipe.
I've also found that for the meringue, it is very important to use good quality fresh egg whites - otherwise the whites do not whip up well and you get a flat meringue :(

Ingredients:
For the pastry:

  • 125g (1 cup) plain flour
  • 30g (2 tbsp) icing sugar
  • 1/4 tsp salt
  • 2 tsp ground ginger
  • 1 tsp ground cinnamon
  • 60g (1/4 cup) butter, chilled and cubed
  • 1 egg yolk
  • 1 & 1/2 tbsp water


For the filling:

  • 1 tin (400g, 1&1/4 cups) sweetened condensed milk
  • 120ml lime juice (I used bottled lime juice, but this would be 4-5 limes/1/2 cup)
  • 2 egg yolks
  • 1 tbsp chopped stem ginger


For the meringue topping:

  • 300g (1 & 1/2 cups) sugar
  • 2 tsp lime juice
  • 140g (1/2 cup & 1 tbsp, about 5 medium eggs worth) fresh free-range egg whites 
  • 180ml (1/2 cup) water
  • Red food colouring (concentrated gel)


Method:

1. Prepare the pastry. Into a large bowl sieve the plain flour, icing sugar, salt, ginger and cinnamon.

2. Add the butter to the dry ingredients and rub together until the mixture resembles breadcrumbs. Be patient at this point and make sure no large clumps of butter remain.

3. Add the egg yolk and water. Bring the dough together with your hands. Knead lightly into a ball.

4. Roll the dough out between two layers of clingfilm, until it is around the thickness of a pound coin (2-3mm). Transfer to the tart tin. Trim off any excess pastry. Line with baking parchment, and fill with baking beans/rice/flour.

5. Chill the pastry for 30 minutes.

6. Preheat your oven to 180c (160c fan)/350f/gas mark 4.

7. Bake the pastry case for 10 minutes. Carefully remove the parchment and baking beans/rice/flour, then bake again for 3 minutes. Set aside whilst you make the filling.

8. Beat together the lime juice, sweetened condensed milk, egg yolks and chopped stem ginger. Pour into the pastry case, it will nearly come to the top of the tin.

9. Reduce the temperature of the oven to 160c (150c fan)/325f/gas mark 3. Return the tart to the oven for around 10 minutes, until the filling is set (it doesn't wobble when the tart is lightly moved).

10. Remove from the oven and leave to cool.

11. Make the Italian meringue. Pour the sugar and water into a medium saucepan, and place on a medium heat. Heat the mixture until it reaches 113c/235f.

12. Meanwhile, whip the egg whites using an electric whisk or stand mixer until stiff peaks form - this means that when the whisk is removed from the mixture, a peak of egg white stands, which doesn't tip over.

13. Once the sugar/water has reached 113c/235f, take off the heat. Whilst whisking the egg whites, gradually pour in the hot sugar syrup. Keep whisking until the meringue has stiff peaks - this takes between 7 and 9 minutes, so if you have one, use a stand mixer (or have a great arm work out!).

14. Turn your piping bag inside out, and paint a stripe of red food colouring up one side of the bag (about 1/2cm wide). Turn your bag back outside (so that the red food colouring is on the inside).

15. Place a 2D closed star nozzle into the piping bag. Trim the end off the bag, then fill with meringue. Pipe rosettes all over the tart, as neat as you can.

16. Return the tart to the oven for 10 minutes, until the meringue has lightly browned all over. Leave to cool.

17. Enjoy!


Yum
Print This Recipe: