Monday 24 September 2018

GBBO 2018 Week 4 - Desserts - Pumpkin Spice Latte Meringue Roulade

Pumpkin Spice Latte Roulade

This week on GBBO was dessert-themed, with meringue roulades being the signature challenge. Now, I'm not too good with meringue, I have a bit of a love-hate relationship when making it. However, following my success following bits of Dan's recipes before, I decided to give his meringue base a crack, and wow, it worked really well!!

However, I went very off-piste with the filling. I can't eat double cream without having a bad stomach, so I avoid it wherever possible. 99% of the roulade recipes I found used a whipped cream, which made me pretty sad. So, whilst walking today, I thought of this concoction - french buttercream is lovely and silky and holds it's shape well when spread. I've flavoured it with coffee before, and whilst thinking of this, I remembered my adoration of the pumpkin spiced latte.
So, this roulade is filling with a coffee creme aux beurre (French buttercream) and a lightly sweetened (but heavily cinnamon-ed) pumpkin (but I used butternut squash, which works just as well) puree.

This is brilliant for a relaxed after dinner dessert, not too sweet because of the coffee, but just enough so you know you're having a treat.

Enjoy!!!

Makes one roulade (serves 8-10)

Ingredients:

For the roulade:

  • 4 egg whites
  • 250g (1 & 1/4 cups) caster sugar
  • 1 tsp white wine vinegar
  • 1 tsp vanilla extract
  • 1 tsp cornflour

For the French coffee buttercream:

  • 4 egg yolks
  • 125g (5/8 cup) caster sugar
  • 2 tbsp water
  • 125g (1/2 cup) butter/baking margarine, at room temperature
  • 2 tsp ground coffee dissolved in 1 tbsp boiling water

For the sweetened pumpkin puree:

  • 500g (3 & 1/3 cups) frozen pumpkin/butternut squash
  • 60g (1/3 cup) light soft brown sugar
  • 1 tbsp ground cinnamon
  • 1 tsp ground ginger
  • 1/2 tsp ground nutmeg
  • 1/4 tsp salt
  • Zest of one orange

Method:

1. Preheat your oven to 180c (160c fan)/355f/gas mark 4. Grease and line the base of a 20 x 30cm swiss roll tray.

2. In a spotlessly clean bowl (I used the bowl in a stand mixer), pour the egg whites and whisk on a medium speed until they have at least tripled in volume and turned white.

3. One tablespoon at a time, add the caster sugar and continue whisking for 5-7 minutes until stiff peaks form when the whisk is lifted from the bowl, and the meringue is white and glossy.

4. Add the vinegar, vanilla and cornflour and gently fold in with a spatula. Pour onto the prepared baking tray and smooth out as evenly as you can.

5. Bake for around 20 minutes, or until the top has browned slightly and is crisp.

6. Make the pumpkin puree by placing the pumpkin/butternut squash in a microwave safe bowl. Add a splash of water then put in a microwave on high power for 5 minutes. Stir and repeat, until the squash/pumpkin is cooked through (soft all the way through). Leave to cool for 5 minutes.

7. Blitz the pumpkin/squash in a blender/food processor until smooth. Pour into a mixing bowl, and then add the remaining pumpkin puree ingredients. Stir to combine, then set aside to cool to room temperature.

8. Make the coffee buttercream. Place the caster sugar and water in a saucepan on a medium heat. Heat until a sugar thermometer dipped into the mixture reads 121c/249f. Meanwhile, pour the egg yolks into the bowl of a stand mixer (with the whisk attached). Start whisking on a low speed.

9. Once the sugar is up to temperature, carefully and slowly, pour the hot sugar over the egg yolks, keeping the speed of the mixer low. Once all of the syrup has been added, turn the speed of the mixer up (to about medium), and leave to whisk for around 10 minutes, until the mixture is at room temperature.

10. Whilst whisking, add the butter in small pieces gradually and then leave to whisk for another few minutes. Add the coffee, then whisk for 3-4 minutes until you have a silky, spreadable buttercream. Place in the fridge until you're ready to assemble.

11. To finish the roulade, flip the meringue out onto a work surface. Carefully peel off the baking parchment. Spread over the coffee buttercream, followed by the pumpkin puree.

12. Roll the roulade up along one of the short sides. Cracks will happen, but that's okay (it adds to the charm I think!).

13. Enjoy!
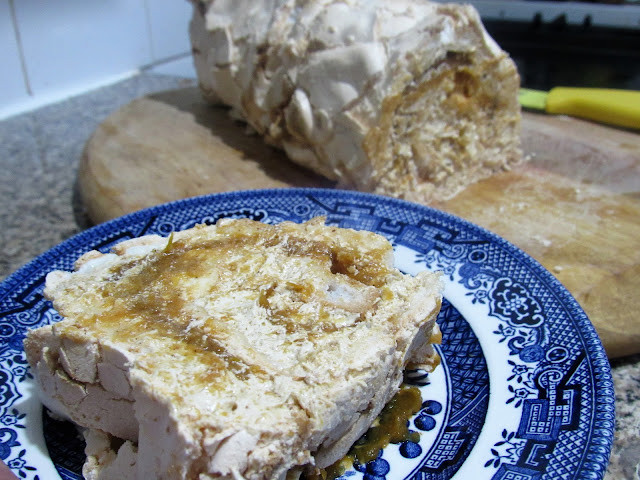
Pumpkin Spice Latte Roulade
Yum
Print This Recipe:

Monday 17 September 2018

GBBO 2018 Week 3 - Bread - Coconut & Rum Chelsea Buns

Coconut Rum Chelsea Buns


Apologies for the lateness of this post! I had a big race yesterday, and have been very busy prepping for that/recovering afterwards (not that the recovery is over yet...). However, this weekend I just about squeezed in enough time to bake my GBBO bake of the week. This week was all about bread, and I really want to give all three challenges a go at some point.

Due to limited time, I knew I wouldn't be able to get a decent Showstopper attempt done - the intricate korovai wedding bread looked a bit too fancy for me! One to do when I don't have a crazy weekend perhaps. I also wasn't planning to eat Indian food, and so making the technical challenge of the garlic naan breads seemed like it'd be a waste.

For these reasons I made my variation of the signature challenge - Chelsea buns. I followed Dan's recipe for the dough (great recipe!), but changed the rest of the recipe. I filled these buns with a mixture of dessicated coconut, brown sugar and rum infused sultanas, some of my favourite flavours!! I then topped the buns with a sticky ginger glaze and a rum icing. Very decadent, yet not too over-the-top, perfect for a mid-morning snack (or a very sweet breakfast?).

Again, as I was busy, there were a few steps where I left the dough for a while in the fridge. After I'd made the dough and left it to rise for a few hours, I realised I needed to go out to get bits and pieces, and visit some friends in the evening. I placed the dough (in the bowl) in the fridge until I got home a few hours later. I then rolled out, filled, re-rolled and cut the buns, and left them covered in the fridge for nearly 24 hours! I was worried they'd over-prove, but actually they ended up lovely and light, packed with flavour! True, they're not as neat as the bakers made in the tent, but I'm very happy with them.

Makes 9

Ingredients:

For the dough:

  • 200ml milk (I used 0% fat)
  • 50g margarine/butter
  • 75g caster sugar
  • 1 tsp salt
  • 500g strong white bread flour
  • 1 tsp ground cinnamon
  • 1/2 tsp ground nutmeg
  • 10g fast-action dried yeast
  • 2 eggs

For the filling:

  • 75g dessicated coconut
  • 50g very soft butter
  • 125g sultanas
  • 50 ml coconut rum
  • 100g light soft brown sugar
  • 1 tsp ground cinnamon
  • 1 tsp ground ginger

For the glaze:

  • 50g granulated sugar
  • 75ml water
  • 1 tsp ground ginger

For the icing:

  • 100g icing sugar, sifted
  • Around 2 tbsp coconut rum

Method:

1. Prepare the dough. Pour the milk into the jug with the butter/margarine. Place in the microwave for 15-30 seconds, just until the butter has melted. Pour into the bowl of a stand mixer with the dough hook attachment.

2. To the stand mixer bowl, add the caster sugar, salt and flour, followed by the spices, yeast, and the eggs. Turn the mixer onto a low-medium speed and mix for around 10 minutes.

3. Cover and leave to prove for at least an hour, until it has doubled in size. This depends on the temperature - when its cooler, this can take a lot longer. As mentioned above, I left mine for 2 hours, then placed it in the fridge for another few hours whilst I went out shopping - this didn't seem to be detrimental to the dough.

4. Whilst the dough is proving make the dough by pouring the rum and sultanas into a small saucepan and placing on a low heat. Bring the rum to a light simmer and cook for 2-3 minutes, until the sultanas are juicy. Set aside to cool.

5. Mix together the brown sugar, spices and dessicated coconut.

6. Dust your work surface with flour and tip out your dough onto the floured surface. Roll out the dough until it about a 35 cm square.

7. Evenly spread the butter over the surface of the dough, then sprinkle over the sugar/coconut. Scatter over the rum infused sultanas.

8. Roll the dough up as tightly as possible (to get as many swirls as you can). Slice into 9 even rounds.

9. Grease a 20 cm roasting tin (or a 20 x 30 cm baking tray with deep sides if you have one), and gently transfer the dough rolls to the tray, leaving a few cm gap between each roll. Cover and leave to prove for at least another hour - as I mentioned above, I left mine in the fridge overnight - they lost a bit of shape but still tasted great. If you do this, make sure to bring the rolls back to room temperature before baking.

10. Bake for around 35 minutes, until the tops are golden. Leave to cool for around 15 minutes whilst you make the glaze.

11. To make the glaze pour the sugar, water and ground ginger into a saucepan and place on a hob on a low heat. Leave to boil, stirring occasionally, until the sugar has dissolved and the liquid has reduced by about half, then turn off the heat and leave to cool for a few minutes. 

12. Use a pastry brush to spread the syrup over the warm buns, and allow to seep in and for the buns to completely cool to room temperature.

13. Make the icing by sifting the icing sugar into a mixing bowl. Add one tablespoon of the rum, and stir in, then gradually add more rum until the icing is thick enough that when lifted from the bowl it runs off the spoon into the mixture and leaves a visible trail on top of the mixture that stays there for a few seconds. Spoon into a piping bag and trim off the end.

14. Pipe lines of icing over each bun and leave to set.

15. Tear off buns and enjoy!

Coconut Rum Chelsea Buns


Yum
Print This Recipe:

Monday 10 September 2018

GBBO 2018 Week 2 - Cake - Chocolate Collar Peanut Butter Cake

Chocolate Collar peanut butter cake

Chocolate Collar peanut butter cake slice

The showstopper challenge for week 2 of GBBO was all about making a two-tiered cake with a chocolate collar. This is essentially a layer of chocolate wrapped around the outside of the cake - not something I've ever properly tried before, though I do like chocolate work.

So, to test myself, I gave this a go - I made two chocolate sponges (I used Karen's recipe, adapting it only slightly, and it worked wonderfully) and sandwiched and frosted them with and a funky peanut butter frosting, which crazily makes a meringue buttercream but contains egg yolks! It didn't hold as firm as the standard Italian meringue buttercream I'm used to, but worked well for sandwiching and frosting.

I then didn't follow the challenge rules and only collared the top cake...sorry guys, but after doing the top collar, I couldn't face doing the bottom one, and to be honest, I think it didn't need it!

So...chocolate collars are pretty fiendish. I have by no means mastered this, but I did learn a few things:

1. If you can, use acetate sheets cut to the length you need. I only had plastic wallets and had to tape some together to get the length I needed (51cm for my 15cm round cake)...this made it very fiddly.

2. Once the chocolate has tempered, it sets really fast!! I temper chocolate an old-fashioned way in using a granite slab to cool down the melted chocolate - I think all the bakes used sugar thermometers, which possibly would have been easier.

3. I mean, it sets really really fast!! Be careful, you need to transfer the wrap to the cake when it is still soft enough that it doesn't crack, but isn't liquid. This took me three attempts to get right, so have spare chocolate in if you can.

4. I used a cheap 54% dark chocolate - I think I could have got a nicer shine if I'd used a fancier 70-80% one.

However, the cake still cut wells and tastes great, so it's worth a go when you have a day or so to spare!

Makes one 15cm and one 23cm cake

Ingredients:

For the cake sponges:
  • 450g (3&1/2 cups) margarine
  • 450g (2&1/4 cups) caster sugar
  • 8 eggs
  • 1 tsp vanilla extract
  • 1 tbsp instant coffee dissolved in 1 tbsp boiling water
  • 100g (1 cup) cocoa powder
  • 350g (2&1/2 cups) self-raising flour
  • 1/2 tsp salt
  • 200ml (1 cup minus 3 tbsp) yoghurt
For the peanut butter frosting:
  • 2 eggs and 1 egg yolk
  • 120ml (1/2 cup) water
  • 220g (1 & 1/4 cups) caster sugar
  • 340g (2&2/3 cups) butter, cut into cubes (room temperature)
  • 150g (5/8 cup) crunchy peanut butter
  • 1 tsp ground cinnamon
  • pinch of salt (depending on whether your peanut butter had salt added to it)
For the chocolate:
  • 300g (around 1&3/4 cups)  dark chocolate (I used 54% cocoa solids but 70% would be even better)
  • 90g (1/2 cup) white chocolate (for the shards)

Method:

1. Preheat the oven to 180c (160c fan)/355f/gas mark 4. Grease the base and sides of a loose-bottomed (or springform) 15cm and a 23cm round cake tin. Dust with a little flour.

2. To make the cake, pour the margarine and sugar into the bowl of a stand mixer, with the paddle attached. Start the mixer on a low speed and cream the margarine and sugar together until it is light and fluffy.

3. Sift the flour and cocoa powder into a mixing bowl.

4. Add the eggs, one at a time, to the butter/sugar mixture, adding a tablespoon of the flour/cocoa powder after each egg.

5. Add the remaining flour/cocoa, and the yoghurt, salt and coffee. Turn the stand mixer to a low setting, and mix together just until all of the flour has been incorporated.

6. Divide between the two tins so that they are about 2/3 full each. Bake. The 23cm tin will take about 35-40 minutes to cook, the 15cm should take 55-60 minutes. They are cooked when a skewer inserted into the centre of the cake comes out clean, and the cakes are springy to the touch.

7. Leave to cool for a few minutes, before turning the cakes out of the tin onto wire racks to cool fully.

8. Make the frosting by heating the water with the sugar in a small saucepan, stirring occasionally until the sugar has dissolved.

9. Pour the eggs and egg yolk into the bowl of a stand mixer fitted with the whisk attachment, and start whisking on a medium speed until they have at least tripled in volume and become light in colour.

10. Keep heating the sugar and water until a sugar thermometer dipped in the syrup reads 113c/235f. As soon as it reaches this temperature, turn off the heat and VERY CAREFULLY, pour the syrup over the egg yolks, making sure the speed of the mixer is set to low. Once all of the syrup has been added, turn up the speed of the mixer (to about medium) and keep whisking until the side of the bowl no longer feels warm (about 10 minutes). The mixture will get very light, but not hold as firm peaks as the traditional meringue would.

11. Once cooled to room temperature, keep whisking whilst adding the butter, a cube at a time. Don't add too much butter at once, or the buttercream may split.

12. Once all of the butter has been added, add the peanut butter and cinnamon, mix and taste. If needed add a little salt or more peanut butter. Place in the fridge until ready to use.

13. To assemble the cakes, use a serrated knife to level off the top of each cake, then slice each cake into two.

14. Place the first 23cm cake onto your serving dish. Add 2-3 tbsp of the frosting and smooth over the top of the layer. Gently press on the second 23cm cake layer, and then cover the top and sides of the cake with more frosting. There should be more than enough frosting to cover and fill these cakes, so you shouldn't have to worry about running out.

15. Place the first 15cm cake layer onto the centre of the 23cm cake. Top with 2 tbsp of the frosting, and add the final layer of cake. Cover with more peanut butter frosting, and then chill for 20 minutes.

16. It's chocolate collar time! Prepare your acetate sheets - they need to be a little taller than your 15cm cake, and around 51cm wide (which should be the circumference of the cake, you can check this if you like). Once prepared, place on a surface you don't mind getting covered in chocolate...

17. This is how I temper chocolate. Break two-thirds of the chocolate into cubes and put in a microwave-safe bowl. Heat for 20-30 second bursts, stirring well after each burst. During the bursts, finely chop the remaining third of the chocolate.

18. Once all of the chocolate has melted, remove from the microwave and pour in the remaining chopped chocolate. Stir until the chopped chocolate has melted and then pour onto a granite slab. 

19. Use a palette knife to spread the chocolate around the slab, scooping it up into a line, then spreading out and repeating. You'll notice the chocolate starts to get thicker. At this point, spoon the chocolate back into a bowl and QUICKLY spread out evenly over the acetate mould, going over the edges.

20. Wait for a few minutes, until the chocolate looks light it is starting to set - this is difficult to judge but it shouldn't take more than 3 minutes. Gently press the collar around the cake, leaving the acetate facing outwards for now. Leave for another few minutes, and then, when you think the chocolate has fully set, gently pry away the acetate.

21. I tempered more white and dark chocolate and spread them on some spare plastic wallets I had. Once cool I broke these into shards to decorate the top and sides of the cake. Next time I might try some different chocolate decorations - if you do anything cool, please let me know!

22. Enjoy!


Chocolate Collar peanut butter cake slice
Yum
Print This Recipe:

Sunday 9 September 2018

GBBO 2018 Week 2 - Cake - Custard Cream Blondies

Custard Cream Blondies

Week 2 on GBBO was all about cake, and the first signature round was "traybakes" - most of the bakers made cake-like traybakes, like the two black forest gateaus. One baker made a frangipane tart though, which sounded delicious! When thinking about what I wanted to make, I wanted something simple but yummy, that couldn't just be bought from a shop.

So, I made these blondies (which I at least have never seen in my local supermarket) with custard creams (which are easily one of my top 5 classic UK biscuits). Blondies are the cousin of a brownie, being dense and moreish, but without any milk/dark chocolate. These have white chocolate and custard powder, as well as crushed custard creams.

They might not look the most show-stopping I'll admit, but they taste amazing!

Makes 16

Ingredients:

  • 175g (3/4 cup) butter (or margarine)
  • 180g (1 cup) light soft brown sugar
  • 145g (3/4 cup) caster sugar
  • 2 eggs
  • 2 tsp vanilla extract
  • 250g (2 cups) self-raising flour
  • 4 tbsp instant custard powder
  • 1/2 tsp salt
  • 150g (1 cup) custard creams, broken into approximate quarters
  • 150g (1 cup) chopped white chocolate

Method:

1. Preheat the oven to 180c (160c fan)/355f/gas mark 4. Grease the base of a 20 x 20cm cake tin, and dust lightly with flour (alternatively, you could line with baking parchment).

2. Melt the butter in a saucepan with the caster and brown sugar, stirring regularly. Once all of the butter has melted and the sugar has dissolved, set aside to cool for a few minutes.

3. In a large mixing bowl, sift together the flour and custard powder, and mix in the salt.

4. Pour the melted butter/sugar mixture onto the flour/custard powder, and then add the eggs and vanilla extract. Fold together briefly.

5. Add the white chocolate and the custard creams and continue folding until all of the flour has been taken up and the custard creams are evenly distributed.

6. Pour into the prepared tin and level out. Bake for around 20 minutes, and then turn the tin around in the oven (for even heat distribution). Bake for another 10 minutes, or until only the very centre of the blondie has a small wobble when lightly shaken.

7. Remove from the oven and leave to cool before cutting into bars. Store in an airtight container and they should last around a week.

8. Enjoy!

Custard cream blondies
Yum
Print This Recipe:

Saturday 1 September 2018

GBBO 2018 Week 1 - Caraway and Turmeric Goosnargh Sandwich Biscuits with Mango and Chilli Jam

Caraway and Turmeric Goosnargh Sandwich Biscuits with Mango and Chilli Jam

Caraway and Turmeric Goosnargh Sandwich Biscuits with Mango and Chilli Jam

The Great British Bake Off is back, and my flat is going to be filled to the brim with baked goods for the next few weeks because of it! Unusually for GBBO, week 1 was all about biscuits. After watching the episode, the biscuits that really captured my interest were from the signature challenge - regional biscuits. Antony's Goosnargh biscuits with caraway seeds and turmeric sounded so strange but wonderful. Better yet they were filled with mango jam, and mango chutney is one of my favourite condiments!!

I decided to give these biscuits a go, with a few adjustments. The main of these are described below, but there are a few more tweaks if you read my recipe :)

Firstly, due partially to laziness, partially due to not being a lover of icing, I didn't ice the sandwich biscuits as Antony did. I found they were sweet enough without this, and it saved a lot of time.

Secondly, I adapted the mango jam - I wasn't sure of his ratio of sugar to mango, so I tested my version out and it worked wonderfully - sweet with the heat from the chilli flakes - it would be delicious with poppadoms as well as the biscuits themselves.

Finally, Antony added baking powder to his biscuit dough. I completely forgot to do this...however, the biscuits turned out melt-in-the-mouth soft (but easy to pick up without crumbling) - like a whipped shortbread.  Oh, and I used a buttery margarine instead of butter, as it meant I didn't need to worry about the butter being overly hard from the fridge.

This recipe made 12 sandwich biscuits, but I ended up not filling all of them, as the biscuits without the filling are also brilliant!

Ingredients:

For the biscuits:

  • 135g (1 cup & 2 tbsp) plain flour
  • 135g (2/3 cup) caster sugar
  • 135g (1/2 cup + 1 tbsp) margarine (or softened butter)
  • 90g (3/4 cup + 2 tbsp) icing sugar
  • 2 tsp caraway seeds
  • 1 tsp ground turmeric
  • Pinch of black pepper
  • 1/2 tsp sea salt 
  • 2 tbsp milk
  • Red food colouring (optional)

For the mango jam:

  • 1 can of mangos, drained (a 400g tin will give you about 270g of mangoes)
  • Around 270g caster sugar (the same weight as the mangoes)
  • Zest and juice of 2 lemons
  • 1 tsp medium strength chilli flakes

Method:

1. Make the mango jam. Firstly, once the mangoes have been drained, weigh them. Weigh out an equal quantity of caster sugar.

2. Finely blend the mango in a food processor, and then pour into a saucepan along with the sugar, lemon zest, lemon juice and chilli flakes. Bring to the boil and simmer for around 10 minutes, stirring occasionally, until a sugar thermometer reads 105c/220f. Pour into a bowl and set aside to cool fully.

3. To make the biscuits, sift the flour and icing sugar into a bowl of a stand mixer with a beater attachment. Add the caster sugar, caraway seeds, turmeric, pepper and salt and briefly mix. Add the margarine/butter, and turn the stand mixer on to a low speed.

4. Keep the mixer on until the mixture has formed fine breadcrumbs. Turn off the mixture and if colouring half of the dough, tip out half of the mixture into a separate bowl.

5. To the uncoloured dough, add 1 tbsp of the milk and turn the mixer back on at a low speed. Once the dough starts to stick together, turn off the mixer and bring the dough together into a ball. Wrap in clingfilm and place in the fridge for at least 30 minutes.

6. To the remaining mixture, dip a cocktail stick in the red food colouring (I use a concentrated gel food colouring) and dip this in the mixture. Add 1 tbsp of the milk, and bring the dough together to a ball as you did with the uncoloured dough. It will need a bit more mixing to have an evenly red coloured dough, but I quite liked the marbled effect of not fully mixing the colour through. Wrap the dough and chill for 30 minutes.

7. Preheat your oven to 180c (160c fan)/ 355f/gas mark 4. Grease and line two baking trays with baking parchment/kitchen foil.

8. Cover your work surface with clingfilm and bring the uncoloured dough out of the fridge. Unwrap and place on the work surface, before covering with a fresh sheet of clingfilm. Roll the biscuit dough out until it is around 5mm thick.

9. Use a 4cm round biscuit cutter to make rounds of the biscuits. Transfer these to the baking trays. Re-roll out the remaining dough offcuts to make as many biscuits as you can.

10. Bake for 8-10 minutes, until lightly golden on the edges. About halfway through the cooking, switch the baking trays (so the tray that was on the top shelf of your oven goes to the bottom shelf and vice versa), to help get an even bake.

11. Once baked, transfer to a wire rack to cool fully.

12. Roll out the red dough as you did the uncoloured. Use the 4cm cutter to make circles of biscuit dough. I then used a flower fondant cutter to cut out the middle of each round (but you could use a different shape if you like).

13. Bake for 8-10 minutes, then transfer to a wire rack to cool fully.

14. To assemble the biscuits, flip the uncoloured biscuits over, and spread with a heaped teaspoon of the mango and chilli jam. Gently press a red biscuit on top of the jam.

15. Enjoy!

Caraway and Turmeric Goosnargh Sandwich Biscuits with Mango and Chilli Jam

Yum
Print This Recipe: