Thursday 31 August 2017

Cookies & Ice Cream

Cookies and Cream Oreo Ice Cream

The Great British Bake Off is back!! Were you excited? I sure was, and I thought episode 1 was excellent and inspiring :) However, before I do any GBBO bakes, I needed to share this really quick and delicious recipe with you guys. I've made ice cream a few times before, but this one is even easier than those ones. With only three ingredients (four if you count salt...), this recipe made around 900ml of ice cream and cost just under £2 to make. AND it takes minutes to prepare, requires no churning, and tastes incredible!

What's the secret? Well, two ingredients form the base as in some of my other ice creams (see here) - double cream and condensed milk. I only used half a standard can of condensed milk, so you could double up the recipe to make use of the other tin OR make a half batch of the amazing miracle fudge I made last week (see here).

I haven't even mentioned the flavour of the ice cream yet. Cookies & Cream - aka Oreos. I was a slow learner when it came to how delicious Oreos are, but I think it's my favourite food from America. I love that they're cocoa-y, so not way too sweet, and they add an amazing flavour to the ice cream base.

Makes 900ml

Ingredients:

  • 200g condensed milk (1/2 a  can or 2/3 cup)
  • 300ml (1 & 1/4 cups) double cream
  • 1 x 154g (around 1 & 1/2 cups) pack Oreos
  • Pinch of salt

Method:

1. Find an old ice cream tub that used to have around 900ml of ice cream in (or just use a regular 1 litre tub).

2. Set aside 3 Oreos, then crush the remaining Oreos until they are fairly fine (you want to have some slightly bigger chunks, i.e. not a fine crumb).

3. In a medium mixing bowl, whisk together the cream and condensed milk, using an electric whisk if you have one (a normal whisk will work - it's just a little more effort). Whisk until the mixture forms stiff peaks (i.e. when you lift the whisk from the mixture a peak forms that doesn't fall to one side).

4. Fold in the crushed Oreos. Once evenly mixed through, pour into the tub.

5. Break the remaining three Oreos into uneven pieces (e.g break one into quarters, another into thirds and a third into eighths) and scatter over the top of the ice cream. Place in the freezer for at least three hours, until set. This ice cream won't form ice crystals, and you don't need to worry about it freezing too firm. If, for example, you left it a few days in the freezer before devouring it, just leave it at room temperature for 5 minutes before serving - then it'll be a nice soft scoop :)

6. Enjoy!!

Cookies and Cream Oreo Ice Cream

Yum
Print This Recipe:

Saturday 19 August 2017

Miracle Microwavable Fudge

Miracle Kahlua Fudge

Fudge...wow...words cannot express how much I love fudge. I've made it many times before (see my amaretto fudge, treacle and cinnamon fudge, and traditional vanilla fudge recipes), and love every recipe, but was asked for the easiest recipe I could find, which didn't need any special equipment. I'd heard of fudge made in a microwave, known as miracle fudge, and decided to give that a go. I flavoured the fudge with vanilla and a few tablespoons of Kahlua (because what isn't better without coffee liqueur?), and amazingly the fudge turned out perfect! No sugar thermometer needed :)

These have a delicate taste of alcohol, so you can increase the amount if you want it super boozy, or leave it out if the fudge is for children/keeping pregnant ladies happy.

With only 5 ingredients, this is cheap to make, makes a lot of fudge (I made about 60 pieces), and all you need is a microwavable bowl and a microwave. My microwave is 800w, and I checked the mixture every 2 & 1/2 minutes. If you have a more powerful microwave (e.g. a 900w), check the fudge more often, say every 2 minutes. If you have a 1000w microwave, check every 90 seconds.

 It took me in total 15 minutes to make, then 45 minutes to set. So, perfect delicious fudge in an hour!

Fills a 20cm square cake pan (cuts into 8 x 8 squares)

Ingredients:


  • 400g (2 cups) golden caster sugar
  • 1 x 397g (1 & 1/3 cups) tin condensed milk
  • 140g (3/5 cup) butter, cut into cubes
  • 1/2 tsp salt
  • 1 tsp vanilla extract
  • 2 tbsp Kahlua (or other liqueur)


Method:

1. Grease the base of a 20cm square cake tin (I used a silicon one but any should work fine) and line with baking parchment.

2. In a large heatproof bowl, pour the caster sugar, condensed milk, butter and salt. You want there to be enough room in the bowl that the fudge could increase to double it's size (it bubbles a lot in the microwave). Stir to dissolve the sugar into the condensed milk. Once you can't see any more sugar crystals, you're ready for the microwave.

3. Place the mixture in the microwave and heat for 12 minutes, stirring well every 2-3 minutes (every 3 minutes if you're microwave is 800w, and decrease the time if a higher power). The mixture will bubble up, start thickening and turn a very light caramel colour.

4. Add the Kahlua and vanilla extract and stir in. Heat for another 2 minutes, then take out of the microwave (carefully as the bowl will be very hot). Stir well, leave to rest for a minute, then stir well again. Repeat the stirring and resting 4 more times, then pour into the prepared tin and level.

5. Leave to set for 45 minutes - 1 hour until it's fully cool and sets. Slice into squares - I divided the fudge into 64 squares (8 x 8), but make the fudge pieces as big or small as you like. Store in an airtight container - it theoretically will keep up to 3 weeks, but it's so moorish, I highly doubt it'll last that long.

Miracle Kahlua Fudge

Yum
Print This Recipe:

Tuesday 15 August 2017

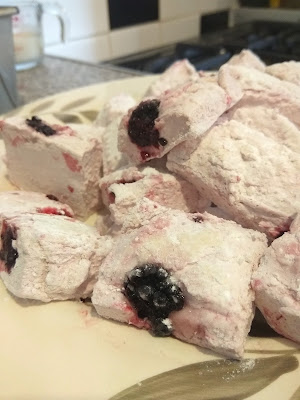
Foraged Blackberry Marshmallows


Blackberry marshmallows

Marshmallows are one of my favourite sweets to make (second only to fudge), and these ones only keep a few days, but they won't last that long! It's now the perfect season (at least in the UK) to forage for blackberries, and we collected a glut of them last weekend. I made a crumble and attempted (and failed) a blackberry sorbet. Then I decided to have a go at blackberry marshmallows - it uses my standard marshmallow recipe, and looks sieved and blended blackberries as the liquid base. After the marshmallow was finished, I poured it into a tin, which I'd scattered fresh blackberries into. And wow, these are flavour packed! And foraging is free, so provided you know what you're looking for, go for it :)

These will keep 2-3 days, and make a perfect sweet to delight your work mates/family!

Only pick the black ones, and be careful of thorns!
Makes around 25 pieces

Ingredients:
  • 60ml (4 tbsp) blitzed and sieved blackberries (around 150g)
  • 60ml (4 tbsp) water
  • 2 x 12g sachets gelatine powder
  • 450g (3 cups) caster sugar
  • 150ml (2/3 cup) golden syrup
  • 150ml (2/3 cup) water
  • 50g (1/2 cup) icing sugar
  • 2 tbsp cornflour
  • 50-75g fresh blackberries (depending on how much you love blackberries)
  • Flavourless oil, for greasing

Method:

1. Grease a 20cm square tray/tin (I find a silicon tray works best) lightly with a flavourless oil. Pour the blended blackberries and water into a mixing bowl, and sprinkle over the two sachets of gelatine powder. Set aside until the gelatine has been absorbed into the liquid (it will become very thick) - this will only take around 5 minutes.

2. Pour the golden syrup, caster sugar and water into a medium saucepan and heat on a low heat, stirring constantly until the sugar has dissolved.

3. Turn the heat up and bring the mixture to a boil. Boil until the mixture reaches 130C/ 266F , and then remove from the heat for a few minutes (just until it has stopped boiling).

4. Start whisking the gelatine mixture in the mixing bowl (using an electric whisk or in a stand mixer with the whisk attachment). Slowly and carefully, pour the hot sugar syrup onto the gelatine mixture, whisking constantly. The mixture will steadily grow in volume.

5. Once all of the sugar syrup has been added, keep whisking for 5 to 10 minutes, until the bowl just feels warm to the touch. I find that if using an electric whisk, I whisk until the marshmallow is so thick I can't whisk the mixture anymore even on the highest power setting. The marshmallow will be very thick and sticky.

6. In a small bowl, sieve together the cornflour and icing sugar.  Sprinkle half of this on the base of the lined square tub. Sprinkle the blackberries on the base of the tin.

7. Lightly oil a spatula and use this to transfer the marshmallow into the container. Leave to set at room temperature for at least 6 hours (you want it really firm before you slice it!) - ideally leave it overnight.

8. Sprinkle the remaining of the icing sugar/cornflour onto a chopping board, and tip the marshmallow out onto this board.

9. Dip a sharp knife in hot water, dry, then slice the marshmallow into 25 pieces. After each cut, repeat the dipping and drying - this will give the cleanest slices.

10. Turn the marshmallow squares in any spare icing sugar/cornflour, so that all sides are covered.

11. Enjoy!

Blackberry marshmallows


Yum
Print This Recipe:

Friday 11 August 2017

French Chocolate Tart


This tart is inspired by French patisserie, and is ideal for those people who adore dark chocolate - packed full of flavour and the filling is incredibly smooth on the palette. This is the kind of dessert you can make for you/your partner, and not worry about the children wanting to steal any (at least that's how it was described to me). Use the best quality chocolate you can afford, but as long as it's 70%, the recipe will work :)

If you're like me and love orange chocolate, to give the tart an extra delicious note, you could add some orange zest to the filling and pastry.

The pastry can be trickier to work with than normal shortcrust, as it contains eggs and icing sugar. However, the taste makes up for it - the sweetness of the pastry really complements the deep bitterness of the tart filling. This pastry is blind-baked, meaning that it is baked first without any filling in it - this prevents the dreaded soggy bottom.

If you are worried about the soggy bottom, when you take the pastry out of the oven (before adding the filling), you can spread a thin layer of egg white over the case and bake for a few minutes - this adds an extra seal to 100% stop sogginess.

Serve this tart at room temperature, and serve small slices - it's incredibly filling!

To finish off the tart, I chilled some dark chocolate (about 20g) in the fridge until it was really cold. Then use a vegetable peeler or knife to scrape along the top of the chocolate bar. This will make nice scrapings to top the tart off.

The best kind of tart tin to use is a fluted loose-bottomed one, i.e. the bottom can be removed from the tin. Spring-form tart tins tend to brake and not being able to separate the sides from the bottom will make getting even slices very difficult.

Serves 20 (makes one 20cm tart).

Ingredients:

For the pastry (sweet sable):

  • 175g (1 cup) butter, cut into cubes
  • 75g (3/4 cup) icing sugar, sifted
  • 1 egg yolk
  • 250g (2 cups) plain flour
  • Finely grated zest of one orange (optional)


For the filling:

  • 500g (2 & 7/8 cups) 70% dark chocolate, chopped
  • 3 medium eggs
  • 200ml (4/5 cup) 4% (full fat) milk
  • 350ml (1 & 1/2 cups) double cream
  • Finely grated zest of one orange (optional)


To finish:

  • 1-2 tbsp icing sugar, for dusting
  • Dark chocolate shards (see above)
  • Zest of one orange
  • 1-2 tbsp flavourless oil (e.g. sunflower oil)


Method:

1. Prepare the pastry by creaming the butter and sugar together in a mixing bowl, until all of the butter has been incorporated and the mixture is light and fluffy. You could use a hand electric mixer for this.

2. Add the egg yolk, and the plain flour (and orange zest, if using), and either use a food processor or your hands to bring the dough into a bowl. If the dough seems very floury, add a tablespoon of cold water. Once the mixture is a smooth dough ball, cover in clingfilm and refrigerate for 30 minutes.

3. Prepare your 20cm fluted loose-bottomed tart case by greasing the base and sides with butter, then dusting with plain flour. Lie a piece of clingfilm on your work surface. Place the chilled dough on the cling film and place another layer of clingfilm on the dough. This allows you to roll the pastry out thin, without needing to add loads of extra flour.

4. Roll the dough out until it is about 1/2cm thick. You can check whether you have enough dough by placing the bottom of the tin over the dough and check there is enough dough to cover the base and an extra 3cm around the base. Once thin enough, remove the top layer of clingfilm. Pick the dough up carefully and flip into the tart tin (so that the remaining clingfilm is on top of the dough. Remove the clingfilm. Press the dough into the sides of the tart tin. Leave the trailing pastry, and trim off after baking.

5. Place back in the fridge for 15 minutes. Whilst chilling, preheat the oven to 180c (160c fan)/355f/gas mark 4.

6. Once chilled, line the tart with some greaseproof paper, and fill with baking beans/rice/flour. Place on top of another tray. Bake for 15-18 minutes, until the sides are golden. Carefully remove the paper and baking beans/rice/flour, then bake for another 5-10 minutes, until the base has gained a little colour and feels firm to the touch.

7. Whilst baking, make the filling. Melt the dark chocolate in a bowl over a pan of simmering water (making sure that the bowl doesn't touch the water!). In another saucepan heat together the milk and double cream until small bubbles are starting to form on the surface of the mixture. Try not to let the mixture boil so much it froths up.

8. Whisk the eggs briefly, then pour the milk/cream over the eggs whilst whisking. Once all of the milk has been added pass the mixture through a sieve onto the melted chocolate, and whisk until the mixture is smooth and a deep chocolate colour. Add the orange zest, if using.

9. Once the tart case is baked, open the oven door. Pour the filling into the tart (it's easiest to leave the tart on the tray. Close the door and then turn the oven off. Leave for 45 minutes until the oven and tart is cool.

10. Remove the tart from the oven, and take out of the tin. Combine the orange zest with the oil.

11. Dust with icing sugar and cut into slices. Top with a little orange zest/oil and chocolate shards, and serve.

12. Enjoy!


Yum
Print This Recipe:

Saturday 5 August 2017

Toffee Date Flapjacks

Toffee Date Flapjacks


I'm pretty into hiking at the moment, and on our long hikes, it's a good idea to make sure you have enough food :) Better yet that it tastes great to keep your mood up when the weather/terrain turns nasty. Porridge oats are a fantastic source of slow-release energy, and they shouldn't be overly messy to eat (unless you decided to make them extra sticky with a sauce or chocolate of course). Flapjacks are a quick and simple traybake, which seemed like an obvious choice for a high energy food.

I wanted something slightly different to the normal flapjack, which traditionally is just butter, white sugar, golden syrup and porridge oats. By switching the white sugar with  light soft brown sugar, and the golden syrup for treacle, you get a lovely deep toffee-like flavour. Dates are used in sticky toffee pudding to give the ultimate toffee hit, and add an extra dimension to these flapjacks.
If you're not taking these on a hike and don't mind them being sticky, you could dip these in caramel sauce for a decadent snack.

Makes 16-20 (fills one 20cm square cake tin)

Ingredients:

  • 150g (2/3 cup) lightly salted butter
  • 125g (3/5 cup) light soft brown sugar
  • 1 tbsp treacle
  • 1 tbsp ground cinnamon
  • 225g (1 cup) whole porridge oats
  • 100g (1/2 cup + 2 tsp) dates, pitted and chopped into 1cm cubes
  • 50g (1/4 cup) fudge, chopped into 1cm cubes (optional)


Method:

1. Preheat your oven to 200c (180c fan)/ 400f/ gas mark 6. Grease the base and sides of a 20cm cake tin (I used a silicon one, but a standard one would be fine). Dust lightly with flour.

2. Combine the salted butter, sugar, and treacle in a saucepan and heat, stirring occasionally, until all of the butter has melted.

3. Pour the porridge oats into a mixing bowl and add the cinnamon. Stir, then pour the melted butter/sugar mixture into the bowl. Stir until all of the oats have been coated.

4. Stir in the chopped dates and chopped fudge (if using). Pour into the prepared cake tin. Bake for around 15 minutes, until the top of the flapjacks are turning golden and the mixture doesn't shake when the tray is lightly moved.

5. Remove from the fridge and leave to cool. Turn out and cut into squares.

6. Enjoy!

Toffee Date Flapjacks

Yum
Print This Recipe: