Saturday 30 June 2018

My Favourite Milk Chocolate Brownies

Milk chocolate brownies


June has been a busy month! With work, studying and ultra-marathon training, I also managed to squeeze in a race involving 50 miles of cycling, a mountain run and a canoe. So that's my excuse for not being as up-to-date with my blog posts as I would like! However, my partner has also been training for the ultra, and is covering so many miles each week. Sometimes we both need a high carbohydrate and calorific treat, but with little time to go to the shops, I had to root through my cupboards to find something to bake.
Luckily I pretty much always have a stash of cheap chocolate (I get the supermarket own-brand), which I find great to use for simple bakes. We also had eggs, cocoa powder, butter and brown sugar. With all of these ingredients, I thought I'd have a go at milk chocolate brownies.

Milk chocolate brownies are usually quite a bit sweeter than the traditional (which tend to use the higher percentage cocoa solid dark chocolate). The addition of the cocoa, however, knocks back this sweetness, and the texture wasn't affected at all. The outside was lovely and crisp, with a soft centre that could still easily be cut. I added white chocolate chips to mine, but chopped walnuts would be amazing as well (sadly I had none in my cupboards).

I was really happy with the result, and if you wanted to serve this as a dessert, bake the brownies for 2 minutes less, so that they are a little gooier. Serve warm with some ice cream, and that'd be bliss!
The version I've baked are perfect as an afternoon treat, or as replenishment after a really hard run.

I also prepared and cooked these beauties in less than an hour, so no excuses...GO :)

Makes around 16

Ingredients:

  • 175g (1 cup) milk chocolate, chopped roughly
  • 175g (3/4 cup) softened butter (margarine will also work), plus 1 tsp for greasing
  • 3 eggs
  • 250g (1 & 1/3 cups) light soft brown sugar
  • 40g (1/3 cup) cocoa powder
  • 75g (1/2 cup) plain flour
  • pinch of sea salt
  • 60g (1/3 cup) white chocolate, chopped into chunks (or use chocolate chips)


Method:

1. Preheat your oven to 180c (160c fan)/355f/gas mark 4. Lightly grease the base and sides of a 20cm square cake tin, and line with baking parchment.

2. Place the milk chocolate and butter into a heatproof bowl, and place over a pan of simmering water. Make sure that the base of the bowl DOES NOT touch the water.

3. Stir regularly until all of the butter and chocolate have melted. Set aside for 5 minutes to cool.

4. Whilst the butter/chocolate are cooling, pour the eggs and sugar into the bowl of a stand mixer with a whisk attachment (or use an electric whisk). Whisk for 5 minutes (on a medium speed) or until the mixture has at least doubled in size and thickened.

5. Sift the cocoa and flour over the egg mixture, add the salt, and pour over the butter/milk chocolate mixture. Fold together until no more flour speckles can be seen.

6. Briefly fold in the white chocolate chips until fairly evenly spread through the batter.

7. Pour into the prepared cake tin. Bake for 25-30 minutes (or for 20-22 minutes if you want a super gooey centre), until the top is crisp and if you shake the tray a little, it only wobbles in the very centre.

8. Remove from the oven and leave to cool fully before slicing (unless serving warm with ice cream of course).

9. Enjoy!!

Keep these in an airtight container in the fridge, and they theoretically will last a good two weeks (but they are pretty moreish so they're not going to ever last that long in my household!)

Milk chocolate brownies
Yum
Print This Recipe:

Tuesday 26 June 2018

Pistachio Macarons

Pistachio Macarons


Here's another macaron recipe! This time it's quite a sophisticated one I think as the macarons are filled with a pistachio buttercream, which gives the macarons an extra nutty taste. You could also try finely grinding some pistachios and use 50% pistachio, 50% ground almond in the macaron mix, but I haven't had a go at this method yet (hopefully soon I'll give that a go!).

These need to be kept in an airtight container, and I think they are best eaten the day after baking, as the shells soften slightly and the flavour seems to intensify.

Ingredients:

For the macaron shells:
  • 160g (1 & 1/4 cups) ground almonds
  • 175g (1 & 1/2 cups) icing sugar
  • 4 (125ml/1/2 cup) medium egg whites
  • 165g (3/4 cup) granulated sugar
  • 50ml (3 tbsp and 1 tsp) water
  • Green food colouring (I used a concentrated gel)

For the pistachio filling:

  • 50g (1/3 cup) shelled pistachios
  • 1/4 tsp sea salt
  • 65g (1/3 cup) caster sugar
  • 55g (1/4 cup) softened butter
  • 2 egg yolks
  • 2 tbsp water

Method:

1. Place the ground almonds and icing sugar in a food processor (or high power blender) and blitz for 2-3 second bursts, until the mixture is very fine. Don't over blend the mixture as the almonds will start to turn to almond butter.

2. Sieve the almonds/icing sugar into a large bowl. Add 2 (60ml/1/4 cup) of the egg whites, and beat until a smooth paste is formed.

3. Heat the granulated sugar and water in a saucepan, stirring occasionally until the sugar has dissolved. Then stop stirring and place a sugar thermometer in the pan. In a grease-free bowl, add the remaining two egg whites. Once the sugar/water has reached 112C, start whisking the egg whites at a medium speed (I used a stand mixer and found this required less of my attention than a handheld).

4. Once the sugar/water syrup has reached 118C, the egg whites should be white and frothy (like shaving foam). Turn the stand mixer down to a low speed, then carefully pour the syrup onto the egg whites, whisking constantly. Be very careful not to touch the syrup as it is super hot! Once all of the syrup has been added, turn up the speed of the mixer to high and keep whisking until the mixture is shiny and forms peaks when the whisk is lifted from the mixture (this should take between 5 and 7 minutes).

5. Dip a toothpick into the violet food colouring and then dip into the meringue mixture. Whisk briefly. Add more food colouring until you have the desired green colour.

6. Use a metal spoon to fold a third of the egg white mixture into the almond/sugar paste. Once incorporated, gently fold in the remaining egg whites.

7. Fill a piping bag with the macaron mixture, and cut off 1cm from the end (or use a large round nozzle). Grease and line four baking trays with parchment paper and hold the piping bag vertically above where you want to pipe. Pipe directly down onto the tray until you have a circle 3cm wide (or whatever shape you like - I also like making rectangles so that they look like mini eclairs). Repeat across the trays, leaving about a 1&1/2cm gap between each macaron shell.

8. Tap the tray on the surface a few times, then leave at room temperature for 30 minutes to an hour, until a "skin" has formed on the macarons - this means that when you gently touch the macaron, no mixture goes on your finger.

9. Preheat the oven to 170c (150c fan)/ 340F/ gas mark 3. Before you place the baking trays into the oven, tap the trays against the surface again. This gives the perfect "foot" of macarons. Bake the macarons for 10-12 minutes - keep an eye on them after 8 minutes in case they are browning too much. Remove the macarons from the oven and transfer the macarons (with the baking paper still attached) to a wire rack to cool.

10. To make the pistachio filling, place the pistachios and salt in a high-speed blender/food processor with around 1 tsp water. Pulse until the mixture becomes a smooth butter, adding teaspoons of water if the mixture isn't coming together.

11. Pour the caster sugar and 2 tbsp water into a saucepan. Bring to a boil and cook until the temperature reads 120c/250f on a sugar thermometer.

12. Start whisking the egg yolks using an electric whisk or in the bowl of a stand mixer. Once the sugar/water gets to 120c/250f, gently pour over the egg yolks, continuously whisking on a low speed (to prevent splashing).

13. Once all of the sugar syrup has been added, turn the speed of the whisk up to medium, and whisk for 5-10 minutes, or until the temperature drops to 40c/104f.

14. Chop the butter into 1cm cubes, and add a few cubes of butter at a time to the buttercream whilst whisking. Once you can no longer see the butter cubes, add another 2-3 cubes. Keep going until you have used up all of the butter and the mixture is light.

15. Add the pistachio paste and whisk in to combine. Once well mixed, transfer to a piping bag.

16. Once the macarons have cooled, flip half over and pipe about 2 tsp worth of filling on each flipped shell. Top with an un-flipped shell.

17. Enjoy!!

Pistachio Macarons


Yum
Print This Recipe:

Monday 25 June 2018

Race Day Chocolate Flapjacks

Race Day Chocolate Flapjacks


I'm currently in training for an ultra-marathon, and on the long runs, I need high energy, tasty treats to keep me going. I had a go at some chocolate flapjacks the other day and added a scoop of my favourite caramel protein powder (from the Myprotein True Whey selection) to the mixture. The result was pretty amazing! Not too sweet, with enough chew to feel like you were eating something (rather than just consuming electrolyte gels and Lucozade), but not so much as to cause issues whilst running. Plus with the porridge oats, they are a great source of slow release energy, and the sugar/chocolate gives the quick burst of energy you need to pep o

I filled my flapjacks with dark chocolate chips, but you could use desiccated coconut, dried fruit or nuts if you prefer.

Makes 24 small squares

Ingredients:

  • 250g (1 cup) porridge oats
  • 125g (2/3 cup) light soft brown sugar
  • 3 tbsp golden syrup
  • 1 scoop (around 30g) protein powder
  • 125g (1/2 cup) butter/margarine
  • Pinch of sea salt
  • 100g (2/3 cup) dark chocolate chips
  • 2 tbsp white chocolate chips

Method:

1. Preheat the oven to 200c (180c fan)/390f/gas mark 6. Lightly grease the base of a 20cm square cake tin (I used a silicone one, but any ovenproof dish should be fine), and line with baking parchment.

2. In a saucepan, melt together the brown sugar, golden syrup and butter/margarine. Once all of the butter has melted, set aside for 10 minutes to cool.

3. Pour the porridge oats, salt and protein powder into a mixing bowl and pour over the butter mixture. Use a wooden spoon to combine, until you have one sticky dough.

4. Pour in the dark chocolate chips and stir briefly to distribute.

5. Spoon the flapjack mixture into the cake tin and smooth out. I found this easiest using a metal fork - it'll be about 1/2 inch/ 1.5cm thick.

6. Sprinkle the top with the white chocolate chips. Bake for 12-15 minutes until it's a deep golden brown - due to the brown sugar and chocolate, it may look darker than your traditional flapjack.

7. Leave to cool, before turning out and slicing into squares.

8. Store in an airtight container.

9. Enjoy!

Race Day Chocolate Flapjacks

Yum
Print This Recipe:

Tuesday 5 June 2018

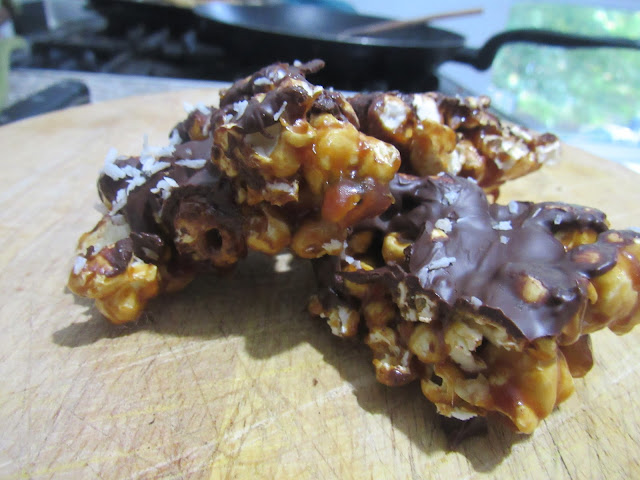
Vegan Caramel Popcorn Bites

Vegan Caramel Chocolate Popcorn Bites


Now I've said in previous posts how I try to avoid double cream where possible, as it doesn't agree with me (and I've never been a fan of the taste, to be honest). So, when I had a spare can of coconut in my pantry, I wondered whether I could make a nice-tasting caramel using the cream from the can. To separate the cream from the water in the can, place the can in the fridge for around 12 hours. You can then scoop out the cream. Or, if the weather is chilly, the cream may well settle on top in your pantry (mine do in winter).

The coconut cream made a lovely caramel sauce, which had the perfect pouring consistency. If you don't like the taste of coconut, I wouldn't recommend this, but otherwise, it really is worth giving a go.

To make the caramel really sing, I used it to make popcorn bites - which are really simple to make and a tasty biscuit jar treat :)

These can easily be made completely dairy-free/vegan by using a dairy-free chocolate :)

Makes 24 popcorn bites

Ingredients:

  • Cream from one tin of full-fat coconut milk (chill the can for 12 hours and the cream will rise to the top of the tin) - around 1 cup/240ml
  • 150g (3/4 cup) light soft brown sugar
  • Pinch of salt
  • 85g (1/3 cup) popcorn kernels
  • 1 tsp coconut oil
  • 90g (1/2 cup) milk chocolate (dairy free if you're making these vegan-friendly)

Method:

1. To make the caramel sauce, pour the brown sugar into a saucepan and place on a low heat.

2. Heat the sugar, stirring occasionally, until the sugar has all melted.

3. Add the coconut cream and salt, and whisk in until smooth. Bring the mixture to a boil and heat for 8-10 minutes, until the mixture has thickened (and coats the back of a spoon).

4. Place the teaspoon of coconut oil in a large pan, and place on a medium heat. Once the oil has melted, pour in the kernels, and cover the pan.

5. Keep the pan on the heat until the popping sound of popcorn stops. At this point, take the pan off the heat and set aside for 5 minutes to cool down.

6. Carefully transfer the cooled popcorn into a fresh bowl, throwing away any unpopped kernels.

7. Lightly grease and line a 20cm square silicon tray with greaseproof paper.

8. Pour the caramel sauce over the popcorn - if the caramel sauce has become too thick, heat for few seconds in the microwave to loosen. Stir well to evenly coat the popcorn with the caramel.

9. Place in the fridge for 30 minutes to set.

10. Melt the chocolate by breaking into chunks and placing in a heatproof mixing bowl. Place in a microwave and heat on full power for 30-second bursts, stirring well after each burst, until all of the chocolate has melted.

11. Pour the melted chocolate into a piping bag and snip off the end.

12. Drizzle the chocolate over the popcorn caramel. Place in the fridge to set for at least 1 hour.

13. Cut into squares.

14. Enjoy!

Vegan Caramel Chocolate Popcorn Bites
Yum
Print This Recipe: