Saturday, 29 December 2018

My Favourite Christmas Cake


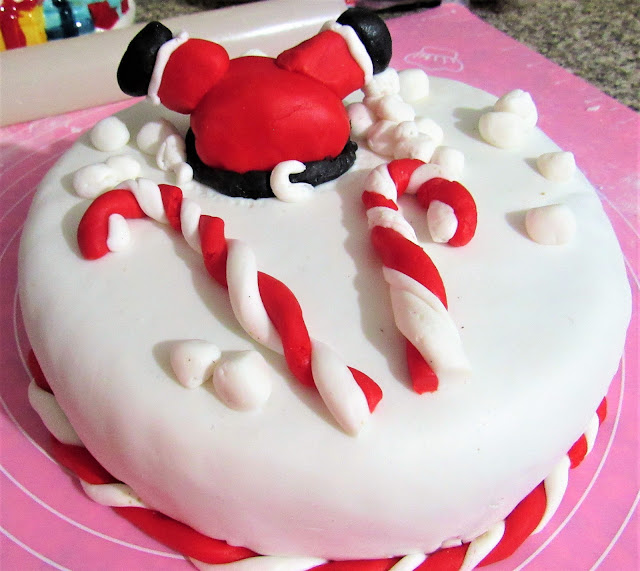
Christmas Cake Santa

Christmas Cake Slice

Hope everyone had a great Christmas. The Christmas cake I baked this year was my favourite yet, and so I thought I'd share my recipe :) I baked this about 4 weeks before Christmas, and it was packed full of flavour and super moist.

I covered the cake with a layer of marzipan and fondant icing, and then attempted to make a Santa and snowballs :)

Makes one 20cm cake

Ingredients:

For the cake mix:

  • 200g plain flour
  • 1 tbsp ground almonds
  • 1/2 tsp bicarbonate of soda
  • 1 tsp mixed spice
  • 1 tsp ground cinnamon
  • 1/4 tsp ground nutmeg
  • 1/4 tsp salt
  • 150g butter/margarine softened
  • 120g soft dark brown sugar
  • Finely grated zest of one orange
  • Finely grated zest of one lemon
  • 15g black treacle
  • 25g fine-cut marmalade
  • 3 eggs
  • 45ml (3 tbsp) brandy
  • 25ml dark rum

For the fruit mix:
  • 140g dried currants
  • 380g sultanas
  • 100g dried apricots, roughly chopped
  • 95g chopped dried dates, roughly chopped
  • 75g dried prunes, roughly chopped
  • 75g glace cherries - halved
  • 100g mixed peel
  • 75ml dark rum
  • 75ml brandy

Method:

1. 24 hours prior to baking, soak all of the dried fruits in 75ml of rum and 75ml brandy. Cover and leave at room temperature until ready to bake.

2. Preheat your oven to 160c (140c fan)/320f/gas mark 3. Grease and line the base and sides of a 20cm cake tin with two layers of greaseproof paper.

3. Sift together the plain flour, ground almonds, bicarbonate of soda, spices and salt.

4. Cream together the butter and sugar with the lemon and orange zest until light and fluffy. 

5. Add the treacle and marmalade and beat again to combine. 

6. Beat in 2 of the eggs with a tablespoon of the flour mixture, followed by the rest of the flour mixture. Mix until just combined, and then fold in the soaked fruit mixture.

7. Fold in the remaining egg, and then pour into the prepared cake tin. Bake for between 2 and 2.5 hours, until firm to the touch and a skewer inserted into the centre of the cake comes out clean.

8. As soon as the cake is out of the oven, brush the rum and brandy all over the surface of the cake and leave to cool. Once completely cool, wrap in cling film/place in an airtight container until ready to decorate.

9. Enjoy!

Christmas Cake Santa
Yum
Print This Recipe:

Saturday, 22 December 2018

Simple and Delicious Chocolate Fudge

Chocolate Fudge


This fudge is the perfect last-minute addition to a Christmas hamper. Provided you have a large saucepan and a sugar thermometer, it's really simple and is incredibly smooth and delicious.
Use a much larger saucepan than the mixture looks like it needs (I used a large stock pot) - it bubbles up like crazy, so the bigger the pan, the less you have to worry about making a mess/having to take the pan off the heat constantly for fear of causing that mess.

Makes around 24 pieces of fudge

Ingredients:

  • 300ml whole milk
  • 350g caster sugar
  • 100g unsalted butter, cut into cubes
  • 1 tsp ground ginger (optional)
  • 1 tsp vanilla extract
  • 100g dark chocolate (I used 55% but you could go darker if you like), finely chopped

Method:

1. Grease and line the base of a 20cm square tin (I used a silicon-one but a standard cake tin would work fine, or even a sandwich tub) with baking parchment.

2. Pour the milk, sugar and butter into a large saucepan and bring to the boil, stirring regularly. Once boiling, continue stirring and checking the temperature of the mixture. It will take about 15 minutes for it to reach 115c/239f.

3. Once the mixture reaches 115c/239f, take off the heat and leave to cool for 5 minutes. Add the chopped chocolate, ginger and vanilla extract and stir until melted.

4. Continue to stir the mixture whilst it cools - it will begin to thicken and come away from the sides of the pan. Keep beating until it loses its glossy appearance (it starts to go a matt brown colour).

5. Pour into the prepared tin/tub and smooth. Leave to cool to room temperature before slicing into squares. Store in an airtight tub :)

6. Enjoy!

Chocolate Fudge
Yum
Print This Recipe:

Sunday, 16 December 2018

Pistachio and Cranberry Stollen

Pistachio and Cranberry Stollen

Pistachio and Cranberry Stollen Whole


This is an upgrade of the classic Stollen - sometimes with a bake, I wonder whether the time it takes to make/bake is worth it when alternatives can be bought in shops. This is a classic example of when it definitely is worth it! I made a pistachio and hazelnut marzipan (instead of the classic almond one), and it lifts the stollen to a different level. This was going to be pure pistachio to be honest, but I didn't buy enough so I supplemented with hazelnuts, and it worked beautifully! The dough is also heavily spiced with mixed spice, and filled with cranberries and mixed dried fruit. Perfect to serve at Christmas.

I want to try making individual stollen, so if I get around to that, I'll do a post showing those soon. Here, I made a wreath, which I think worked pretty effectively.

Makes one wreath (easily serves 12)

Ingredients:

For the dough:

  • 300g strong white bread flour
  • 2 tbsp mixed spice
  • 7g fast action dried yeast
  • 1 tsp finely ground sea salt
  • Zest of one lemon
  • Zest of one orange
  • 75g butter/margarine, melted
  • 150ml milk (I used skimmed milk, but any would work), lukewarm

For the pistachio and hazelnut marzipan:

  • 150g pistachios (unshelled)
  • 50g hazelnuts
  • 200g icing sugar sifted
  • 1 egg

For the filling/topping:

  • 100g dried cranberries
  • 100g dried mixed fruit (mine was a mix of raisins, sultanas and mixed peel, but you could use whatever your favourite dried fruit is)
  • 25g butter/margarine

Method:

1. Prepare the dough. Pour the flour into a large mixing bowl in a stand mixer fitted with a dough hook if you have one (if not, this dough is fine to be worked by hand, just knead for an extra 5 minutes). Pour the yeast on one side of the bowl, and the mixed spice, salt, lemon and orange zest on the other side. Stir briefly to mix.

2. Pour over the melted butter and milk. Turn the stand mixer on and leave to knead for around 10 minutes (or if doing by hand, 15 minutes), until it is springy to the touch. Cover the bowl with clingfilm and leave in a warm place for at least 90 minutes, until it has doubled in size).

3. Meanwhile, make the pistachio and hazelnut marzipan (this is really simple don't worry!). Finely blend the pistachio and hazelnuts (I used a nutribullet, but a food processor or even a pestle and mortar will work). Add the icing sugar and egg and blend until the marzipan is fairly smooth (I like a bit of texture so left it a little chunky, but that's optional). Chill until ready to use.

4. Place a layer of cling film on your surface and dust with plain flour. Tip the dough out onto this surface and roll until it is 60cm long and 20cm wide.

5. It's now time to spread the marzipan - this is tricky as the marzipan is very sticky, but I found the easiest way was to spoon blobs of marzipan all over the surface. Then I laid over some clingfilm and then spread out the marzipan over the whole dough (leaving a 1-2cm gap around the edges) - this seemed to work for me. Alternatively, if the marzipan has firmed up in the fridge, you could roll the marzipan out between two sheets of clingfilm and tip this onto the dough.

6. Sprinkle over the dried cranberries and mixed dried fruit.

7. Roll the dough up from the long edge as tight as you can. Once finished, turn so the seam is at the bottom.

8. Use a sharp knife to slice along the middle of the "log", leaving a 3-4cm gap at one end of the log. Place the right side of the log over the left side, and move the left side to where the right side was - effectively twisting the dough. Repeat until you have reached the end of the dough. Shape into a wreath and transfer to a baking tray lined with baking parchment. Cover and leave to prove for around 1 hour.

9. Preheat the oven to 180c (160c fan)/355f/gas mark 4. Bake the stollen for 22-25 minutes until nice and golden. Once out of the oven, brush over the 25g melted butter and cover with a clean tea towel to cool.

10. Enjoy!

Pistachio and Cranberry Stollen
Yum
Print This Recipe:

Sunday, 2 December 2018

Gingerbread Mince Pies

Gingerbread mince pie

It's nearly Christmas!!! Well, okay...not really, but it is now December, meaning I can make Christmas related bakes without feeling a bit silly.

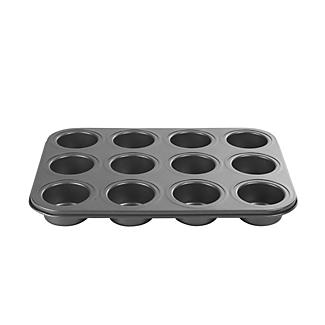
I made these yesterday (aka 1st December) and I know for sure I'll be making more batches in the run-up to Christmas - really simple mince pies, with a few twists. I use a special tin I bought from Lakeland, which is meant for making individual mini sandwich cakes - here is the link to the Lakeland page, and I've copied a picture of the tin below. I like using these as it means I can pack the pies full of mincemeat and keep the pastry nice and tin. You could instead use a deep muffin tin :)
My Kitchen 12 Cup Mini Sandwich Tin alt image 1
I spiced the pastry with ginger and cinnamon to give a gingerbread feel and added chopped satsuma and apple to the mincemeat (which was storebought, but you could make your own - here's my recipe from quite a few years ago now) to freshen it up.

This made 12 mince pies.

Ingredients:

For the pastry:

  • 380g (3 cups) plain flour
  • 90g (6 tbsp) icing sugar
  • 2/3 tsp salt
  • 1 tbsp ground ginger
  • 1 tbsp ground cinnamon
  • 180g (9 tbsp) butter, chilled and cubed
  • 2 egg yolk
  • 4 tbsp water

For the filling:

  • 1 x 400g good quality mincemeat (I used Tesco Finest, which was delicious!)
  • 1 Braeburn (or similar) apple, roughly chopped
  • 1 satsuma, peeled and roughly chopped
To finish:
  • 1 egg
  • Sprinkle of granulated sugar (around 2 tbsp)

Method:

1. Grease the mini sandwich cake tin or deep muffin tin with butter.

2. Sift together the flour and icing sugar into a large mixing bowl, then stir in the salt, ground ginger and cinnamon.

3. Add the butter and rub into the flour mixture, until the mix resembles breadcrumbs. Add the egg yolks and water and bring the dough together into a ball. Take two-thirds and roll out between two layers of clingfilm until it is a few mm thick. Use a 10cm circular cutter to cut out circles, and gently press these into the tin. If there are any rips, use the spare dough to patch it up. 

4. Place the pastry in the fridge to firm up for around 20 minutes, whilst you prepare the filling.

5. Preheat the oven to 180c (160c)/430c/gas mark 6. 

6. Mix together the chopped apple, satsuma and mincemeat until well combined. Spoon into the moulds - you should get about 2 tbsp of filling into each pie. Place back in the fridge whilst you prepare the rest of the pastry.

7. Roll out the remaining third of pastry until it is a few mm thick. I used a small gingerbread man cutter to cut out little gingerbread men to top each pie. You could do this, or use another cutter like a star, heart, tree, or anything you want really - you could also just do a circle, but it the top is fully enclosed, you need to poke a small hole in the top of the pie to prevent bursting of the pie during cooking.

8. Top the pies with the toppers (gingerbread men, stars etc.). If you want, you can then cut thin strips of the spare dough and used this to line the top of each pie to get a neat edge. If you do this, gently press the strips to seal to the sides of each pie.

9. Beat the egg, and lightly brush over the top of each pie. Bake for around 15 minutes, or until the tops are nice and golden. Once out of the oven, sprinkle over the sugar. Leave to cool for around 10 minutes before taking out of the tins. These are amazing warm but also can be eaten at room temperature.

10. Enjoy!


Gingerbread mince pie
Yum
Print This Recipe:

Sunday, 25 November 2018

Roasted Almond and Cranberry Biscuits

Roasted almond cranberry biscuits

I'm a bit behind on bakes this month :( It's been very busy with training and studying (as well as planning some Christmas bakes) - however, I had time to try out these biscuits a few hours ago. Oaty biscuits with orange-soaked cranberries and roasted almonds - they're a grown-up (i.e. not too sweet) biscuit, perfect with a cup of tea. My partner approves (and he's a tough critic when it comes to biscuits!), and I've been told I have to make them again :-)

Once baked and cooled, these will keep in an airtight container for around a week.

Makes around 20 biscuits

Ingredients:

  • 175g whole almonds (unpeeled)
  • 225g softened butter
  • 100g light soft brown sugar
  • 90g wholemeal flour
  • 150 porridge oats
  • 1/4 tsp salt
  • 100g dried cranberries, soaked in 2 tbsp orange juice for at least 2 hours

Method:

1. Preheat your oven to 180c (160c fan)/355f/gas mark 4. Line a baking tray with baking parchment and pour over the almonds. Bake for 10 minutes and then set aside to cool fully.

2. Chop the roasted almonds into pieces around 1cm in size.

3. Turn the oven up to 190c (170c fan)/375f/gas mark 5, and line two baking trays with baking parchment.

4. Cream together the butter and the light soft brown sugar for a few minutes, until all of the sugar has dissolved and the mixture is light and fluffy.

5. Add the flour, oats, salt, roasted almonds and cranberries and bring the mixture together into a ball.

6. Wrap in clingfilm and chill for around half an hour.

7. Dust your surface with a little flour, and then roll the dough out until it is around 1/2-1cm thick - it will never be perfectly level due to the almonds.

8. Use a 7cm round cutter make your rounds of biscuit, and then gently transfer to a baking tray lined with baking parchment.

9. Bake for 12-14 minutes, until the edges are starting to brown. Leave to cool for a few minutes, and then transfer to a wire rack to cool fully.

10. Enjoy!

Roasted almond cranberry biscuits
Yum
Print This Recipe:

Sunday, 11 November 2018

Nutty Treacle Tart with Crystallized Sage

Nutty Treacle Tart Slice


This treacle tart is amazing. It's not your classic super sweet golden-syrup filling but contains proper black treacle with brown sugar and plenty of nuts. Deep, rich and satisfying, this will last for several days in your fridge. I topped the tarts with crystallized sage but this is completely optional. The sage is VERY strongly flavoured so don't go eating a whole crystallized leaf at one (unless you like the flavour of soap that is).

Makes one 20cm tart (8 large slices)

Ingredients:

For the pastry:
  • 200g (1 cup) plain flour
  • 120g (1/2 cup + 1tsp) cold butter
  • 2 tbsp caster sugar
  • 1/4 tsp salt
  • 1/2 tsp white wine vinegar
  • 3 tbsp ice-cold water
For the filling:
  • 175g (2 cups) nuts (I used a mixture of walnuts and hazelnuts, but pecans or macadamias would be lovely also)
  • 110g (2 cups) wholemeal bread, crustless
  • 50g (1 cup) bran flakes
  • Zest of one orange
  • 120g (1/3 cup) black treacle
  • 200g (10 tbsp) golden syrup
  • 1/2 tsp salt
  • 1/2 tsp ground cinnamon
  • 2 tbsp butter
  • 100ml (2/5 cup) double cream
  • 2 eggs
For the crystallized sage leaves (optional):
  • 8 sage leaves
  • 1 egg white
  • 2 tbsp caster sugar
Method:

1. If making the sage leaves, lightly whip the egg whites until frothy. Lay the sage leaves on a wire rack and brush each side of the leaf with the egg white. Sprinkle liberally with the sugar and leave to dry. Depending on the temperature/dryness of your kitchen this can take at least 8 hours so it might be best to do this the day before you want to bake the tart.

2. Prepare the pastry by sifting the plain flour into a large bowl, and stir in the caster sugar and the salt. Chop the butter into small chunks (about 1cm cubes) and add to the bowl.

3. Rub the butter into the flour mixture until the mixture resembles fine breadcrumbs.

4. Add the white wine vinegar and ice cold water and bring the dough together into a smooth ball. Try not to overwork the dough - as soon as it forms a ball, stop working. Cover in cling film and place in the fridge and chill for at least one hour (it can stay in the fridge for a few days provided it is well covered).

5. Lay out a piece of clingfilm on your counter and place the chilled dough on top. Cover with another piece of cling film and roll the dough out until it is about 5mm thick.

6. Lightly grease a loose-bottomed 20cm fluted tart tin with butter and dust with flour. Carefully transfer the dough to the tin and press into all of the corners. Leave the overhanging pastry for now. Cover with clingfilm and return to the fridge for at least half an hour.

7. Preheat your oven to 180c (160c fan)/355f/gas mark 4. Line a baking tray with baking parchment (or kitchen foil) and spread out your choice of nuts. Once the oven has pre-heated, roast the nuts for 8-10 minutes (until the nutty fragrance is wafting out of the oven). Set aside to cool.

8. Place a layer of baking parchment on the pastry dough and fill the case with ceramic baking beans, or I tend to use spare flour/rice. Bake for around 20 minutes, or until the sides of the pastry are golden brown.

9. Remove the tart case from the oven and gently remove the baking parchment with the baking beans/flour. Bake for another 8 minutes.

10. Whilst baking the tart case, prepare the filling by pouring the bread, bran flakes, and 100g of the nuts into a food processor, and blitz to a fine crumb. Stir in the orange zest.

11. In a small saucepan melt together the butter with the golden syrup and treacle, until the butter has melted and the syrup has become very loose.

12. Pour the syrup mixture over the crumbs, and combine. Add the two eggs and double cream and whisk until smooth. Finally, roughly chop the remaining 75g of the nuts and fold these through the filling.

13. Once the tart has finished cooking, remove from the oven. Trim off any excess pastry overhanging the tart case, and then carefully pour over the filling. Return to the oven for 18 minutes until it has just set.

14. Remove from the oven to cool for around 20 minutes, if you want to serve the tart warm (with some ice cream perhaps). This tart also tastes great at room temperature.

15. When ready to serve, top the slices with a crystallized sage leaf (if using).

16. Enjoy!

Nutty Treacle Tart Slice
Yum
Print This Recipe:

Sunday, 4 November 2018

GBBO 2018 Week 9 - Patisserie - Cherry Chocolate Millefeuille


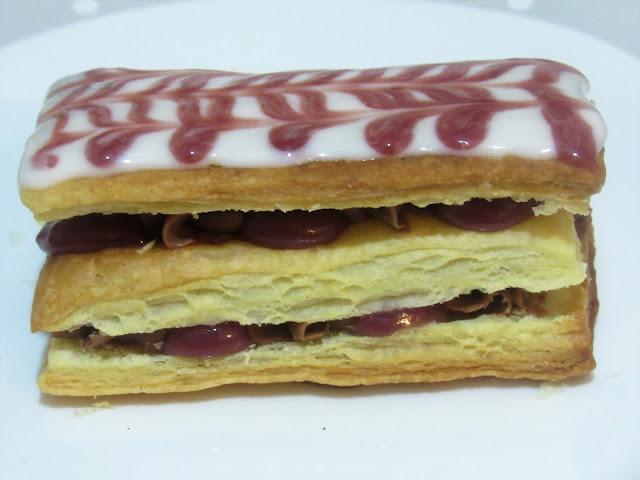
Cherry Chocolate Millefeuille


I've got a little behind on my Bake Off posts this year :( These Mille Feuille are my take on one part of the showstopper from the semi-finals of GBBO 2018. I made my own rough puff pastry and filled layers of puff with a cherry chocolate ganache and cherry curd, then iced the top layer of puff pastry to give a neat finish.
These are the perfect showstopper dessert to serve at a dinner party, but once assembled, they ideally need to be eaten the same day - one workaround for this is to make all the components (puff pastry, curd and ganache) the day (or a few days) before, and assemble just before you need them :)
I made my ganache dairy-free (as I find cream overrides the chocolate flavour and makes the ganache too rich).

Makes 12

Ingredients:

For the puff pastry:

  • 250g '00 plain flour
  • 250g butter, frozen (to enable grating)
  • 1/2 tsp salt
  • 125ml cold water

For the cherry curd:

  • 140g (1 cup) frozen cherries
  • 115g (1/2 cup) caster sugar
  • 1 tbsp lime juice
  • 3 egg yolks
  • 4 tbsp butter

For the cherry chocolate ganache:

  • 200g milk chocolate (dairy-free)
  • 100g dairy-free sunflower margarine
  • 150g icing sugar
  • 2 tbsp hazelnut milk
  • 2 tbsp cherry liqueur (or concentrated cherry syrup)

For the icing:

  • 100g icing sugar
  • 2-3 tbsp hazelnut milk

Method:

1. Prepare your ruff puff pastry. Sift the flour into a large mixing bowl and grate over the frozen butter and add the salt. Mix together with your fingertips until all of the butter has been coated in flour.

2. Slowly pour over the water, and bring the dough together into a ball - try not to overwork the pastry.

3. Dust your work surface with flour, and tip your dough onto the surface. Roll out to a rectangle about 40 x 20cm in size. With the long edge facing you, fold the right third over the middle of the dough, and the left third on top of it (like making an A4 leaflet). Cover in clingfilm and chill for 20 minutes.

4. Unwrap the dough, turn so the long edge is facing you, and then roll out the dough to a 40 x 20cm rectangle. Fold as in step 3. Turn the dough 90 degrees (a quarter turn) - so the long edge is again facing you - and roll and fold again. Cover in cling-film and chill for 30 minutes.

5. Repeat the rolling and folding twice more, and chill for a final 30 minutes (this can be chilled overnight if very short on time).

6. Meanwhile, make your fillings. To make the cherry curd, place the cherries, lime juice and sugar into a saucepan, and place on a medium heat. Leave to cook for 3-5 minutes, until the cherries have fully broken down.

7. Press the mixture through a sieve (to remove and cherry skins) into a bowl. In a separate bowl whisk the egg yolks, and pour over the cherry mixture, whisking constantly.

8. Return to the pan on a low heat, stirring constantly for around 5 minutes, until the curd has started to thicken. Add the butter, one tablespoon at a time, and continue to cook for a minute or so, or until the curd is thick enough to cover the back of a spoon. Pour into a bowl, and leave to cool to room temperature. Cover, and place in the fridge until ready to use.

9. Make the cherry chocolate ganache, by melting the milk chocolate and margarine in a saucepan over a low heat. Once melted, pour into a mixing bowl and leave for a few minutes to cool slightly.

10. Sift over the icing sugar, then add the hazelnut milk and cherry liqueur/syrup. Beat until the mixture is thick and glossy - if it's too stiff, add more milk or cherry liqueur (depending on how strong a cherry kick you want in the ganache), and if it's too loose, add more icing sugar, a tablespoon at a time. Cover and chill for at least an hour - if at this point it is still very runny, add more icing sugar until it would be firm enough to pipe.

6. Preheat your oven to 220c (200c fan)/430f/gas mark 7. Grease and line baking tray with baking parchment.

7. Roll the puff pastry out on a floured surface until it is a rectangle about 33 x 30cm in size. Cut into 18 rectangles, 11cm x 5cm. Transfer to the lined baking tray. Place any rectangles that don't fit onto the tray back in the fridge whilst the first batch bakes.

8. Cover the tray with another layer of baking parchment, and top with another tray. Bake for 25 minutes, until golden brown, then leave to cool fully.

9. To make the icing, sift the icing sugar into a bowl, and add the hazelnut milk, one teaspoon at a time until the icing is thick enough to pipe.

10. To assemble, slice each rectangle into two (to get to 36 rectangles of puff pastry). Place one rectangle cut side up on your work surface. Pour the cherry curd into one piping bag, and the ganache into another. Pipe "blobs" of curd and ganache over the puff pastry layer (about one teaspoon's worth of ganache/curd per blob). Top with a second layer of puff pastry, and add more ganache and curd. Top with the final layer of puff pastry (cut side DOWN).

11. Gently smooth the icing on top of the final layer of puff pastry so that it just reaches the edges of the rectangle. Across the short edge of the rectangle, pipe thin lines of cherry curd, and lightly drag the back of a spoon through the lines to create a feathering effect. Leave for around 10 minutes (until the icing has started to set), and then serve.

12. Enjoy!

Cherry Chocolate Millefeuille
Yum
Print This Recipe:

Wednesday, 24 October 2018

GBBO 2018 Week 8 - Danish - Cumberland Rum Nicky Danish Swirls

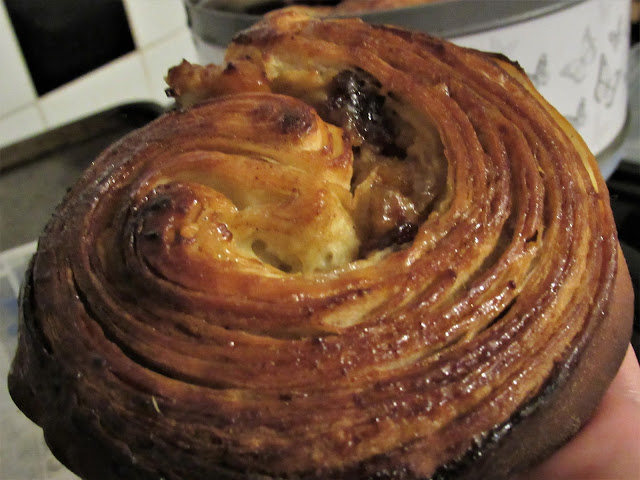
Danish Cumberland Rum Nicky


For the quarter-final of GBBO 2018, the bakers were tasked with three Danish bakes. The signatures were Danish open sandwiches, made from rye bread. Although I want to make rye bread someday, it wasn't really enticing me last weekend. The technical challenge looked simple enough but required a fancy pan - Aebleskiver - like doughnuts with an apple and cinnamon filling.

I decided to instead make a basic version of the showstopper - kagekone - a Danish birthday "cake", where Danish pastries are shaped to be a boy or a girl. Some of the baker's creations were really impressive, I particularly loved the appearance of Kim-Joys. Due to time constraints and being unsure whether the recipe would work, I decided to make the Danish pastries only. I have made Danish pastry once previously - two years ago in fact (see here for the White Chocolate and Blueberry Danishes I baked then) - but I thought I'd try out one of the baker's recipes, and see if I had better results.

I filled the swirls with a filling I made a few years ago for a technical bake made in the tent - Cumberland rum Nicky (see link here for that recipe). This tart has a filling of dates, ginger and apricots with lots of spiced rum, and I remembered it really packed a punch of flavour. To add a more traditional note, before spreading over the spiced rummy fruits, I made a creme patissiere and spread that on first.

I used Briony's recipe for the dough itself, with one alteration (because I can't read recipes sometimes...). The dough was lovely to work with, and I think they worked really well! I checked on them in the oven after 12 minutes, and they'd already gone a bit browner than ideal, and so I covered them with foil and baked them for 8 more minutes. Next time, I'll check them sooner, but I don't think they're so dark to be unappealing :)

The pastries taste amazing - I was pretty impressed with the lamination! They've so far kept for 4 days without going soggy/stale, and this is definitely a recipe I'll return to (and maybe make the whole Kagekone one day!).

Makes 12

Ingredients:

For the dough:
  • 345g strong white bread flour 
  • 35g caster sugar 
  • 2 tsp fast-action dried yeast  
  • 1 tsp salt 
  • 240g butter, chilled 
  • 125ml whole milk 
  • 50ml warm water 
  • 1 large egg 
  • 1/2 tsp vanilla extract 
For the rum Nicky filling:
  • 125g dried dates, pitted and coarsely chopped
  • 50g dried apricots, coarsely chopped
  • 25g crystallised ginger, finely chopped
  • 30ml (2 tbsp) spiced dark rum
  • 25g soft dark brown sugar
For the creme patissiere:
  • 50g caster sugar 
  • 1 tsp ground ginger 
  • 2 egg yolks 
  • 20g cornflour 
  • 250ml whole milk 
For the glaze:
  • 3 tbsp granulated sugar
  • 6 tbsp water

Method:

1. Make the dough. Sift together the flour, sugar,  yeast and salt into the bowl of a stand mixer (with the dough hook attachment), and stir briefly. Add 1 tbsp (15g) of the butter and rub in until there are no lumps left.

2. In a jug, whisk together the egg, milk, water and vanilla, then pour over the flour mixture. Turn the stand mixer on to a low speed and knead for 5 minutes, until the dough is smooth and sticky.

3. Halve the remaining butter and roll out between two sheets of baking parchment (or clingfilm) to a rectangle around 15 x 23cm. Place in the freezer, and then repeat with the other half of the butter.

4. Flour your work surface, then tip the dough out onto it. Dust with flour and then roll out the dough to a rectangle roughly 30cm x 60cm. Turn so the long side is closest to your body.

5. Unwrap one of the halves of butter and place in the centre of the rolled out dough. Dust off any excess flour from the dough, then fold the right side over the butter. Dust off excess flour, and then fold over the left side. Seal so that no butter is visible.

6. Turn the dough 90 degrees, and then roll out to a rectangle 30cm x 60cm. Place the remaining half of the butter in the centre of the rolled out dough, and cover the butter with the dough as in step 5.

7. Turn the dough 90 degrees and again roll out the dough to a rectangle around 30 x 60cm. Fold one-third of the dough into the centre, and then fold the other third on top (like if you make an A4 leaflet). Cover with cling film and freeze for 20 minutes.

8. Whilst the dough is chilling, make your fillings. To make the rum Nicky filling, pour the dates, crystallized ginger, dried apricots into a bowl along with the rum and brown sugar. Stir to ensure all of the sugar has dissolved and then set aside.

9. To make the creme patissiere, place the egg yolks, sugar, cornflour, and sugar into a small bowl and whisk until well combined. Meanwhile, heat the milk in a saucepan until it is lightly simmering.

10. Whilst whisking, pour the milk over the egg mix. Once all of the milk has been added, return to the pan and cook for a few minutes (on a low heat) until the mixture thickens enough to coat the back of a spoon. Pour into a clean bowl, cover with cling film (to prevent a skin forming), and set aside.

11. Take the dough out of the freezer and unwrap onto a well-floured work surface. With the short side nearest to you, roll the dough out to a 25 x 60cm rectangle. Fold one third on the centre, then the other third on top (as previously). Cover and return to the freezer for 15 minutes.

12. Unwrap the dough and roll out to a 30 x 30cm square. Spread over the creme patissiere evenly, and then sprinkle over the rum-soaked fruits. Roll up into as tight a spiral as you can.

13. Gently divide the roll into twelve even spirals, and transfer to two baking trays lined with baking parchment, leaving plenty of space between each spiral.

14. Cover lightly with clingfilm/a tea towel, and prove for around 45-60 minutes, until doubled in size.

15. Preheat your oven to 220c (200c fan)/428f/gas mark 7.

16. Bake the spirals for 18-20 minutes. After around 10 minutes, check on the pastries - if they are getting very brown, cover with kitchen foil and return to the oven for the remainder of the cooking time.

17. In the last 5 minutes of baking, make the glaze by pouring the sugar and water into a saucepan and bringing to a boil. Boil for a few minutes until the liquid has reduced slightly and is syrupy.

18. As soon as the pastries are out of the oven, use a pastry brush to brush over the glaze. Leave to cool (although they would taste great warm!).

19. Enjoy!

Danish Cumberland Rum Nicky
Yum
Print This Recipe:

Sunday, 14 October 2018

GBBO 2018 Week 7 - Vegan - Chocolate Hazelnut Cake

Vegan Chocolate Hazelnut Cake

I was so excited for this week's GBBO, and it didn't disappoint at all!! There were so many recipes I wanted to give a go, and am sure I will bake in the coming weeks. The first, however, was Briony's showstopper - a lovely looking chocolate coffee hazelnut cake, filled with raspberry jam, and coated in a vegan chocolate ganache. Due to time constraints, I didn't make all the elements she did, and I had to alter the recipe slightly, as I couldn't find a few ingredients.

Despite these alterations, the sponge is amazing - like a brownie, you wouldn't know it contained no dairy or eggs! As I've mentioned in previous posts, I try to not eat anything cream-based and have always struggled with ganache. Previously, I've tried water-based ganache, but Briony used full-fat coconut cream instead, and as a coconut lover, I gave this a go. My ganache firmed up a bit too much, but after adding a bit of hot water, it spread really nicely and the recipe made plenty for the whole cake.

Also, when picking a dark chocolate, don't just look in your dairy-free aisle. Good quality dark chocolate should never contain milk, and therefore is vegan without saying it directly on the packaging. I used a Tesco cooking dark chocolate, after checking the ingredients and finding no dairy. This saved me quite a bit of money due to the premium shops put on some vegan foods.

Now, I have to admit I am not a lover of vegan buttercream - I've yet to find a recipe where the frosting pipes to make lovely crisp flowers and leaves. This could be due a lack of decent vegan butter available in the supermarkets I frequent, so I'm going to keep an eye out and keep trying different brands. Briony's recipe does work and makes fairly stiff buttercream, but it still doesn't work quite as well as "real" buttercream. It does look pretty though, just be careful to keep the cake cold after piping so the buttercream doesn't soften too much.

This cake will easily serve 10 :)

Ingredients:

For the cake:
  • 565g (4 & 1/2 cups) self-raising flour
  • 600g (3 cups) granulated sugar
  • 125g (1 cup) cocoa powder (I used Dr Oetker)
  • 1 1/2 tsp baking powder
  • 1 1/2 tsp salt
  • 200g (1 & 1/3 cups) hazelnuts, roasted, peeled and roughly chopped*
  • 200g (7/8 cup) dairy-free spread, melted
  • 400ml (1 & 2/3 cups) hazelnut milk (I used Innocent)
  • 250ml (1 cup and 2 tsp) walnut oil
  • 1 tsp xantham gum
  • 3 1/2 tbsp instant coffee granules
  • 50ml (3 tbsp and 1 tsp) boiling water

For the vegan ganache:
  • 300g (around 1 & 1/5 cups) coconut cream (NOT creamed coconut)
  • 300g (1 cup and 2 tbsp) dairy-free dark chocolate (I used an 85% but 70% would work well)
  • pinch of salt
  • 2 tbsp Kahlua

For the vegan buttercream:
  • 50g (3 tbsp) vegan margarine
  • 200g (2 cups) sifted icing sugar
  • 1/4 tsp vanilla extract
  • Red and green concentrated gel food colouring (I use Wilton)

To finish:
  • Around 200g (5/8 cup) raspberry jam

*It tends to be much cheaper to buy whole hazelnuts and roast them yourself. Simply preheat your oven to 200c (180c fan)/400f/gas mark 6, and cook the hazelnuts for 5 minutes. Pour into a sieve and shake to peel off the skins. Pick out all of the peeled hazelnuts, cool, and then roughly chop.


Method:
Ganache

The ganache takes a few hours to firm up so I would suggest making this first.

1. Chop all of the chocolate roughly and pour into a heatproof bowl.

2. Heat the coconut cream in a saucepan over a low heat until it is bubbling. Take off the heat and pour over the chocolate. Stir until all of the chocolate has melted.

3. Stir in the Kahlua. Cover with cling-film and chill for around 2 hours, or until it is spreadable (a Nutella-like consistency would work well).

4. If the ganache becomes too firm, don't worry! Boil a kettle and add boiling water, half a teaspoon at a time, beating well after each addition, until it is back to the ideal spreadable consistency.

5. Before using, whisk the ganache to aerate it, using a hand-whisk or in a stand mixer. It will become a light brown colour and increase in volume.

Cake Layers

1. Make the sponge. Preheat your oven to 180c (160c)/355f/gas mark 4. Grease the base and sides of three 20cm circular cake tins, and dust with flour (I find this gives a better result than using baking parchment).

2. In a large mixing bowl, pour the self-raising flour, sugar, cocoa, baking powder, roasted hazelnuts, and salt. Briefly stir together.

3. In the bowl of a stand mixer with a whisk attachment, pour the melted spread and hazelnut milk, and start whisking on a medium speed. Add the boiling water to the instant coffee, mix until smooth, and then pour into the spread/milk mix, along with the walnut oil and xantham gum (whilst whisking). Whisk for a few minutes to aerate.

4. Make a well in the centre of the dry ingredients, and pour in the wet mix. Beat until all of the dry ingredients have been incorporated. My batter ended up very thick. 

5. Evenly divide between the three cake tins, and bake for around 35 minutes, until firm to the touch and a skewer inserted into the centre of the cake comes out clean. Once cooked, leave to cool for a few minutes, then turn out onto a wire rack to cool fully.

Vegan "Buttercream"

1. Beat the margarine with the icing sugar and vanilla extract until smooth.

2. Spoon out one-third of the buttercream, and colour this green. Colour the remaining buttercream a red/pink colour. Chill until ready to use.

Assembly

1. Place a tablespoon of ganache on your serving dish. Place the first sponge on this ganache and press down lightly. This sticks the cake to your dish, making it easier to decorate.

2. Spread over a thin layer of the ganache, and then spread over half of the raspberry jam - you want there to be a visible layer of raspberry as the chocolate and coffee flavours are so strong.

3. Top with the next layer of sponge. Spread over another thin layer of ganache, then the remaining raspberry jam. Top with the final layer of sponge.

4. Cover the top and sides of the cake with ganache - take time doing this, it can take a bit of patience to make sure all of the cake is covered neatly. I found I got a neater finish by dipping a palette knife (or you could use an icing smoother) in hot water, drying it, and then smoothing over the top and sides of the cake.

5. Place a 2D Wilton nozzle (large rose tip) into one piping bag, and a large leaf nozzle (Wilton 366) into another. Spoon the red buttercream into the piping bag with the 2D nozzle, and the green buttercream into the other piping bag.

6. Snip off the ends of each piping bag, and pipe roses and leaves onto the cake as desired.

To pipe roses - hold the piping bag vertically over where the middle of the flower will be, and then pipe a spiral outwards. 
To pipe leaves, simply use even pressure to pipe around 2cm lines on the cake - the nozzle gives the leaf effect. 

7. Enjoy!

Vegan Chocolate Hazelnut Cake


Yum
Print This Recipe:

Monday, 8 October 2018

GBBO 2018 Week 6 - Pastry - Chicken Curry Banquet Pie

 Chicken Curry Pie Slice

Chicken Curry Pie

Now, I'd be the first to pipe up and mention how I never make savoury food. Never is an exaggeration, but only a slight one in comparison to how many sweets I bake. It's an area I lack confidence in, so when this week's GBBO had a showstopper challenge of banquet pies, where the pies couldn't be baked in a mould, I wanted a go!

Ruby's chicken curry pie, with turmeric hot water crust pastry, a completely home-made chicken curry and spiced rice, looked delicious, and I was really happy to find the recipe :)

I only made a few tweaks, and sadly, did cook my pastry for a little too long - I even reduced the time the recipe stated - so lesson learnt, after 45 minutes, check the pie often so it doesn't catch! Still, even with the browner bits, the pie tasted amazing, and works really well for lunch as well as dinner :)

Makes 1 big pie (easily serves 6-8)

Ingredients:

For the chicken curry:

  • 225g (1 cup) new potatoes, quartered
  • 1 tsp ground cardamom
  • 2cm cinnamon stick  
  • 1 tsp black pepper
  • 1 star anise  
  • 2 1/2 tsp ground cumin 
  • 4 cloves 
  • 2 tbsp coconut oil 
  • 2 bay leaves 
  • 350g (3 & 1/3 cups) onions, roughly chopped 
  • 1 heaped tsp ginger & garlic paste 
  • 1 heaped tsp hot chilli powder 
  • 1 heaped tsp ground coriander 
  • 1 heaped tsp ground turmeric 
  • 1 1/2 tsp garam masala  
  • 250g (1 & 1/4 cups) tomatoes (I used plum tomatoes), chopped 
  • 2 tbsp tomato purée  
  • 2 tsp salt, plus extra to taste 
  • 900g (around 8 cups) diced chicken breast
  • 1 bunch of coriander, chopped 
  • 1 1/2 tbsp chopped root ginger 
  • 50g (1/4 cup) frozen spinach leaves 

For the rice filling:

  • 1 tbsp coconut oil  
  • 25g (2 tbsp) sliced onion 
  • 1 1/2 tsp salt  
  • 1 1/2 tsp garam masala  
  • 2 tsp ground coriander 
  • 1 tsp ground cumin 
  • 200g (1 cup) basmati rice, rinsed in cold water  

For the turmeric dough: 

  • 450g (3 cups) plain flour 
  • 100g (2/3 cup) strong white bread flour  
  • 1 tbsp ground turmeric 
  • 200ml (around 4/5 cup) water
  • 1/2 tsp salt  
  • 175g (3/4 cup) lard 
  • 1 egg, beaten, to glaze  

Method:

1. Make the curry. Boil water in a pan and add the potatoes. Cook for 10 minutes, then drain and set aside.

2. Prepare the spice blend by grinding the star anise, cinnamon and cloves in a spice grinder/high powered blender until a fine powder. Stir in the ground cardamom, black pepper and ground cumin.

3. Heat the coconut oil in a large pan and add the spice mix and the bay leaves/ Fry for 1-2 minutes, until they are sizzling. Add the onions and a splash of water, and then cook for about 5 minutes (until the onions have softened).

4. Add the ginger and garlic puree, chilli powder, ground coriander, ground turmeric, salt and garam masala and stir to coat all of the onions in the spices. Cook for another 2 minutes.

5. Add the tomato puree, chopped tomatoes and another splash of water, and then cook for around 8 minutes, checking often that the pan doesn't get too dry. It wants to be fairly dry but I was worried about burning, so added a splash of water now and again to keep the mixture a little wet.

6. Stir in the chopped chicken and cook for a further 5 minutes, stirring regularly to make sure all of the chicken is cooked evenly.

7. Add the chopped coriander, chopped ginger and spinach. Allow the spinach leaves to defrost, stir well, then turn off the heat. Transfer the curry to a large baking tray to cool quickly.

8. Make the rice. In a saucepan (that you have a well fitting lid to!), melt the coconut oil, then fry the onions with the salt, garam masala, ground coriander, and ground cumin for 1-2 minutes.

9. Rinse the basmati rice well in cold water, then add to a saucepan with 350ml water. Cover with a lid and bring to the boil. Simmer with the lid on for 10 minutes, until the water has evaporated and the rice is tender. Pour onto a large baking tray and leave to cool.

10. When the curry and rice have cooled, it's time to make the pie! Preheat your oven to 220c (200f)/430f/gas mark 7. Grease the base of an around 28cm pizza dish (or a large enough square dish to fit a 28cm circle on), and line with baking parchment.

11. Make the pastry. Sift together the plain flour, strong white bread flour and turmeric. Meanwhile, pour the water, lard and salt into a saucepan and place on a medium heat.

12. Heat the water/lard/salt until all of the lard has melted and the mixture is bubbling. Take off the heat and pour over the flour mix.

13. Carefully (as at first it will be very hot), bring the dough together with your hands/a wooden spoon (depending on how hot the dough is). Take a third of the dough.

14. Line your surface with clingfilm, and place the 1/3 dough on it, Cover with another layer of film, then roll out until it is bigger than the base of the pizza dish/a 28cm circle. Use a template to evenly cut a 28cm circle, and place the offcuts back with the remaining unrolled dough.

15. Take the top layer of clingfilm off, and then flip onto the prepared tray. Remove the base layer of clingfilm.

16. Spoon the rice on the pastry circle, leaving a 2cm rim around the edge. Spoon over the curry - use a slotted spoon if there seems to be a lot of liquid. Use your hands to mould into a dome.

17.Reserve 100g of the remaining dough, and then roll the remaining dough out as before until it is around a 35cm circle. Carefully transfer over the curry mound, and seal to the dough base. Brush the entire pie with egg wash.

18. Roll the remaining dough out until it is about 35cm long and 5cm wide. Cut into 6 long ribbons, and make two three-strand plaits, and stick to the rim of the pie. With any remaining pastry cut out whatever shapes you like - I went for hearts and people, but it's up to you :)

19. Brush the whole pie (including the decorations) with more egg wash. Bake for 45 minutes.

20. Turn the heat of the oven down to 180c (160c fan)/355f/gas mark 4. Cook for 15 minutes. Check the pie, covering it with foil if it's browning very quickly. Cook for around another 15 minutes until the pastry feels crisp and is golden all over.

21. Leave to cool for a few minutes before serving.

22. Enjoy!

Chicken Curry Pie Slice
Yum
Print This Recipe:

Wednesday, 3 October 2018

GBBO 2018 Week 5 - Spice - Ginger and Lemon Cake

Ginger and Lemon Cake


Sorry, this week's bake is a bit late!!! It was Spice week on GBBO last week, and I made a variation of Manon's signature - a ginger and lemon cake. The sponge (which I adapted slightly from Manon's recipe) is lovely and soft, and deep with ginger - I never would have thought to use fresh ginger, but it worked incredibly well! The sponges are sandwiched with Manon's recipe for lemon and ginger curd - I do like this but it is VERY strong in ginger, so I only used a thin layer to sandwich the cakes, but you could use more if you like.

Her recipe also makes a lot of curd, so pour the rest into a sterilized jar and it can be spread on toast or used in other bakes!

I covered the cakes with an Italian meringue (as Manon did), but I flavoured it with a touch of chilli - this is controversial, but I like the slight heat in the meringue (where the heat isn't just more ginger). If you don't want this heat though, you could any other spices you like, or just something like vanilla extract or lemon rind.

Now, I'm not sure I'm super keen on how I coloured my meringue so I won't put that in the recipe below. If you're interested, I used Wilton's concentrated gel colourings to colour some of the meringue red and orange, then spread this on the cake to try to give an ombre effect - if you have tips on how to get stronger red/orange colours that'd be really good (I always end up with pastel shades...)

Makes one 20cm cake (serves 10-12)

Ingredients:

  • For the sponges:
  • 200g baking margarine
  • 250g dark soft brown sugar
  • 100g black treacle
  • 100g golden syrup
  • 100g root ginger, fresh (I washed but didn't peel mine), finely grated
  • 2 eggs
  • 2 tsp ground cinnamon
  • 1 tsp ground ginger
  • pinch of salt
  • 250g plain flour
  • 1 tsp bicarbonate of soda
  • 2 tsp baking powder
  • 150ml skimmed milk

For the curd:

  • Juice of 4 large lemons (around 150ml)
  • Zest of 2 large lemons
  • 2 sheets of gelatine
  • 150g caster sugar
  • 100g fresh ginger (this is really strong, so if worried, cut down to 50-75g)
  • 1 tsp ground ginger
  • 3 eggs
  • 3 egg yolks
  • 100g baking margarine (I found this worked just fine, but you could use butter instead)
  • pinch of salt

For the Italian meringue

  • 3 egg whites
  • 300g granulated sugar
  • 2 tbsp water
  • 1/2 tsp chilli flakes (to taste/optional)

Method:

1. Make the cake. Preheat your oven to 180c (160c fan)/350f/gas mark 4. Grease the base and sides of two 20cm cake tins (preferably with loose bottoms/springform), and dust with flour.

2. In a saucepan, melt together the margarine, brown sugar, treacle, golden syrup and ginger, stirring regularly until all of the margarine has melted. Set aside to cool for a few minutes.

3. In a large mixing bowl sift together the plain flour, bicarbonate of soda, baking powder, ground ginger and cinnamon and add the salt. Pour over the melted margarine mixture and then add the eggs and the milk. Whisk together just until all of the flour has been incorporated.

4. Pour the mixture into the prepared cake tins and bake for 20-25 minutes, until just firm to the touch and the edges are slightly coming away from the sides of the tins. Leave to cool for 5 minutes, and then turn out onto a wire rack to cool fully.

5. Make the curd. Pour the lemon juice into a pan and add the leaves of gelatine, fully submerging them. Leave for 5 minutes for the gelatine to soften.

6. Add the lemon zest, ginger, caster sugar, ground ginger, eggs and egg yolks and start to stir. Place on a very low heat and keep stirring for 5-7 minutes, until the curd thickens enough to cover the back of a wooden spoon (do not let it boil or the eggs will scramble!)

7. Add the margarine, spoonfuls at a time, mixing well between each addition. Season with salt to taste. Leave to cool to room temperature, and then place in the fridge to fully set.

8. Make the Italian meringue. Pour the granulated sugar and water into a small saucepan and place on a low heat.

9. Meanwhile, place the 3 egg whites into a grease-free bowl of a stand mixer with the whisk attachment, and start whisking on a low speed.

10. Once the sugar and water reach around 110c/230f, turn the speed of the mixer up to whisk the egg whites until they are white and frothy. Keep heating the sugar/water until the temperature reads 119c/248f. At this point, take off the heat and turn down the speed of the stand mixer. 

11. Gently pour the VERY HOT syrup over the egg whites whilst whisking on a low speed. Once all of the syrup has been added, turn the speed of the mixer up and whisk until the meringue is glossy and holds stiff peaks.

12. To assemble the cakes, place one sponge on your cake board/serving tray. Spoon over a few tablespoons of the curd and level out. Top with the other layer of sponge and then cover with the meringue.

13. Enjoy!!

Ginger and Lemon Cake


Yum
Print This Recipe:

Monday, 24 September 2018

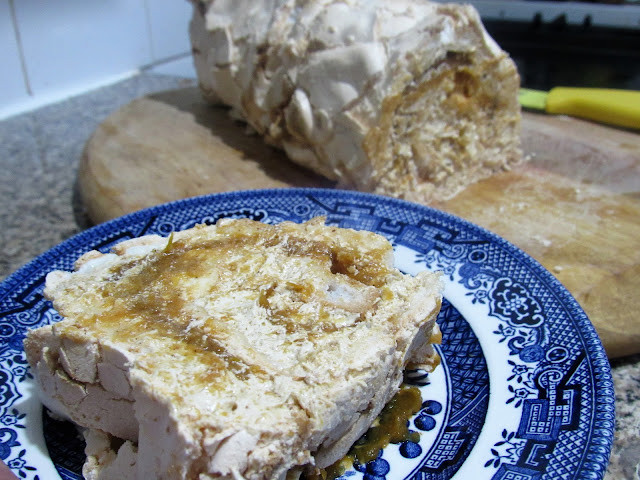
GBBO 2018 Week 4 - Desserts - Pumpkin Spice Latte Meringue Roulade

Pumpkin Spice Latte Roulade

This week on GBBO was dessert-themed, with meringue roulades being the signature challenge. Now, I'm not too good with meringue, I have a bit of a love-hate relationship when making it. However, following my success following bits of Dan's recipes before, I decided to give his meringue base a crack, and wow, it worked really well!!

However, I went very off-piste with the filling. I can't eat double cream without having a bad stomach, so I avoid it wherever possible. 99% of the roulade recipes I found used a whipped cream, which made me pretty sad. So, whilst walking today, I thought of this concoction - french buttercream is lovely and silky and holds it's shape well when spread. I've flavoured it with coffee before, and whilst thinking of this, I remembered my adoration of the pumpkin spiced latte.
So, this roulade is filling with a coffee creme aux beurre (French buttercream) and a lightly sweetened (but heavily cinnamon-ed) pumpkin (but I used butternut squash, which works just as well) puree.

This is brilliant for a relaxed after dinner dessert, not too sweet because of the coffee, but just enough so you know you're having a treat.

Enjoy!!!

Makes one roulade (serves 8-10)

Ingredients:

For the roulade:

  • 4 egg whites
  • 250g (1 & 1/4 cups) caster sugar
  • 1 tsp white wine vinegar
  • 1 tsp vanilla extract
  • 1 tsp cornflour

For the French coffee buttercream:

  • 4 egg yolks
  • 125g (5/8 cup) caster sugar
  • 2 tbsp water
  • 125g (1/2 cup) butter/baking margarine, at room temperature
  • 2 tsp ground coffee dissolved in 1 tbsp boiling water

For the sweetened pumpkin puree:

  • 500g (3 & 1/3 cups) frozen pumpkin/butternut squash
  • 60g (1/3 cup) light soft brown sugar
  • 1 tbsp ground cinnamon
  • 1 tsp ground ginger
  • 1/2 tsp ground nutmeg
  • 1/4 tsp salt
  • Zest of one orange

Method:

1. Preheat your oven to 180c (160c fan)/355f/gas mark 4. Grease and line the base of a 20 x 30cm swiss roll tray.

2. In a spotlessly clean bowl (I used the bowl in a stand mixer), pour the egg whites and whisk on a medium speed until they have at least tripled in volume and turned white.

3. One tablespoon at a time, add the caster sugar and continue whisking for 5-7 minutes until stiff peaks form when the whisk is lifted from the bowl, and the meringue is white and glossy.

4. Add the vinegar, vanilla and cornflour and gently fold in with a spatula. Pour onto the prepared baking tray and smooth out as evenly as you can.

5. Bake for around 20 minutes, or until the top has browned slightly and is crisp.

6. Make the pumpkin puree by placing the pumpkin/butternut squash in a microwave safe bowl. Add a splash of water then put in a microwave on high power for 5 minutes. Stir and repeat, until the squash/pumpkin is cooked through (soft all the way through). Leave to cool for 5 minutes.

7. Blitz the pumpkin/squash in a blender/food processor until smooth. Pour into a mixing bowl, and then add the remaining pumpkin puree ingredients. Stir to combine, then set aside to cool to room temperature.

8. Make the coffee buttercream. Place the caster sugar and water in a saucepan on a medium heat. Heat until a sugar thermometer dipped into the mixture reads 121c/249f. Meanwhile, pour the egg yolks into the bowl of a stand mixer (with the whisk attached). Start whisking on a low speed.

9. Once the sugar is up to temperature, carefully and slowly, pour the hot sugar over the egg yolks, keeping the speed of the mixer low. Once all of the syrup has been added, turn the speed of the mixer up (to about medium), and leave to whisk for around 10 minutes, until the mixture is at room temperature.

10. Whilst whisking, add the butter in small pieces gradually and then leave to whisk for another few minutes. Add the coffee, then whisk for 3-4 minutes until you have a silky, spreadable buttercream. Place in the fridge until you're ready to assemble.

11. To finish the roulade, flip the meringue out onto a work surface. Carefully peel off the baking parchment. Spread over the coffee buttercream, followed by the pumpkin puree.

12. Roll the roulade up along one of the short sides. Cracks will happen, but that's okay (it adds to the charm I think!).

13. Enjoy!

Pumpkin Spice Latte Roulade
Yum
Print This Recipe:

Monday, 17 September 2018

GBBO 2018 Week 3 - Bread - Coconut & Rum Chelsea Buns

Coconut Rum Chelsea Buns


Apologies for the lateness of this post! I had a big race yesterday, and have been very busy prepping for that/recovering afterwards (not that the recovery is over yet...). However, this weekend I just about squeezed in enough time to bake my GBBO bake of the week. This week was all about bread, and I really want to give all three challenges a go at some point.

Due to limited time, I knew I wouldn't be able to get a decent Showstopper attempt done - the intricate korovai wedding bread looked a bit too fancy for me! One to do when I don't have a crazy weekend perhaps. I also wasn't planning to eat Indian food, and so making the technical challenge of the garlic naan breads seemed like it'd be a waste.

For these reasons I made my variation of the signature challenge - Chelsea buns. I followed Dan's recipe for the dough (great recipe!), but changed the rest of the recipe. I filled these buns with a mixture of dessicated coconut, brown sugar and rum infused sultanas, some of my favourite flavours!! I then topped the buns with a sticky ginger glaze and a rum icing. Very decadent, yet not too over-the-top, perfect for a mid-morning snack (or a very sweet breakfast?).

Again, as I was busy, there were a few steps where I left the dough for a while in the fridge. After I'd made the dough and left it to rise for a few hours, I realised I needed to go out to get bits and pieces, and visit some friends in the evening. I placed the dough (in the bowl) in the fridge until I got home a few hours later. I then rolled out, filled, re-rolled and cut the buns, and left them covered in the fridge for nearly 24 hours! I was worried they'd over-prove, but actually they ended up lovely and light, packed with flavour! True, they're not as neat as the bakers made in the tent, but I'm very happy with them.

Makes 9

Ingredients:

For the dough:

  • 200ml milk (I used 0% fat)
  • 50g margarine/butter
  • 75g caster sugar
  • 1 tsp salt
  • 500g strong white bread flour
  • 1 tsp ground cinnamon
  • 1/2 tsp ground nutmeg
  • 10g fast-action dried yeast
  • 2 eggs

For the filling:

  • 75g dessicated coconut
  • 50g very soft butter
  • 125g sultanas
  • 50 ml coconut rum
  • 100g light soft brown sugar
  • 1 tsp ground cinnamon
  • 1 tsp ground ginger

For the glaze:

  • 50g granulated sugar
  • 75ml water
  • 1 tsp ground ginger

For the icing:

  • 100g icing sugar, sifted
  • Around 2 tbsp coconut rum

Method:

1. Prepare the dough. Pour the milk into the jug with the butter/margarine. Place in the microwave for 15-30 seconds, just until the butter has melted. Pour into the bowl of a stand mixer with the dough hook attachment.

2. To the stand mixer bowl, add the caster sugar, salt and flour, followed by the spices, yeast, and the eggs. Turn the mixer onto a low-medium speed and mix for around 10 minutes.

3. Cover and leave to prove for at least an hour, until it has doubled in size. This depends on the temperature - when its cooler, this can take a lot longer. As mentioned above, I left mine for 2 hours, then placed it in the fridge for another few hours whilst I went out shopping - this didn't seem to be detrimental to the dough.

4. Whilst the dough is proving make the dough by pouring the rum and sultanas into a small saucepan and placing on a low heat. Bring the rum to a light simmer and cook for 2-3 minutes, until the sultanas are juicy. Set aside to cool.

5. Mix together the brown sugar, spices and dessicated coconut.

6. Dust your work surface with flour and tip out your dough onto the floured surface. Roll out the dough until it about a 35 cm square.

7. Evenly spread the butter over the surface of the dough, then sprinkle over the sugar/coconut. Scatter over the rum infused sultanas.

8. Roll the dough up as tightly as possible (to get as many swirls as you can). Slice into 9 even rounds.

9. Grease a 20 cm roasting tin (or a 20 x 30 cm baking tray with deep sides if you have one), and gently transfer the dough rolls to the tray, leaving a few cm gap between each roll. Cover and leave to prove for at least another hour - as I mentioned above, I left mine in the fridge overnight - they lost a bit of shape but still tasted great. If you do this, make sure to bring the rolls back to room temperature before baking.

10. Bake for around 35 minutes, until the tops are golden. Leave to cool for around 15 minutes whilst you make the glaze.

11. To make the glaze pour the sugar, water and ground ginger into a saucepan and place on a hob on a low heat. Leave to boil, stirring occasionally, until the sugar has dissolved and the liquid has reduced by about half, then turn off the heat and leave to cool for a few minutes. 

12. Use a pastry brush to spread the syrup over the warm buns, and allow to seep in and for the buns to completely cool to room temperature.

13. Make the icing by sifting the icing sugar into a mixing bowl. Add one tablespoon of the rum, and stir in, then gradually add more rum until the icing is thick enough that when lifted from the bowl it runs off the spoon into the mixture and leaves a visible trail on top of the mixture that stays there for a few seconds. Spoon into a piping bag and trim off the end.

14. Pipe lines of icing over each bun and leave to set.

15. Tear off buns and enjoy!

Coconut Rum Chelsea Buns


Yum
Print This Recipe:

Monday, 10 September 2018

GBBO 2018 Week 2 - Cake - Chocolate Collar Peanut Butter Cake

Chocolate Collar peanut butter cake

Chocolate Collar peanut butter cake slice

The showstopper challenge for week 2 of GBBO was all about making a two-tiered cake with a chocolate collar. This is essentially a layer of chocolate wrapped around the outside of the cake - not something I've ever properly tried before, though I do like chocolate work.

So, to test myself, I gave this a go - I made two chocolate sponges (I used Karen's recipe, adapting it only slightly, and it worked wonderfully) and sandwiched and frosted them with and a funky peanut butter frosting, which crazily makes a meringue buttercream but contains egg yolks! It didn't hold as firm as the standard Italian meringue buttercream I'm used to, but worked well for sandwiching and frosting.

I then didn't follow the challenge rules and only collared the top cake...sorry guys, but after doing the top collar, I couldn't face doing the bottom one, and to be honest, I think it didn't need it!

So...chocolate collars are pretty fiendish. I have by no means mastered this, but I did learn a few things:

1. If you can, use acetate sheets cut to the length you need. I only had plastic wallets and had to tape some together to get the length I needed (51cm for my 15cm round cake)...this made it very fiddly.

2. Once the chocolate has tempered, it sets really fast!! I temper chocolate an old-fashioned way in using a granite slab to cool down the melted chocolate - I think all the bakes used sugar thermometers, which possibly would have been easier.

3. I mean, it sets really really fast!! Be careful, you need to transfer the wrap to the cake when it is still soft enough that it doesn't crack, but isn't liquid. This took me three attempts to get right, so have spare chocolate in if you can.

4. I used a cheap 54% dark chocolate - I think I could have got a nicer shine if I'd used a fancier 70-80% one.

However, the cake still cut wells and tastes great, so it's worth a go when you have a day or so to spare!

Makes one 15cm and one 23cm cake

Ingredients:

For the cake sponges:
  • 450g (3&1/2 cups) margarine
  • 450g (2&1/4 cups) caster sugar
  • 8 eggs
  • 1 tsp vanilla extract
  • 1 tbsp instant coffee dissolved in 1 tbsp boiling water
  • 100g (1 cup) cocoa powder
  • 350g (2&1/2 cups) self-raising flour
  • 1/2 tsp salt
  • 200ml (1 cup minus 3 tbsp) yoghurt
For the peanut butter frosting:
  • 2 eggs and 1 egg yolk
  • 120ml (1/2 cup) water
  • 220g (1 & 1/4 cups) caster sugar
  • 340g (2&2/3 cups) butter, cut into cubes (room temperature)
  • 150g (5/8 cup) crunchy peanut butter
  • 1 tsp ground cinnamon
  • pinch of salt (depending on whether your peanut butter had salt added to it)
For the chocolate:
  • 300g (around 1&3/4 cups)  dark chocolate (I used 54% cocoa solids but 70% would be even better)
  • 90g (1/2 cup) white chocolate (for the shards)

Method:

1. Preheat the oven to 180c (160c fan)/355f/gas mark 4. Grease the base and sides of a loose-bottomed (or springform) 15cm and a 23cm round cake tin. Dust with a little flour.

2. To make the cake, pour the margarine and sugar into the bowl of a stand mixer, with the paddle attached. Start the mixer on a low speed and cream the margarine and sugar together until it is light and fluffy.

3. Sift the flour and cocoa powder into a mixing bowl.

4. Add the eggs, one at a time, to the butter/sugar mixture, adding a tablespoon of the flour/cocoa powder after each egg.

5. Add the remaining flour/cocoa, and the yoghurt, salt and coffee. Turn the stand mixer to a low setting, and mix together just until all of the flour has been incorporated.

6. Divide between the two tins so that they are about 2/3 full each. Bake. The 23cm tin will take about 35-40 minutes to cook, the 15cm should take 55-60 minutes. They are cooked when a skewer inserted into the centre of the cake comes out clean, and the cakes are springy to the touch.

7. Leave to cool for a few minutes, before turning the cakes out of the tin onto wire racks to cool fully.

8. Make the frosting by heating the water with the sugar in a small saucepan, stirring occasionally until the sugar has dissolved.

9. Pour the eggs and egg yolk into the bowl of a stand mixer fitted with the whisk attachment, and start whisking on a medium speed until they have at least tripled in volume and become light in colour.

10. Keep heating the sugar and water until a sugar thermometer dipped in the syrup reads 113c/235f. As soon as it reaches this temperature, turn off the heat and VERY CAREFULLY, pour the syrup over the egg yolks, making sure the speed of the mixer is set to low. Once all of the syrup has been added, turn up the speed of the mixer (to about medium) and keep whisking until the side of the bowl no longer feels warm (about 10 minutes). The mixture will get very light, but not hold as firm peaks as the traditional meringue would.

11. Once cooled to room temperature, keep whisking whilst adding the butter, a cube at a time. Don't add too much butter at once, or the buttercream may split.

12. Once all of the butter has been added, add the peanut butter and cinnamon, mix and taste. If needed add a little salt or more peanut butter. Place in the fridge until ready to use.

13. To assemble the cakes, use a serrated knife to level off the top of each cake, then slice each cake into two.

14. Place the first 23cm cake onto your serving dish. Add 2-3 tbsp of the frosting and smooth over the top of the layer. Gently press on the second 23cm cake layer, and then cover the top and sides of the cake with more frosting. There should be more than enough frosting to cover and fill these cakes, so you shouldn't have to worry about running out.

15. Place the first 15cm cake layer onto the centre of the 23cm cake. Top with 2 tbsp of the frosting, and add the final layer of cake. Cover with more peanut butter frosting, and then chill for 20 minutes.

16. It's chocolate collar time! Prepare your acetate sheets - they need to be a little taller than your 15cm cake, and around 51cm wide (which should be the circumference of the cake, you can check this if you like). Once prepared, place on a surface you don't mind getting covered in chocolate...

17. This is how I temper chocolate. Break two-thirds of the chocolate into cubes and put in a microwave-safe bowl. Heat for 20-30 second bursts, stirring well after each burst. During the bursts, finely chop the remaining third of the chocolate.

18. Once all of the chocolate has melted, remove from the microwave and pour in the remaining chopped chocolate. Stir until the chopped chocolate has melted and then pour onto a granite slab. 

19. Use a palette knife to spread the chocolate around the slab, scooping it up into a line, then spreading out and repeating. You'll notice the chocolate starts to get thicker. At this point, spoon the chocolate back into a bowl and QUICKLY spread out evenly over the acetate mould, going over the edges.

20. Wait for a few minutes, until the chocolate looks light it is starting to set - this is difficult to judge but it shouldn't take more than 3 minutes. Gently press the collar around the cake, leaving the acetate facing outwards for now. Leave for another few minutes, and then, when you think the chocolate has fully set, gently pry away the acetate.

21. I tempered more white and dark chocolate and spread them on some spare plastic wallets I had. Once cool I broke these into shards to decorate the top and sides of the cake. Next time I might try some different chocolate decorations - if you do anything cool, please let me know!

22. Enjoy!


Chocolate Collar peanut butter cake slice
Yum
Print This Recipe:

Sunday, 9 September 2018

GBBO 2018 Week 2 - Cake - Custard Cream Blondies

Custard Cream Blondies

Week 2 on GBBO was all about cake, and the first signature round was "traybakes" - most of the bakers made cake-like traybakes, like the two black forest gateaus. One baker made a frangipane tart though, which sounded delicious! When thinking about what I wanted to make, I wanted something simple but yummy, that couldn't just be bought from a shop.

So, I made these blondies (which I at least have never seen in my local supermarket) with custard creams (which are easily one of my top 5 classic UK biscuits). Blondies are the cousin of a brownie, being dense and moreish, but without any milk/dark chocolate. These have white chocolate and custard powder, as well as crushed custard creams.

They might not look the most show-stopping I'll admit, but they taste amazing!

Makes 16

Ingredients:

  • 175g (3/4 cup) butter (or margarine)
  • 180g (1 cup) light soft brown sugar
  • 145g (3/4 cup) caster sugar
  • 2 eggs
  • 2 tsp vanilla extract
  • 250g (2 cups) self-raising flour
  • 4 tbsp instant custard powder
  • 1/2 tsp salt
  • 150g (1 cup) custard creams, broken into approximate quarters
  • 150g (1 cup) chopped white chocolate

Method:

1. Preheat the oven to 180c (160c fan)/355f/gas mark 4. Grease the base of a 20 x 20cm cake tin, and dust lightly with flour (alternatively, you could line with baking parchment).

2. Melt the butter in a saucepan with the caster and brown sugar, stirring regularly. Once all of the butter has melted and the sugar has dissolved, set aside to cool for a few minutes.

3. In a large mixing bowl, sift together the flour and custard powder, and mix in the salt.

4. Pour the melted butter/sugar mixture onto the flour/custard powder, and then add the eggs and vanilla extract. Fold together briefly.

5. Add the white chocolate and the custard creams and continue folding until all of the flour has been taken up and the custard creams are evenly distributed.

6. Pour into the prepared tin and level out. Bake for around 20 minutes, and then turn the tin around in the oven (for even heat distribution). Bake for another 10 minutes, or until only the very centre of the blondie has a small wobble when lightly shaken.

7. Remove from the oven and leave to cool before cutting into bars. Store in an airtight container and they should last around a week.

8. Enjoy!

Custard cream blondies
Yum
Print This Recipe: