Saturday, 29 December 2018

My Favourite Christmas Cake


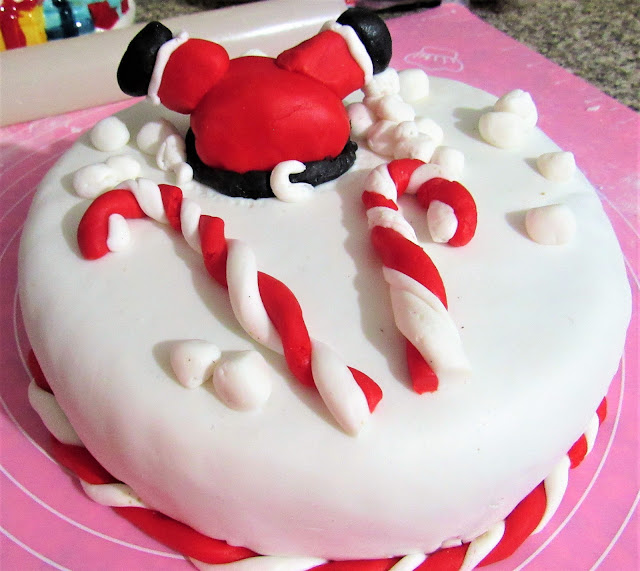
Christmas Cake Santa

Christmas Cake Slice

Hope everyone had a great Christmas. The Christmas cake I baked this year was my favourite yet, and so I thought I'd share my recipe :) I baked this about 4 weeks before Christmas, and it was packed full of flavour and super moist.

I covered the cake with a layer of marzipan and fondant icing, and then attempted to make a Santa and snowballs :)

Makes one 20cm cake

Ingredients:

For the cake mix:

  • 200g plain flour
  • 1 tbsp ground almonds
  • 1/2 tsp bicarbonate of soda
  • 1 tsp mixed spice
  • 1 tsp ground cinnamon
  • 1/4 tsp ground nutmeg
  • 1/4 tsp salt
  • 150g butter/margarine softened
  • 120g soft dark brown sugar
  • Finely grated zest of one orange
  • Finely grated zest of one lemon
  • 15g black treacle
  • 25g fine-cut marmalade
  • 3 eggs
  • 45ml (3 tbsp) brandy
  • 25ml dark rum

For the fruit mix:
  • 140g dried currants
  • 380g sultanas
  • 100g dried apricots, roughly chopped
  • 95g chopped dried dates, roughly chopped
  • 75g dried prunes, roughly chopped
  • 75g glace cherries - halved
  • 100g mixed peel
  • 75ml dark rum
  • 75ml brandy

Method:

1. 24 hours prior to baking, soak all of the dried fruits in 75ml of rum and 75ml brandy. Cover and leave at room temperature until ready to bake.

2. Preheat your oven to 160c (140c fan)/320f/gas mark 3. Grease and line the base and sides of a 20cm cake tin with two layers of greaseproof paper.

3. Sift together the plain flour, ground almonds, bicarbonate of soda, spices and salt.

4. Cream together the butter and sugar with the lemon and orange zest until light and fluffy. 

5. Add the treacle and marmalade and beat again to combine. 

6. Beat in 2 of the eggs with a tablespoon of the flour mixture, followed by the rest of the flour mixture. Mix until just combined, and then fold in the soaked fruit mixture.

7. Fold in the remaining egg, and then pour into the prepared cake tin. Bake for between 2 and 2.5 hours, until firm to the touch and a skewer inserted into the centre of the cake comes out clean.

8. As soon as the cake is out of the oven, brush the rum and brandy all over the surface of the cake and leave to cool. Once completely cool, wrap in cling film/place in an airtight container until ready to decorate.

9. Enjoy!

Christmas Cake Santa
Yum
Print This Recipe:

Saturday, 22 December 2018

Simple and Delicious Chocolate Fudge

Chocolate Fudge


This fudge is the perfect last-minute addition to a Christmas hamper. Provided you have a large saucepan and a sugar thermometer, it's really simple and is incredibly smooth and delicious.
Use a much larger saucepan than the mixture looks like it needs (I used a large stock pot) - it bubbles up like crazy, so the bigger the pan, the less you have to worry about making a mess/having to take the pan off the heat constantly for fear of causing that mess.

Makes around 24 pieces of fudge

Ingredients:

  • 300ml whole milk
  • 350g caster sugar
  • 100g unsalted butter, cut into cubes
  • 1 tsp ground ginger (optional)
  • 1 tsp vanilla extract
  • 100g dark chocolate (I used 55% but you could go darker if you like), finely chopped

Method:

1. Grease and line the base of a 20cm square tin (I used a silicon-one but a standard cake tin would work fine, or even a sandwich tub) with baking parchment.

2. Pour the milk, sugar and butter into a large saucepan and bring to the boil, stirring regularly. Once boiling, continue stirring and checking the temperature of the mixture. It will take about 15 minutes for it to reach 115c/239f.

3. Once the mixture reaches 115c/239f, take off the heat and leave to cool for 5 minutes. Add the chopped chocolate, ginger and vanilla extract and stir until melted.

4. Continue to stir the mixture whilst it cools - it will begin to thicken and come away from the sides of the pan. Keep beating until it loses its glossy appearance (it starts to go a matt brown colour).

5. Pour into the prepared tin/tub and smooth. Leave to cool to room temperature before slicing into squares. Store in an airtight tub :)

6. Enjoy!

Chocolate Fudge
Yum
Print This Recipe:

Sunday, 16 December 2018

Pistachio and Cranberry Stollen

Pistachio and Cranberry Stollen

Pistachio and Cranberry Stollen Whole


This is an upgrade of the classic Stollen - sometimes with a bake, I wonder whether the time it takes to make/bake is worth it when alternatives can be bought in shops. This is a classic example of when it definitely is worth it! I made a pistachio and hazelnut marzipan (instead of the classic almond one), and it lifts the stollen to a different level. This was going to be pure pistachio to be honest, but I didn't buy enough so I supplemented with hazelnuts, and it worked beautifully! The dough is also heavily spiced with mixed spice, and filled with cranberries and mixed dried fruit. Perfect to serve at Christmas.

I want to try making individual stollen, so if I get around to that, I'll do a post showing those soon. Here, I made a wreath, which I think worked pretty effectively.

Makes one wreath (easily serves 12)

Ingredients:

For the dough:

  • 300g strong white bread flour
  • 2 tbsp mixed spice
  • 7g fast action dried yeast
  • 1 tsp finely ground sea salt
  • Zest of one lemon
  • Zest of one orange
  • 75g butter/margarine, melted
  • 150ml milk (I used skimmed milk, but any would work), lukewarm

For the pistachio and hazelnut marzipan:

  • 150g pistachios (unshelled)
  • 50g hazelnuts
  • 200g icing sugar sifted
  • 1 egg

For the filling/topping:

  • 100g dried cranberries
  • 100g dried mixed fruit (mine was a mix of raisins, sultanas and mixed peel, but you could use whatever your favourite dried fruit is)
  • 25g butter/margarine

Method:

1. Prepare the dough. Pour the flour into a large mixing bowl in a stand mixer fitted with a dough hook if you have one (if not, this dough is fine to be worked by hand, just knead for an extra 5 minutes). Pour the yeast on one side of the bowl, and the mixed spice, salt, lemon and orange zest on the other side. Stir briefly to mix.

2. Pour over the melted butter and milk. Turn the stand mixer on and leave to knead for around 10 minutes (or if doing by hand, 15 minutes), until it is springy to the touch. Cover the bowl with clingfilm and leave in a warm place for at least 90 minutes, until it has doubled in size).

3. Meanwhile, make the pistachio and hazelnut marzipan (this is really simple don't worry!). Finely blend the pistachio and hazelnuts (I used a nutribullet, but a food processor or even a pestle and mortar will work). Add the icing sugar and egg and blend until the marzipan is fairly smooth (I like a bit of texture so left it a little chunky, but that's optional). Chill until ready to use.

4. Place a layer of cling film on your surface and dust with plain flour. Tip the dough out onto this surface and roll until it is 60cm long and 20cm wide.

5. It's now time to spread the marzipan - this is tricky as the marzipan is very sticky, but I found the easiest way was to spoon blobs of marzipan all over the surface. Then I laid over some clingfilm and then spread out the marzipan over the whole dough (leaving a 1-2cm gap around the edges) - this seemed to work for me. Alternatively, if the marzipan has firmed up in the fridge, you could roll the marzipan out between two sheets of clingfilm and tip this onto the dough.

6. Sprinkle over the dried cranberries and mixed dried fruit.

7. Roll the dough up from the long edge as tight as you can. Once finished, turn so the seam is at the bottom.

8. Use a sharp knife to slice along the middle of the "log", leaving a 3-4cm gap at one end of the log. Place the right side of the log over the left side, and move the left side to where the right side was - effectively twisting the dough. Repeat until you have reached the end of the dough. Shape into a wreath and transfer to a baking tray lined with baking parchment. Cover and leave to prove for around 1 hour.

9. Preheat the oven to 180c (160c fan)/355f/gas mark 4. Bake the stollen for 22-25 minutes until nice and golden. Once out of the oven, brush over the 25g melted butter and cover with a clean tea towel to cool.

10. Enjoy!

Pistachio and Cranberry Stollen
Yum
Print This Recipe:

Sunday, 2 December 2018

Gingerbread Mince Pies

Gingerbread mince pie

It's nearly Christmas!!! Well, okay...not really, but it is now December, meaning I can make Christmas related bakes without feeling a bit silly.

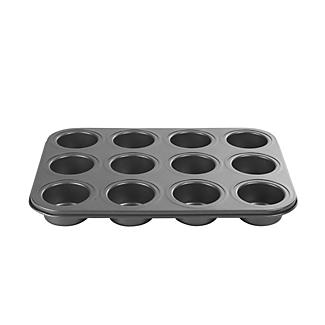
I made these yesterday (aka 1st December) and I know for sure I'll be making more batches in the run-up to Christmas - really simple mince pies, with a few twists. I use a special tin I bought from Lakeland, which is meant for making individual mini sandwich cakes - here is the link to the Lakeland page, and I've copied a picture of the tin below. I like using these as it means I can pack the pies full of mincemeat and keep the pastry nice and tin. You could instead use a deep muffin tin :)
My Kitchen 12 Cup Mini Sandwich Tin alt image 1
I spiced the pastry with ginger and cinnamon to give a gingerbread feel and added chopped satsuma and apple to the mincemeat (which was storebought, but you could make your own - here's my recipe from quite a few years ago now) to freshen it up.

This made 12 mince pies.

Ingredients:

For the pastry:

  • 380g (3 cups) plain flour
  • 90g (6 tbsp) icing sugar
  • 2/3 tsp salt
  • 1 tbsp ground ginger
  • 1 tbsp ground cinnamon
  • 180g (9 tbsp) butter, chilled and cubed
  • 2 egg yolk
  • 4 tbsp water

For the filling:

  • 1 x 400g good quality mincemeat (I used Tesco Finest, which was delicious!)
  • 1 Braeburn (or similar) apple, roughly chopped
  • 1 satsuma, peeled and roughly chopped
To finish:
  • 1 egg
  • Sprinkle of granulated sugar (around 2 tbsp)

Method:

1. Grease the mini sandwich cake tin or deep muffin tin with butter.

2. Sift together the flour and icing sugar into a large mixing bowl, then stir in the salt, ground ginger and cinnamon.

3. Add the butter and rub into the flour mixture, until the mix resembles breadcrumbs. Add the egg yolks and water and bring the dough together into a ball. Take two-thirds and roll out between two layers of clingfilm until it is a few mm thick. Use a 10cm circular cutter to cut out circles, and gently press these into the tin. If there are any rips, use the spare dough to patch it up. 

4. Place the pastry in the fridge to firm up for around 20 minutes, whilst you prepare the filling.

5. Preheat the oven to 180c (160c)/430c/gas mark 6. 

6. Mix together the chopped apple, satsuma and mincemeat until well combined. Spoon into the moulds - you should get about 2 tbsp of filling into each pie. Place back in the fridge whilst you prepare the rest of the pastry.

7. Roll out the remaining third of pastry until it is a few mm thick. I used a small gingerbread man cutter to cut out little gingerbread men to top each pie. You could do this, or use another cutter like a star, heart, tree, or anything you want really - you could also just do a circle, but it the top is fully enclosed, you need to poke a small hole in the top of the pie to prevent bursting of the pie during cooking.

8. Top the pies with the toppers (gingerbread men, stars etc.). If you want, you can then cut thin strips of the spare dough and used this to line the top of each pie to get a neat edge. If you do this, gently press the strips to seal to the sides of each pie.

9. Beat the egg, and lightly brush over the top of each pie. Bake for around 15 minutes, or until the tops are nice and golden. Once out of the oven, sprinkle over the sugar. Leave to cool for around 10 minutes before taking out of the tins. These are amazing warm but also can be eaten at room temperature.

10. Enjoy!


Gingerbread mince pie
Yum
Print This Recipe: