Tuesday, 27 October 2015

Baguettes


Have you ever wanted to try baking every Frenchman's love, the baguette? They were the technical challenge of the Great British Bake Off this year, but I was put off baking them due to the need for thick linen (to make a couche) as well as apparently needing a stand mixer...this weekend we experimented and found a way to get the recipe to work without needing either the couche or the mixer! 
I've been on holiday in France a couple of times, and these baguettes genuinely looked, smelt and best of all, tasted like those we purchased every morning. Crisp and crunchy on the outside, with a light, fluffy center. They're brilliant to dip in soup or fill with cheese and meats :)

Makes 4 baguettes

Ingredients:
  • 500g strong bread flour
  • 10g salt
  • 10g yeast
  • 370 ml water

Method:

1. Lightly oil a large bowl and set aside.

2. Make the dough. In a large mixing bowl, pour in the flour, and to opposite ends add the salt and yeast (DO NOT directly add the salt to the yeast, as this retards the growth of the bread). 

3. Add two thirds of the water and start mixing. We didn't have a stand mixer with a dough hook, so did this by hand instead. Once the mixture starts to come together, add the rest of the water and keep stirring - it will be a very wet dough.


4. If you use a stand mixer, mix for 5-7 minutes. This will take at least 10 minutes by hand -  a very tiring job. We found the best way to work with the wet dough was to put your hand in the mixture, then make move the dough in circles (like the dough hook does).

5. Once the dough looks elastic and smooth, place in the oiled bowl, and cover. Leave to prove for one hour, until it has at least doubled in size.

6. Make the couche. Place two kitchen towels on top of each other. Make two pleats in the towel, one and two thirds along long side. This makes two grooves where the dough sausages will sit. Repeat with another two sheets (to make 4 grooves in total). Dust with flour.


7. Once proved, lightly dust your working surface with flour. Carefully tip the dough onto the surface, and divide into four.

8. Shape each quarter gently into a sausage about 30cm long. The dough will be very sticky but try not to add too much flour, and don't be too tough with the dough, or you will lose the irregular air pocket structure.

9. Place each baguette in the grooves in the tea towels, and cover. Prove for a further hour.

10. Preheat the oven to 240c/220c fan/gas mark 9. Place a roasting tray in the bottom of the oven. Line two baking trays with greaseproof paper.

11. Once the dough has risen and it springs back when lightly pressed, carefully transfer the dough to the baking trays - they will need to go on the baking trays diagonally to fit. Make four diagonal slices along the top of the baguette (only 2-3mm deep).

12. Pour water into the roasting tray at the bottom of the oven. Place the baking trays in the oven, and bake the baguettes for 20-25 minutes, until golden. Leave on a wire rack to cool.

13. Enjoy!


Yum
Print This Recipe:

Sunday, 25 October 2015

Cherry Cheesecake Eclairs


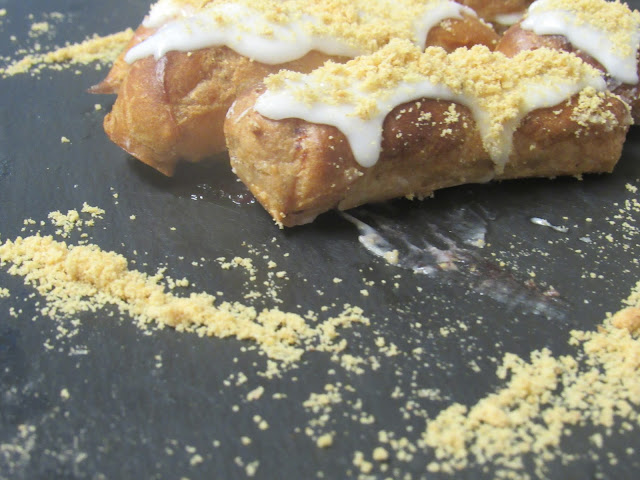
This week I wanted to have a go at baking choux pastry eclairs. The only issue was that I'm not a fan of cream fillings :( My boyfriend and I however both adore cheesecake, so we decided to combine eclairs with the essence of cheesecake - filling the eclairs with a cream-cheese and cherry filling, and topping with icing and digestive biscuits (to resemble the original cheesecake base). 
I wasn't sure whether this recipe was work, but was thrilled with the result. I found they didn't go soggy even when they were filled and eaten the next day! Better yet, the indulgence of the cheesecake filling, with the tang of the cherries is perfect in the soft eclairs. This bake has serious yum factor!


Makes 12 eclairs


Ingredients:

For the choux pastry:

  • 50g butter
  • 1 tsp caster sugar
  • pinch of salt
  • 150ml water
  • 65g strong bread flour
  • 2 eggs, beaten

For the cheesecake filling:

  • 200g soft full fat cheese
  • 50g butter, softened
  • 100g icing sugar
  • 100g cherry jam

To finish:

  • 100g icing sugar
  • 1 tbsp water
  • 100g digestive biscuits, crushed to a fine crumb

Method:

1. Preheat the oven to 190c/180c fan/gas mark 5. Line two baking trays with greaseproof paper.

2. Make the choux pastry. Chop the butter into 1cm chunks, and put into a large saucepan, with  the caster sugar, salt and water. Heat until all of the butter has melted, then bring to the boil.


3. Once the mixture has come to a boil, take off the heat, and immediately add all of the flour. Stir vigorously – the mixture may look loose/lumpy at first, but keep beating until it begins to come away from the side of the pan.


4. Gradually add the eggs – beating vigorously (this is easiest as a two person job, with one person whisking, the other pouring the eggs). The dough will become stiff and glossy.


5. Ideally place your dough in a piping bag with a 1cm nozzle attached. We didn't have any and so instead used a teaspoon.  Pipe/spread 10cm lines of dough onto the baking sheets, leaving at least 2cm between each piece of dough.

6. Bake for 30 minutes, until well risen and golden-brown. Remove from the oven and pierce the eclairs horizontally – this allows the air to escape and dries out the center.


7. Make the filling. In a medium bowl, cream the butter until very soft. Add the cream cheese and icing sugar, and beat until smooth. If you find the filling is lumpy, place in a blender and process until smooth. Alternatively sieve in the icing sugar.


8. Add the cherry jam to the filling, teaspoons at a time, and ripple through (you want the filling to look marbled.


9. Make the icing for the topping by adding 1 tbsp water to the icing sugar. Stir until the icing is smooth and drops off the spoon (add a little more water if needed).


10. To assemble, halve the eclairs horizontally. Sandwich the two halves with the cheesecake filling. Top with icing, and sprinkle on the crushed digestive biscuits.


11. Enjoy!


Note: If you don't want to make eclairs, why not try profiteroles instead? Simply pipe or dollop golf-ball sized spheres of dough onto a baking sheet. Dab a finger in water, and pat down the top of each profiterole (this smooths the top of the profiteroles giving a more even bake). Bake for 30 minutes like the eclairs, and fill :)

Here are some other bakes you might enjoy:


Yum
Print This Recipe:

Wednesday, 21 October 2015

Dave's Dark Treacle and Orange Wild Duck

Here's a guest post from the magnificent Dave, for all of you game-lovers out there :D I'm sure you'll love it ^_^


It's duck season and if you're lucky enough to be able to get hold of some wild duck have a go at this simple and quick recipe:

Serves 2

Ingredients: 

  • 300 - 400g of diced wild duck
  • 1 orange
  • half an onion
  • 100g Greek Yoghurt
  • 100g Black Treacle
  • Fresh Dill

Method:


1. Make the sauce by combining the dark treacle and Greek yoghurt. Squeeze the juice from the orange into the sauce, avoiding getting any orange pips or too much pith in the mixture.


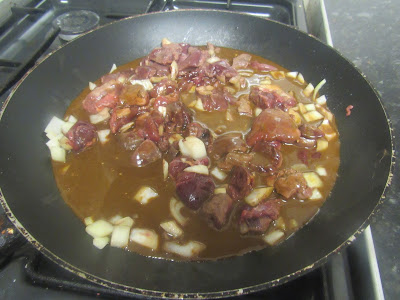
2. Put a bit of oil (about a tablespoon) into a frying pan and add the duck and onion, Fry on a medium heat for 3 minutes until the duck starts browning.


3. Add the sauce and turn up the heat until the sauce start bubbling. Cook the duck for a further 5-7 minutes. To test if it's ready, take out one of the bigger duck pieces and cut into it, it should be cooked all the way through.


4. Sprinkle with fresh dill, and serve alongside vegetables or on a crusty bun.


5. Enjoy!
Yum
Print This Recipe:

Monday, 19 October 2015

Halloween Ideas


Happy Halloween!! I hope you're all getting the pumpkins ready to carve, and the sweets stocked up for the Trick or Treaters. Halloween actually dates back around 2000 years, where it was known as All Hallow's Eve. Then, it was a serious holiday where the dead were honoured. Now, Halloween seems to me to be getting more and more fun each year! Whether you enjoy the day for the scary movies, dressing up yourself and/or your children (or pets!), it's a day to be enjoyed. 

Why not bake something this Halloween to spook/thrill you ;) I found so many brilliant recipes on twitter - here are just a few of the ones I've found.

Try them and let me know how they are. 

Have a Halloween-inspired bake I haven't mentioned? Please let me know, and I'll add it to this post :D


This is a superb halloween-themed cupcake, my favourite so far! The spiders are adorable (creepy in their own way), and look so effective. This is a blog I do love, so I would highly recommend trying this out. I even had another idea based on this for making the spider legs - if they work in my experiments, they'll be posted shortly.


DIY Halloween Cake Pops
These bite-size pumpkin cakes are super cute, and are just about big enough to fit a whole one in your mouth!! This is a super simple recipe for the beginners out there.


Here is a really simple but effective way to decorate your cookies. You  could even buy store-bought biscuits if you're short of time but I'd recommend using a recipe like my ginger biscuits.


Halloween Cookies
Want something cute/creepy? Try these biscuit men decorated in a very creepy way!


Scary Treats
Here are some recipes for grandma's ginger buns/biscuits. Simple decorations like these are simple to buy and are good time-savers.


Halloween Cupcakes
Here's a great recipe for cupcakes, both chocolate and spiced varieties. I love the idea of the strong cinnamon, nutmeg and ginger warming flavours. These have been simply decorated, but they look like they would taste fabulous. Plus those carved pumpkins are amazing!


Creepy Coffin Cookies
Here is another cool way to decorate your biscuits. The coffin in these really stands out, and the skeletons are very fun. Plus it'd be a test of your piping skills :D
This is not as such a halloween recipe, but a very autumnal one. I adore parkin - a treacly dense cake, which improves with age. This recipe comes from my home county, so I may be a little biased, but I reckon it must be brilliant.
Yum
Print This Recipe:

Sunday, 11 October 2015

GBBO Week 10 - Cinnamon and Apple Iced Buns


 I can’t believe the Great British Bake Off 2015 is over!!! It was a struggle to work out which of the bakes I’d make for this week’s blog post, but I finally settled Tamal’s Cinnamon and Apple Iced Buns. The original recipe is here. However I made some adjustments – firstly I wanted to make the buns slightly lighter, so switched the double cream for yoghurt. The flavour of the yoghurt contrasts nicely with the apple compote. Also, after the final showstopper challenge, I was desperate to try making Nadiya’s marshmallow fondant. For that reason I topped the buns with this rather than the traditional royal icing. I didn’t have access to my stand mixer, but the dough still ended up super airy and delicious after kneading by hand :)

Makes 16 buns

Ingredients:

For the dough:
  • 200ml milk (I used skimmed, which worked fine)
  • 2 eggs
  • 735g strong bread flour
  • 80g caster sugar
  • 1 ¼ tsp salt
  • 3 tsp fast-action dried yeast
  • 2 tsp ground cinnamon
  • 80g butter, softened

For the apple compôte:
  • 500g bramley apples, peeled, cored and grated
  • 125g caster sugar
  • 75ml apple juice
  • 1 tsp ground cinnamon

For the marshmallow fondant:
  • 150g white marshmallows
  • 275g icing sugar
  • Food colouring (optional)
  • Vegetable fat, for greasing

To finish:
  • 250g plain yoghurt

Method:

1. Make the dough. In a jug mix together the milk with 175ml boiling water. Beat in the eggs.


2. Sift the dry ingredients into a large bowl. Rub in the butter until the texture is like fine breadcrumbs. Make a well in the centre of the mix and pour in the wet ingredients. If you have a stand mixer, use the dough hook attachment and knead the dough for 5 minutes. If you don’t, knead the dough with your hands – it will be very messy but gave me a fantastic result.

3. Transfer the dough to a lightly greased bowl and cover with clingfilm. Leave to prove for an hour, or until doubled in size.


4. Once proved, divide the dough into 16 pieces. I found that my dough was still quite sticky, but try to get them roughly the same size. Roll out the dough into sausages about 10cm in length.


5. Place on a lined baking trays. Space the dough sausages fairly close together (about 2 fingers widths apart), so that when they rise, they will meet. Cover the baking trays and leave to prove again for an hour.


6. Preheat the oven to 200c/180c fan/gas mark 6.

7. Bake the buns for 10-12 minutes until the tops have browned and the buns are well risen. Set aside to cool.


8. Make the apple compôte. Mix all of the ingredients together in a saucepan and cook on a low heat for 20 minutes, stirring occasionally. Most of the liquid will evaporate. Leave to cool.


9. Make the marshmallow fondant. Put the marshmallows, ½ tsbp water and a little food colouring (optional) in a microwave safe bowl. Heat in short bursts (10-15 seconds) in the microwave. Stir after every burst, until the marshmallows have melted.

10. Add the icing sugar, and stir until it forms a rough paste. Grease your hands and your work surface with vegetable fat. Tip the fondant onto the surface, and knead until smooth.
Roll out to about 5mm thickness and cut out decorations for the iced buns. These can be the traditional strips, or shapes of your choosing (e.g. leaves or hearts).

11. Once baked and cooled, the buns are ready to be assembled. Tear the buns from each other, and slice in half horizontally.


12. Place 2 tsp of plain yoghurt over the top of one cut half of bun, and spread evenly. Top with 2 tsp apple compote. Top with the other half of the bun. Dab the marshmallow fondant with a tiny amount of yoghurt (so the fondant sticks to the bun),  and place on top of the buns.


13. Enjoy!


Are there any bake off recipes I haven't made that you'd like me to try? Have you tried any of the recipes from this season and have tips/tricks? Let me know :D


Yum
Print This Recipe:

Sunday, 4 October 2015

GBBO Week 9 - Peanut Salted Caramel and Chocolate Tart


It was the semi-finals this week on the Great British Bake Off – I can’t believe how quickly it’s gone!! This week was all about chocolate and I’ll jump straight to which challenge I was enticed by – the signature, which were chocolate tarts. Although Ian and Tamal’s tarts looked enticing, I was blown away by the sound of it – a combination of peanut, salted caramel and chocolate, encased in chocolate pastry. It got rave reviews from Paul and Mary, and I decided to bake one this weekend. The original recipe is here. One odd ingredient used was tapioca maltodextrin, which converts fats into powders. I unsurprisingly couldn’t find this in my local supermarket, so used chopped nuts instead. I also made a few other adjustments :)

The end result was easily the best tart I have ever made. Although it looks like a lot of work, the only baking required is for the tart base, and after that it is simple assembly. I’d highly recommend giving it a go – unless you’re allergic to peanuts (in which case I’m going to experiment using hazelnuts soon, and see how that works)…

Makes one 24cm square tart.

Ingredients

For the chocolate pastry:
  • 250g plain flour
  • 2 tbsp icing sugar
  • 2 tbsp cocoa powder
  • 140g butter
  • 2 egg yolks
  • 1 tsp lemon juice

For the chocolate ganache:
  • 400ml double cream
  • 400g dark chocolate (minimum 50% cocoa solids)
  • 60g butter

For the salted caramel:
  • 65g soft brown sugar
  • 50g butter
  • 2 tsbp golden syrup
  • 85ml double cream
  • 200g roasted salted peanuts, chopped into small pieces (I briefly pulsed mine in a blender)

For the cinnamon and honey peanut butter:
  • 130g roasted peanuts ( I used salted peanuts that I rinsed and dried to remove excess salt)
  • 1 ½ tbsp flavourless oil (like vegetable oil)
  • 1 tbsp honey
  • 1 tsp ground cinnamon

For the chocolate peanut mousse:
  • 200ml whipping cream
  • 1 ½ tbsp icing sugar
  • 2 tsp cornflour
  • 2 ½ tbsp cinnamon peanut butter (see above)

For the chocolate and peanut butter truffles:
  • 50g chopped nuts
  • 50g icing sugar

For assembly:
  • cocoa powder (around 3 tbsp)


Method:

1. Preheat the oven to 200c/180c fan/ gas mark 6. Grease the base and sides of a deep 24cm square cake tin.

2. Make the pastry dough. In a large mixing bowl stir together the flour, icing sugar and cocoa powder until an even light brown colour is achieved.


3. Cut the butter into small cubes, and rub into the dry ingredients with your fingertips. Once there are no more clumps of butter, add the egg yolks, lemon juice and 2 tablespoons of cold water. Bring the dough together using your hands, then wrap in cling film and chill for 15 minutes in the fridge.


4. Once chilled, line a surface with cling film, and place your dough on top of it. Cover with another sheet of clingfilm, and roll out the dough to approximately 5mm thickness (big enough to cover the base and go up 5cm of the cake tin's sides. Carefully place in the tin – I found the dough quite crumbly, but patching up the base and sides with spare dough worked great.


5. Prick all over the bottom of the tart with a fork, and cover with a piece greaseproof paper/kitchen foil.  Fill with flour (or baking beans if you have them). I find that I always have spare flour to hand so tend to use this.


6. Bake the tart for 15 minutes, then remove the greaseproof paper and flour, and bake for a further 10 minutes. Leave to cool.


7. Make the chocolate ganache. Bring the double cream to the boil in a medium saucepan. In a bowl, break up the dark chocolate into squares, and add the butter. Pour the double cream over the chocolate and butter, and stir until melted. Reserve about 4 tablespoons of the ganache for the truffles, and place in the fridge.


8. Make the peanut salted caramel. In a medium saucepan, warm together the sugar, butter and golden syrup. Once the sugar has dissolved, pour over the double cream and bring to a simmer. Turn off the heat, and transfer to a bowl. Once completely cool, add the chopped salted peanuts.

9. When the pastry base is completely cool, fill with the peanut salted caramel, and place in the fridge to set (around 30 minutes).


10. Make the cinnamon peanut butter. In a blender (I used a NutriBullet), blitz the peanuts until well-ground.  Add the honey, cinnamon and oil, and blend until smooth.

11. Make the chocolate peanut butter mousse. Whisk the whipping cream with the icing sugar and cornflour until soft peaks form (when the whisk is removed from the mixture, peaks form that topple at the tip). Fold in half of the chocolate ganache and 2 ½ tablespoons of the cinnamon peanut butter. Spread the mousse over the chilled tart, and place back in the fridge for an hour to set.


12. Make the chocolate truffles. Take spoonfuls of the chilled ganache, and shape into 3 balls. Dip in the chopped nuts, and chill to set.


13. Once the mousse has set, spoon over the remaining chocolate ganache. Chill for 30 minutes to set the ganache fully.


14. Make the peanut butter “truffles”. Use the remaining cinnamon peanut butter to make 2 balls the same size as the chocolate truffles, and coat in icing sugar.

15. To finish the tart, cut out a piece of card or paper 24cm in length, and about 12cm in diameter. Place on top the tart off centre, so that on the right hand side of the tart there is a strip big enough to place the truffles (about 3cm). Dust the surface of the tart with cocoa powder.


16. Remove the card/paper to reveal a neat strip of the tart that has no cocoa powder on it. Place the truffles (alternating chocolate and peanut butter) along the thin strip of tart.

17. Enjoy!


See my other GBBO inspired bakes! 

Yum
Print This Recipe: